
Java—SSM&Maven
Maven
在pom.xml中查看依赖关系: Ctrl + Alt + Shift + u, 红线部分为冲突依赖
Maven 是专门用于管理和构建java项目的工具,它的主要功能有:
提供了一套标准化的项目结构;
提供了一套标准化的构建流程 (编译,测试,打包,发布…);
提供了一套依赖管理机制(指jar包,插件);
命令:
- mvn clean:清除target目录中的结果
- mvn compile: 编译源代码,生成的class文件放到target目录下
- mvn test:执行单元测试
- mvn package:打包
- mvn install:打包并把打好的包保存到本地仓库
- mvn deploy:打包并把打好的包保存到本地仓库,上传到远程仓库
分模块开发
多个场景的模块代码如果放入到一个项目,那么当其中某一个模块代码出现问题,就会导致整个项目无法正常启动;而且,各个模块可以单独维护,更方便团队协作。
例子:将SSM的各层分成各个模块

步骤:
创建新模块,将对应代码拷贝进去,删除原代码;
删除domain包后项目会报红,需要在
maven_ssm的pom.xml 中添加maven_03_pojo的依赖。1
2
3
4
5<dependency>
<groupId>com.zzc</groupId>
<artifactId>maven_03_pojo</artifactId>
<version>1.0-SNAPSHOT</version>
</dependency>由于项目
maven_pojo存在于IDEA,而Maven在本地仓库是找不到对应的jar包的,所以还要将maven_pojo安装到本地仓库中:(使用maven的install命令,安装完后可以在Maven的本地仓库repository中对应的项目中查看jar包)
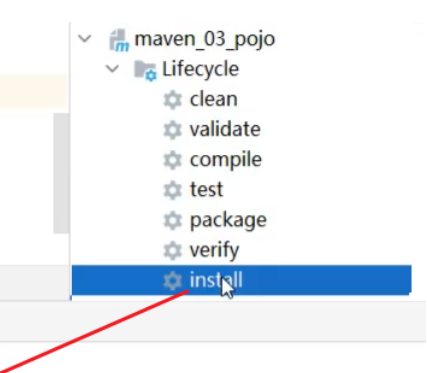
同理,其他模块也是同样的操作:代码转移、添加依赖(安装项目jar包)
依赖管理
<dependency>
jar包查找顺序:本地仓库——远程仓库——中央仓库
远程仓库(私服):一般由公司团队搭建的私有仓库。
使用坐标导入jar包:
- 在 pom.xml 中编写 < dependencies > 标签;
- 在< dependencies >标签中使用< dependency >引入坐标;
- 定义坐标的 groupld, artifactld, version;
资源直接网上搜索:资源名 maven,如 mysql maven,然后会出现maven repository的网页,点进去复制坐标即可。
Maven坐标:是资源的唯一标识,使用坐标来定义项目或引入项目中需要的依赖。
坐标组成:
- groupld:定义当前Maven项目隶属组织的名称(通常是域名反写,如:com.zzc)
- artifactld:定义当前Maven项目名称(通常是模块名称,如:order-service,goods-service)
- version:定义当前项目的版本号
1 | <!--设置当前项目所依赖的所有jar--> |
依赖范围
通过设置坐标的依赖范围(scope),可以设置对应ja包的作用范围:编译环境、测试环境、运行环境
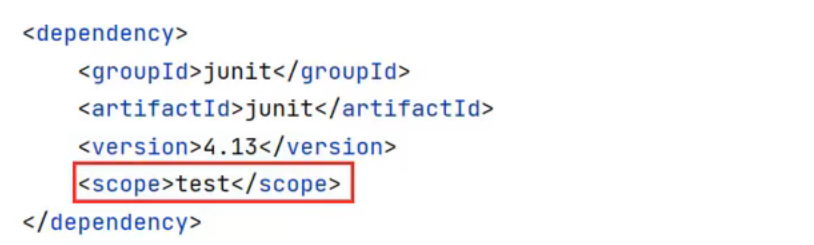
| 依赖范围 | 编译 | 测试 | 运行 | 例子 |
|---|---|---|---|---|
| compile | Y | Y | Y | logback |
| test | - | Y | - | Junit |
| provided | Y | Y | servlet-api | |
| runtime | Y | Y | jdbc驱动 | |
| system | Y | Y | 存储在本地的jar包 | |
| import | 用于导入该依赖的dependencyManagement 中的配置到当前项目 |
依赖管理
依赖传递
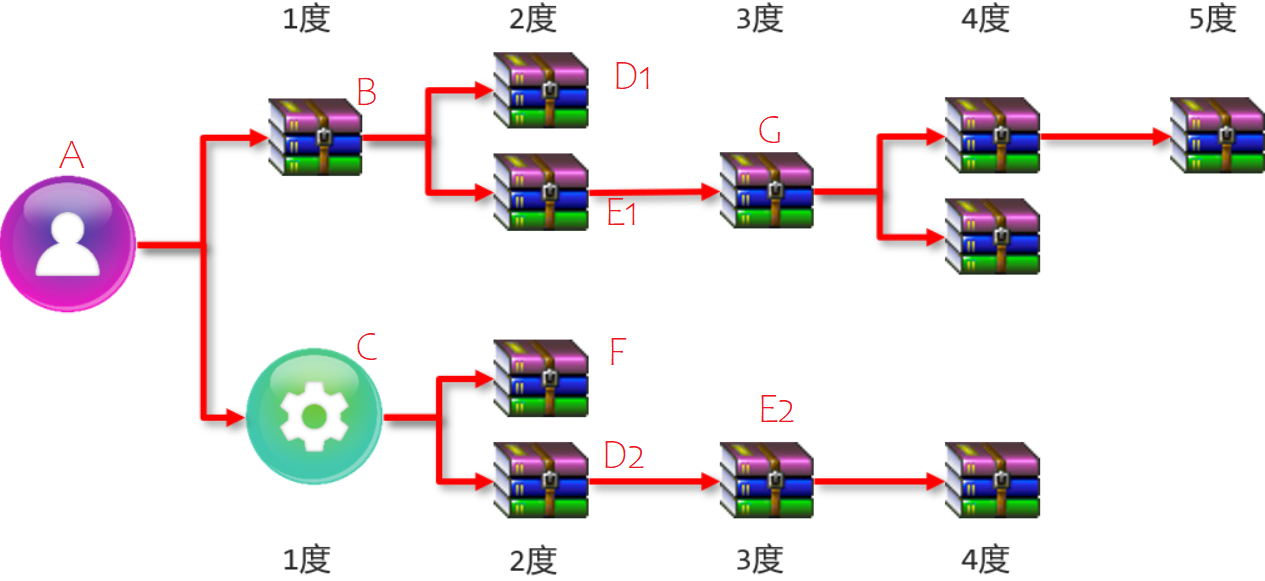
上图所示:A依赖了B和C,B和C有分别依赖了其他jar包,所以在A项目中就可以使用上面所有jar包,这就是所说的依赖传递。
依赖冲突:项目依赖的某一个jar包,有多个不同的版本,因而造成类包版本冲突。
- Maven的默认管理:
- 特殊优先:一个配置页中 配置了相同资源的不同版本,后配置的覆盖先配置的。
- 路径优先:当依赖中出现相同的资源时,层级越深,优先级越低,层级越浅,优先级越高(先出现的就选择)
- 声明优先:当资源在相同层级被依赖时,配置顺序靠前的覆盖配置顺序靠后的。如图中的D1和D2,层级相同,就看谁先声明。
- Maven的默认管理:
可选依赖
可选依赖 指对外隐藏当前所依赖的资源——不透明,别人不需要;隐藏后将不会有依赖传递。
1
2
3
4
5
6
7<dependency>
<groupId>com.zzc</groupId>
<artifactId>maven_03_pojo</artifactId>
<version>1.0-SNAPSHOT</version>
<!--可选依赖是隐藏当前工程所依赖的资源,隐藏后对应资源将不具有依赖传递-->
<optional>true</optional>
</dependency>排除依赖
排除依赖指主动断开依赖的资源,被排除的资源无需指定版本——自己不需要;
1
2
3
4
5
6
7
8
9
10
11
12
13
14
15
16<dependency>
<groupId>com.zzc</groupId>
<artifactId>maven_04_dao</artifactId>
<version>1.0-SNAPSHOT</version>
<!--排除依赖是隐藏当前资源对应的依赖关系-->
<exclusions>
<exclusion>
<groupId>log4j</groupId>
<artifactId>log4j</artifactId>
</exclusion>
<exclusion>
<groupId>org.mybatis</groupId>
<artifactId>mybatis</artifactId>
</exclusion>
</exclusions>
</dependency>
聚合、继承
问题:分模块开发后,各模块相互依赖,可能要多次安装、编译。
对此,我们可以抽取一个项目,把所有的项目管理起来,以后我们要想操作这些项目,只需要操作这一个项目,其他所有的项目都走一样的流程,这就很省事省力。
聚合
- 概念:将多个模块组织成一个整体,同时进行项目构建的过程称为聚合
- 聚合工程:通常是一个不具有业务功能的”空”工程(有且仅有一个pom文件)
- 作用:使用聚合工程可以将多个工程编组,通过对聚合工程进行构建,实现对所包含的模块进行同步构建
- 当工程中某个模块发生更新(变更)时,必须保障工程中与已更新模块关联的模块同步更新,此时可以使用聚合工程来解决批量模块同步构建的问题。
步骤:
新建一个空的Maven工程
maven_01_parent,将项目的打包方式改为pom:1
2
3
4
5
6
7
8
9
10
11
12
<project xmlns="http://maven.apache.org/POM/4.0.0"
xmlns:xsi="http://www.w3.org/2001/XMLSchema-instance"
xsi:schemaLocation="http://maven.apache.org/POM/4.0.0 http://maven.apache.org/xsd/maven-4.0.0.xsd">
<modelVersion>4.0.0</modelVersion>
<groupId>com.zzc</groupId>
<artifactId>maven_01_parent</artifactId>
<version>1.0-RELEASE</version>
<packaging>pom</packaging>
</project>项目的打包方式,一般有三种,分别是
- jar:默认情况,说明该项目为java项目
- war:说明该项目为web项目
- pom:说明该项目为聚合或继承项目
添加要管理的项目:
1
2
3
4
5
6
7
8
9
10
11
12
13
14
15
16
17
18
<project xmlns="http://maven.apache.org/POM/4.0.0"
xmlns:xsi="http://www.w3.org/2001/XMLSchema-instance"
xsi:schemaLocation="http://maven.apache.org/POM/4.0.0 http://maven.apache.org/xsd/maven-4.0.0.xsd">
<modelVersion>4.0.0</modelVersion>
<groupId>com.zzc</groupId>
<artifactId>maven_01_parent</artifactId>
<version>1.0-RELEASE</version>
<packaging>pom</packaging>
<!--设置管理的模块名称-->
<modules>
<module>../maven_02_ssm</module>
<module>../maven_03_pojo</module>
<module>../maven_04_dao</module>
</modules>
</project>点击 compile 命令就可以让被管理的项目都会被执行编译操作。这就是聚合工程的作用。
注:聚合工程管理的项目在进行运行的时候,执行的顺序是 按照项目与项目之间的依赖关系来自动决定的。
继承
问题:多个模块中会出现重复配置的问题,同一个jar包或其不同版本 在不同模块中引入,最后汇集到一起。
概念:描述的是两个工程间的关系,与java中的继承相似,子工程可以继承父工程中的配置信息,常见于依赖关系的继承。
父工程主要是用来快速配置依赖jar包和管理项目中所使用的资源
作用:
- 简化配置
- 减少版本冲突
步骤:
新建一个空的Maven工程
maven_01_parent,将项目的打包方式改为pom(一般和聚合放在同一个工程,不冲突)在子项目中设置它的父工程
1
2
3
4
5
6
7
8<!--配置当前工程继承自parent工程-->
<parent>
<groupId>com.zzc</groupId>
<artifactId>maven_01_parent</artifactId>
<version>1.0-RELEASE</version>
<!--设置父项目pom.xml位置路径-->
<relativePath>../maven_01_parent/pom.xml</relativePath>
</parent>优化子项目共有依赖的导入问题:
将子项目共同使用的jar包都抽取出来,维护在父项目的pom.xml中;
然后删除子项目中已经抽取到父项目的jar包
1
2
3
4
5
6
7
8
9
10
11
12
13
14
15
16
17
18
19
20
21
22
23
24
25
26
27
28
29
30
31
32
33
34
35
36
37
38
39
40
41
42
43
44
45
46
47
48
49
50
51
52
53
54
55
56
57
58
59
60
61
62
63
64
65
66
67
68
69
70
71
72
73
74
75
76
77
78
79
80
<project xmlns="http://maven.apache.org/POM/4.0.0"
xmlns:xsi="http://www.w3.org/2001/XMLSchema-instance"
xsi:schemaLocation="http://maven.apache.org/POM/4.0.0 http://maven.apache.org/xsd/maven-4.0.0.xsd">
<modelVersion>4.0.0</modelVersion>
<groupId>com.itheima</groupId>
<artifactId>maven_01_parent</artifactId>
<version>1.0-RELEASE</version>
<packaging>pom</packaging>
<!--设置管理的模块名称-->
<modules>
<module>../maven_02_ssm</module>
<module>../maven_03_pojo</module>
<module>../maven_04_dao</module>
</modules>
<dependencies>
<dependency>
<groupId>org.springframework</groupId>
<artifactId>spring-core</artifactId>
<version>5.2.10.RELEASE</version>
</dependency>
<dependency>
<groupId>org.springframework</groupId>
<artifactId>spring-webmvc</artifactId>
<version>5.2.10.RELEASE</version>
</dependency>
<dependency>
<groupId>org.springframework</groupId>
<artifactId>spring-jdbc</artifactId>
<version>5.2.10.RELEASE</version>
</dependency>
<dependency>
<groupId>org.springframework</groupId>
<artifactId>spring-test</artifactId>
<version>5.2.10.RELEASE</version>
</dependency>
<dependency>
<groupId>org.mybatis</groupId>
<artifactId>mybatis</artifactId>
<version>3.5.6</version>
</dependency>
<dependency>
<groupId>org.mybatis</groupId>
<artifactId>mybatis-spring</artifactId>
<version>1.3.0</version>
</dependency>
<dependency>
<groupId>mysql</groupId>
<artifactId>mysql-connector-java</artifactId>
<version>5.1.47</version>
</dependency>
<dependency>
<groupId>com.alibaba</groupId>
<artifactId>druid</artifactId>
<version>1.1.16</version>
</dependency>
<dependency>
<groupId>javax.servlet</groupId>
<artifactId>javax.servlet-api</artifactId>
<version>3.1.0</version>
<scope>provided</scope>
</dependency>
<dependency>
<groupId>com.fasterxml.jackson.core</groupId>
<artifactId>jackson-databind</artifactId>
<version>2.9.0</version>
</dependency>
</dependencies>
</project>优化
可能有的子项目并不需要 父项目的jar包,如果引入过多的jar包,也会有“负担”;
使用
<dependencyManagement>,它不真正引入jar包,而是配置可供子项目选择的jar包依赖。
子项目要想使用它所提供的这些jar包,需要自己添加依赖,并且不需要指定版本<version>如:父项目中
1
2
3
4
5
6
7
8
9
10
11<!--定义依赖管理-->
<dependencyManagement>
<dependencies>
<dependency>
<groupId>junit</groupId>
<artifactId>junit</artifactId>
<version>4.12</version>
<scope>test</scope>
</dependency>
</dependencies>
</dependencyManagement>子项目中
1
2
3
4
5
6<!-- 不需要添加版本 -->
<dependency>
<groupId>junit</groupId>
<artifactId>junit</artifactId>
<scope>test</scope>
</dependency>
属性
在Maven中的属性分为:
- 自定义属性(常用)
- 内置属性
- Setting属性
- Java系统属性
- 环境变量属性
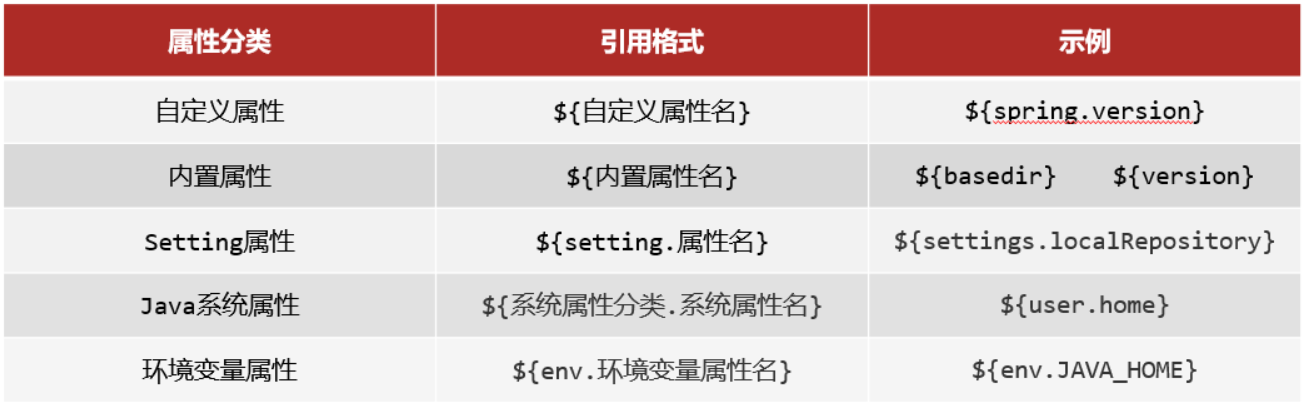
自定义属性
Maven中的自定义属性和变量类似,可以方便修改;
如:定义spring版本号 spring.version = “5.2.10.RELEASE“, junit.version = “4.12”等等
1 | <!--定义属性--> |
修改依赖的version
1 | <dependency> |
配置文件加载属性
。。。。。。。。
。。。。。。。。
版本管理
在jar包的版本定义中,有两个工程版本用的比较多:
- SNAPSHOT(快照版本)
- 项目开发过程中临时输出的版本,称为快照版本
- 快照版本会随着开发的进展不断更新
- RELEASE(发布版本)
- 项目开发到一定阶段里程碑后,向团队外部发布较为稳定的版本,这种版本所对应的构件文件是稳定的
- 即便进行功能的后续开发,也不会改变当前发布版本内容,这种版本称为发布版本
除了上面的工程版本,我们还经常能看到一些发布版本:
- alpha版:内测版,bug多不稳定内部版本不断添加新功能
- beta版:公测版,不稳定(比alpha稳定些),bug相对较多不断添加新功能
- 纯数字版
多环境配置
多环境配置
一般项目分为若干环境,有:
- 生产环境produce,
- 开发环境develop,
- 测试环境test,
平时开发工作是在 开发环境develop进行的;开发完成后,需要把开发的功能部署到测试环境供测试人员进行测试使用;等测试人员测试通过后,会将项目部署到生成环境上线使用。
这个时候就有一个问题是,不同环境的配置是不相同的,所以会有三个数据库的url配置,需要能在不同环境进行切换:
父工程配置多个环境,并指定默认激活环境,配置完记得 install
1 | <profiles> |
切换不同环境: 执行Maven命令
1 | mvn 指令 -P 环境定义ID[环境定义中获取] |
跳过测试
在执行install指令的时候,Maven都会按照顺序从上往下依次执行,每次都会执行test,
对于test来说有它存在的意义,但有些时候我们需要跳过test:
- 可以确保每次打包或者安装的时候,程序的正确性,假如测试已经通过在我们没有修改程序的前提下再次执行打包或安装命令,由于顺序执行,测试会被再次执行,就有点耗费时间了。
- 功能开发过程中有部分模块还没有开发完毕,测试无法通过,但是想要把其中某一部分进行快速打包,此时由于测试环境失败就会导致打包失败。
方法一:点击Maven工具里的小闪电按钮,关闭测试。
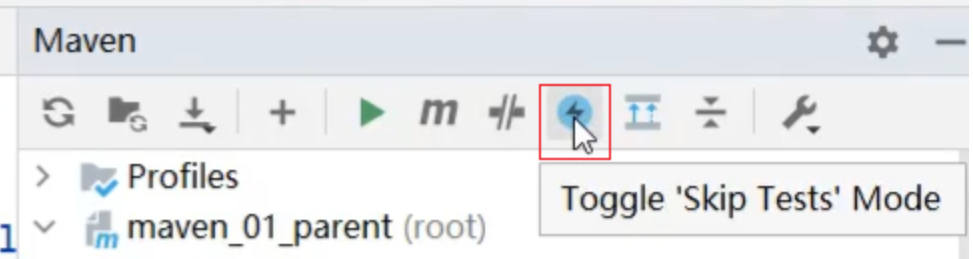
方法二:配置插件
skipTests:如果为true,则跳过所有测试,如果为false,则不跳过测试
excludes:哪些测试类不参与测试,即排除,针对skipTests为false来设置的
includes: 哪些测试类要参与测试,即包含,针对skipTests为true来设置的
1 | <build> |
Tomcat
Web服务器:是一个应用程序(软件),对HTTP协议的操作进行封装,使得程序员不必直接对协议进行操作,让Web开发更加便捷。主要功能是 “提供网上信息浏览服务”。
Tomcat :是Apache软件基金会一个核心项目,是一个开源免费的轻量级Web服务器,支持Servlet / JSP 和少量JavaEE规范。
启动Tomcat服务器:
到bin目录下,双击startup.bat启动,双击shutdown.bat关闭
修改Tomcat的端口号:
mysql默认的端口号是3306,Tomcat默认的端口号是8080,HTTP协议默认的端口号是80;
修改:到conf目录下,修改server.xml配置文件
1
2
3
4
5<!-- 在69行附近 -->
<Connector port="8080" protocol="HTTP/1.1"
connectionTimeout="20000"
redirectPort="8443" />
<!-- 修改其中的port="8080"即可 -->
Tomcat 部署项目:将项目放置到webapps目录下,即部署完成。
- 一般JavaWeb项目会被打成war包,然后将war包放到webapps目录下,Tomcat会自动解压缩war文件
第二种部署方式:
项目不需要放在webapps下,可以放在任何地方;
找到 Tomcat 下的 conf 目录\Catalina\localhost\ 下,创建配置文件,如abc.xml,配置文件内容如下:
2
3
4
5
6
path 表示工程的访问路径:/abc
docBase 表示你的工程目录在哪里
即url中输入path,也就是/abc,路径就会到docBase那里
-->
<Context path="/abc" docBase=" " /
- 当浏览器地址栏输入访问地址为: http ://ip:port/ 时,也就是没有工程名时,默认访问webapps下的ROOT工程;
- 当浏览器地址栏输入访问地址为: http ://ip:port/ 工程名/ 时,也就是没有资源名时,默认访问工程下的index.html页面;
在IDEA中创建Maven Web项目:
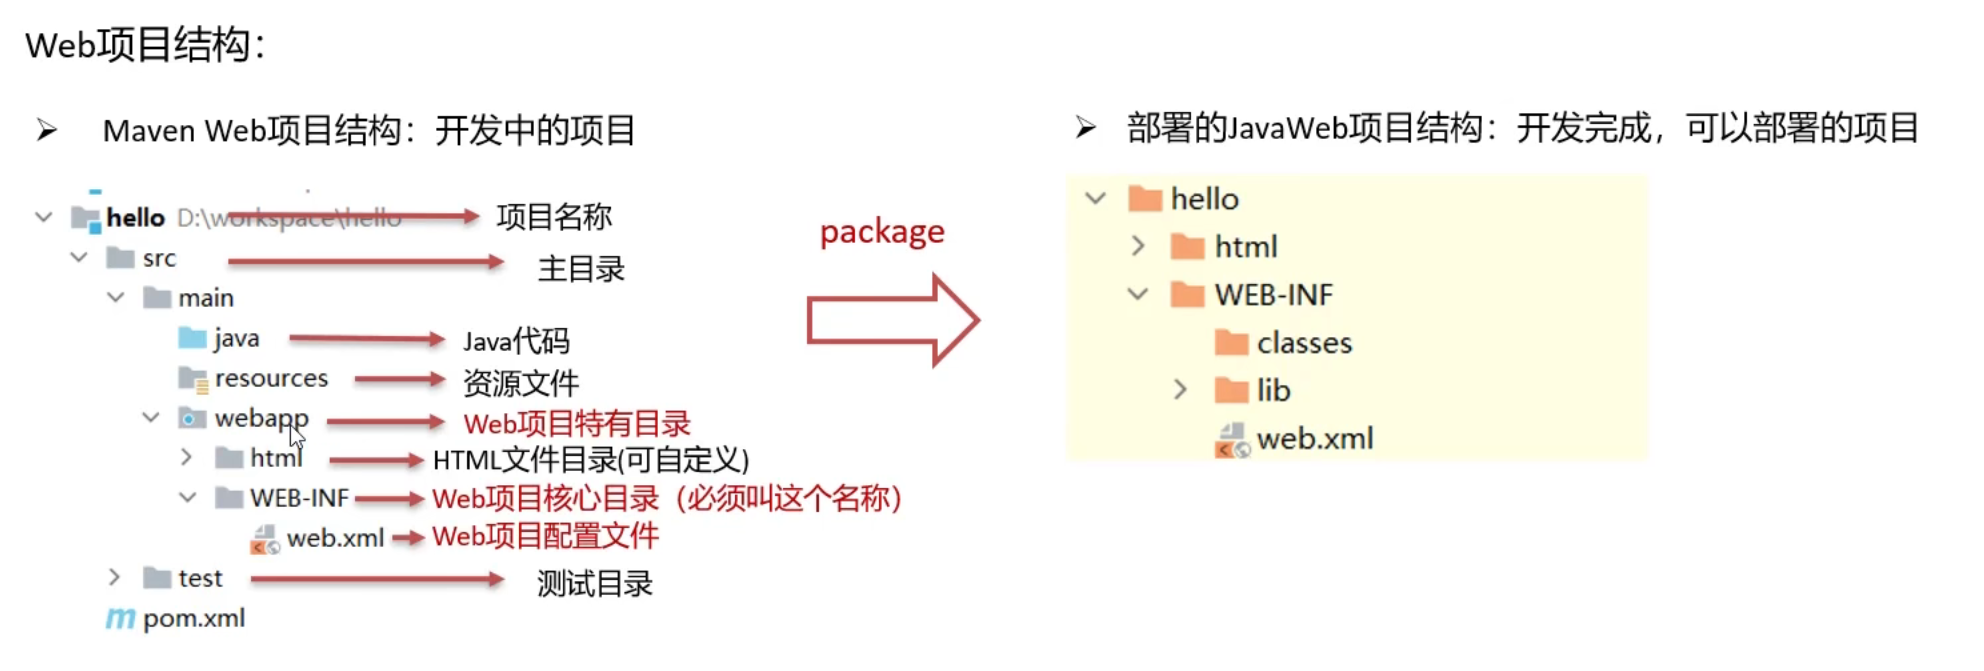
- 编译后的 java字节码文件和resources的资源文件,放到WEB-INF 下的 classes目录下;
- pom.xml中依赖坐标对应的jar包,放入WEB-INF下的Iib目录下;
- WEB-INF是一个受服务器保护的目录,浏览器无法直接访问此目录的内容;
创建方式:
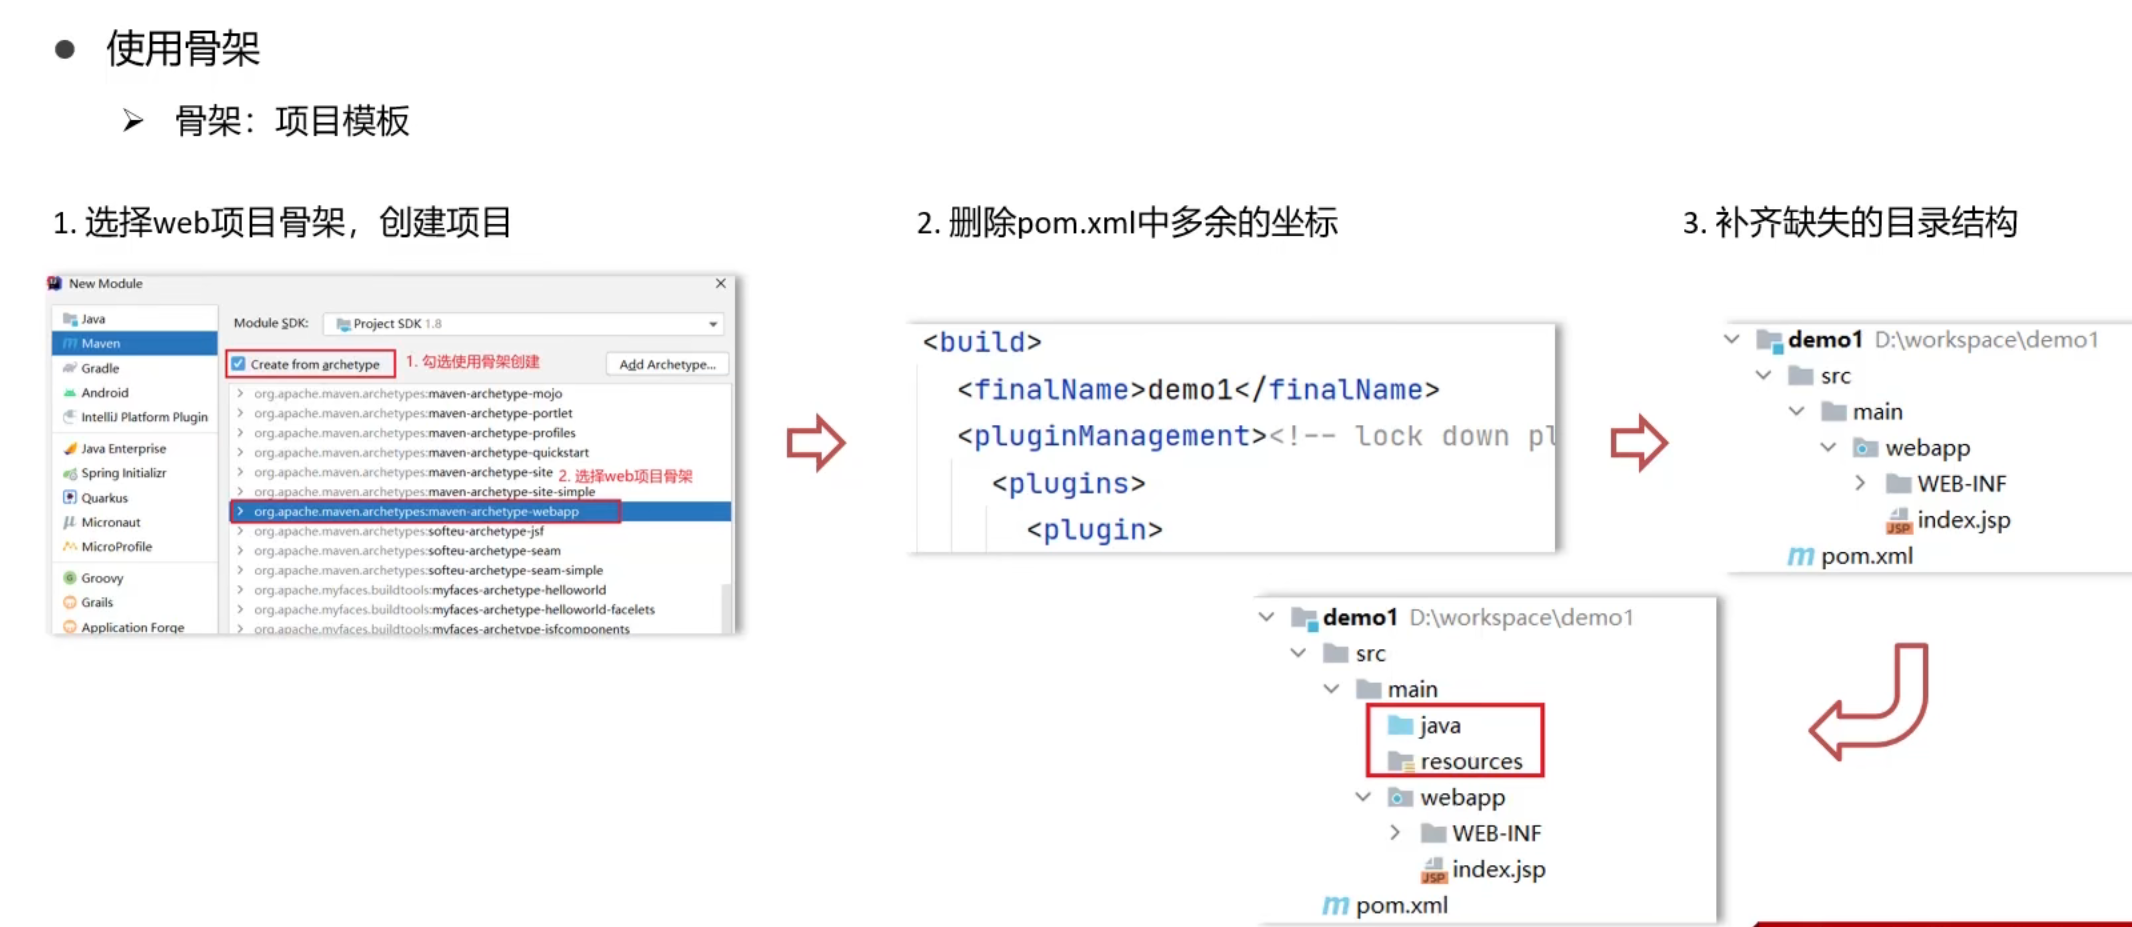
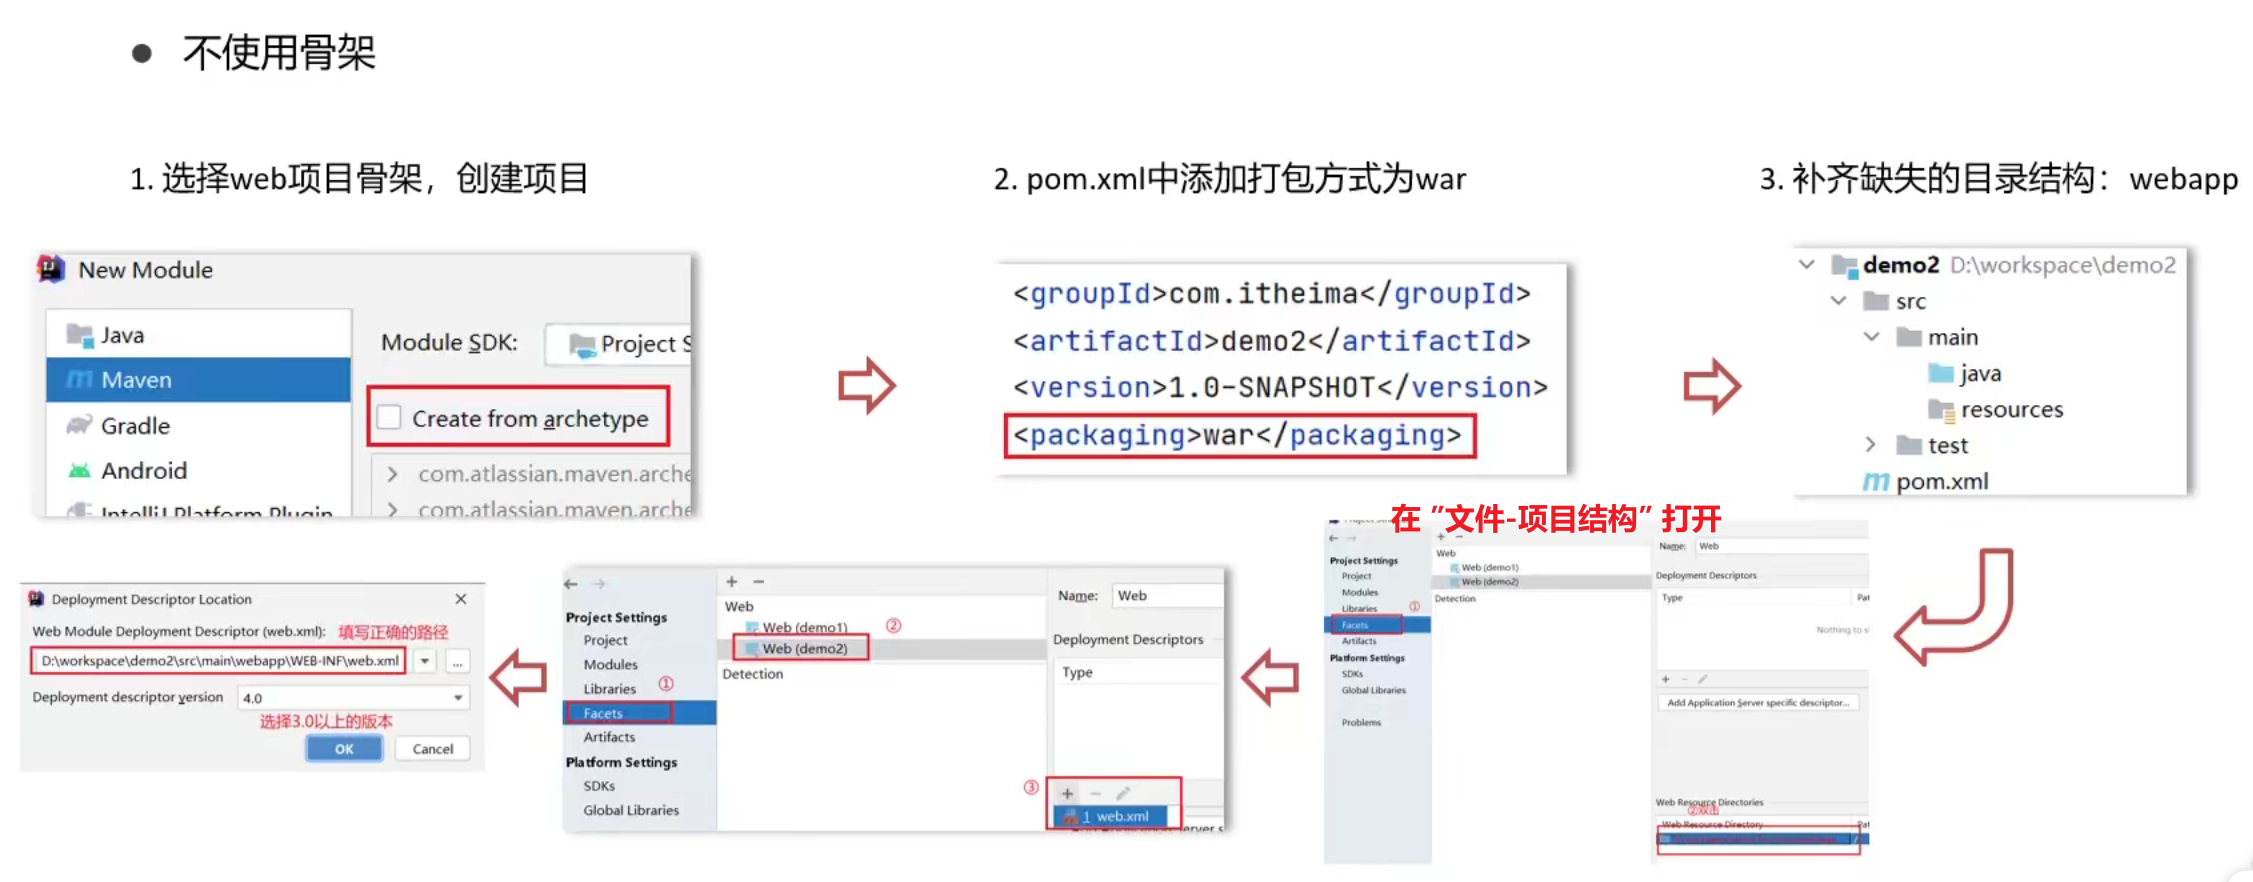
WEB-INF放到webapp目录下
在IDEA中使用Tomcat:
- 方法一:集成本地Tomcat

- 方法二:Tomcat Maven插件
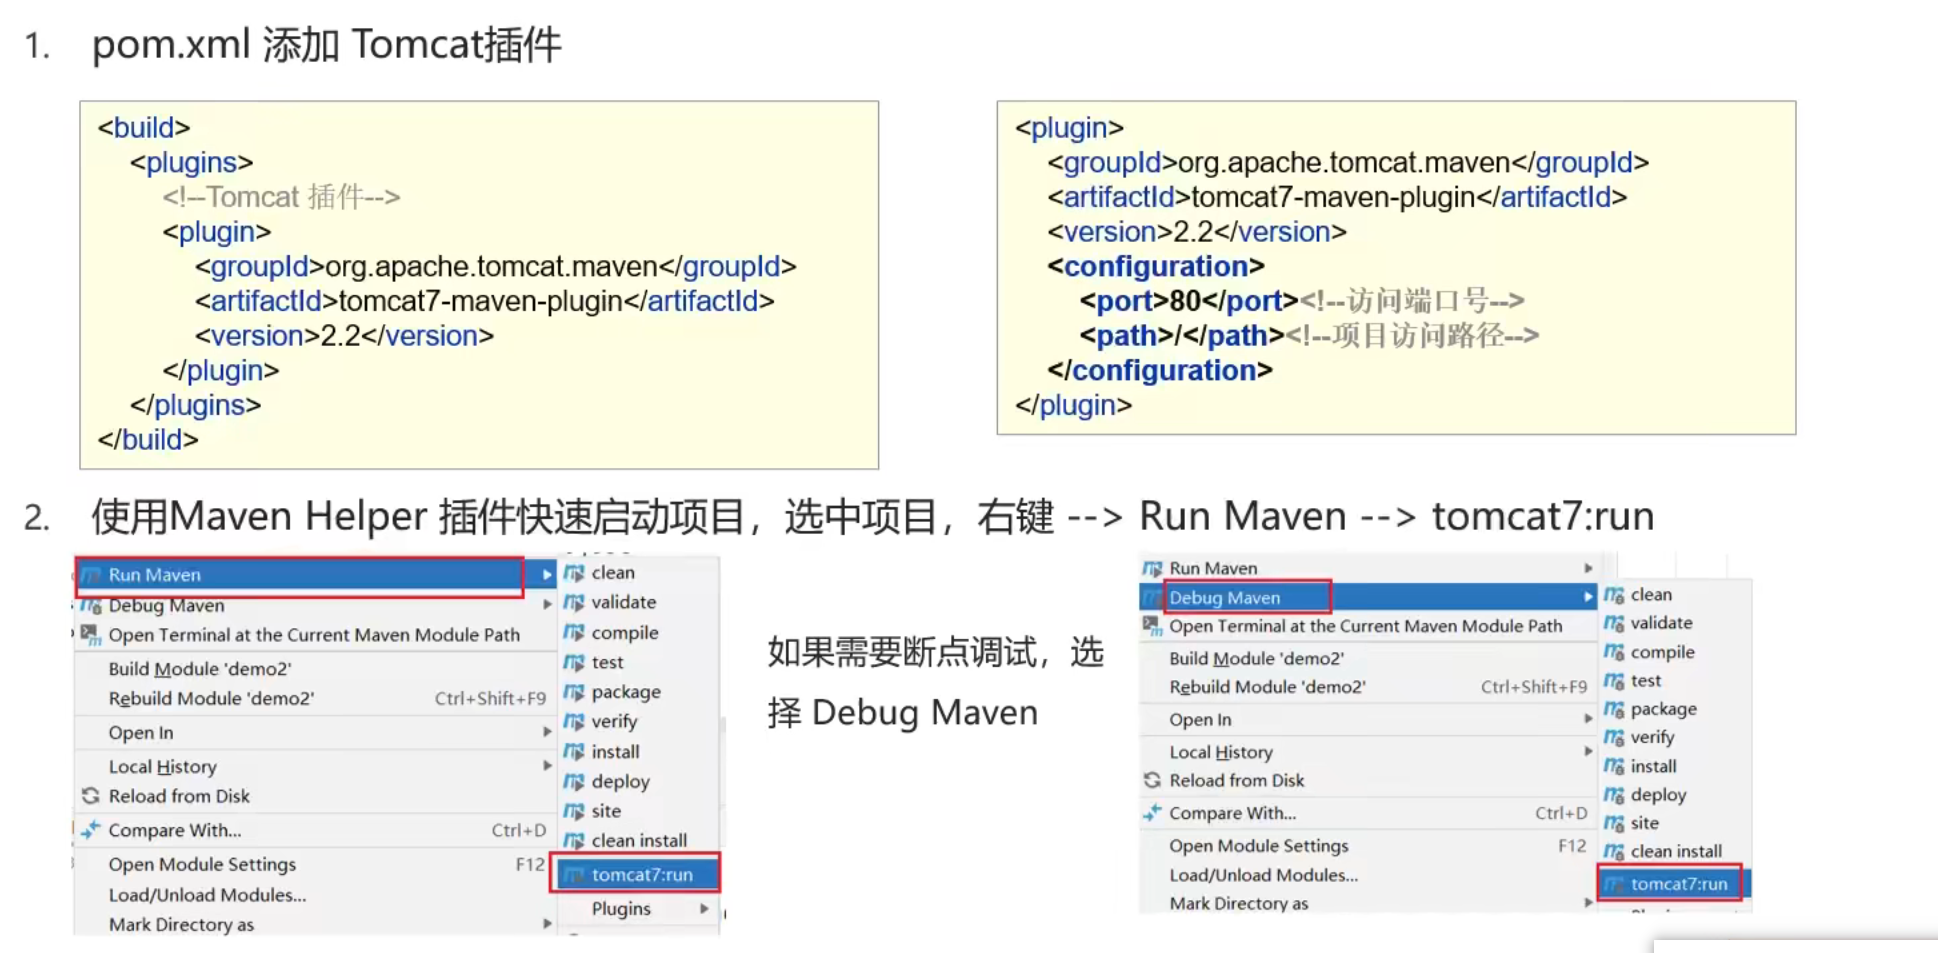
1 | <build> |
私服
手动导入依赖
方法一:
到maven官网下载好对应的jar包后,进入命令提示符界面,输入指令 将jar包导入Maven仓库:
1 | mvn install:install-file |
如:导入 hive-exec-2.3.4.jar
1 | mvn install:install-file -Dfile=hive-exec-2.3.4.jar -DgroupId=org.apache.hive -DartifactId=hive-exec -Dversion=1.16.0 -Dpackaging=jar |
方法二:
在src/main/resources目录下建立一个文件夹lib用来专门存放外来jar包,将jar包复制进去,然后在pom文件中依赖原来的基础上加上这是定位存放目录用的。如果还出现问题,那么b a s e d i r 改 成 {basedir}改成basedir改成{pom.basedir}
1 | <dependency> |
Spring5
Spring是一个分层的 Java SE/EE应用的 full-stack 轻量级的控制反转(IOC,Inverse Of Control)和面向切面编程(AOP,Aspect Oriented Programming)的框架.
核心概念
IoC:控制反转是一种通过描述(XML或注解)并通过第三方去生产或获取特定对象的方式。
也就是说,使用对象时,在程序中不要主动使用new产生对象,将
对象创建控制权由程序转移到外部,这就是控制反转;Spring对IoC思想的思想:
提供了IoC容器,充当“外部”:
IoC容器负责对象的创建、初始化等一系列工作,被创建或被管理的对象在Ioc容器中统称为
Bean。提供DI(Dependency Injection)依赖注入:
在容器中建立bean与bean之间的依赖关系,就是依赖注入;
体系结构
Core Container:核心容器
AOP:面向切面编程;
Aspects:AOP思想实现
Data Access:数据访问
Data Integration:数据集成
- Transactions:事务
Web:Web开发(SpringMVC内容)
Test:单元测试、集成测试
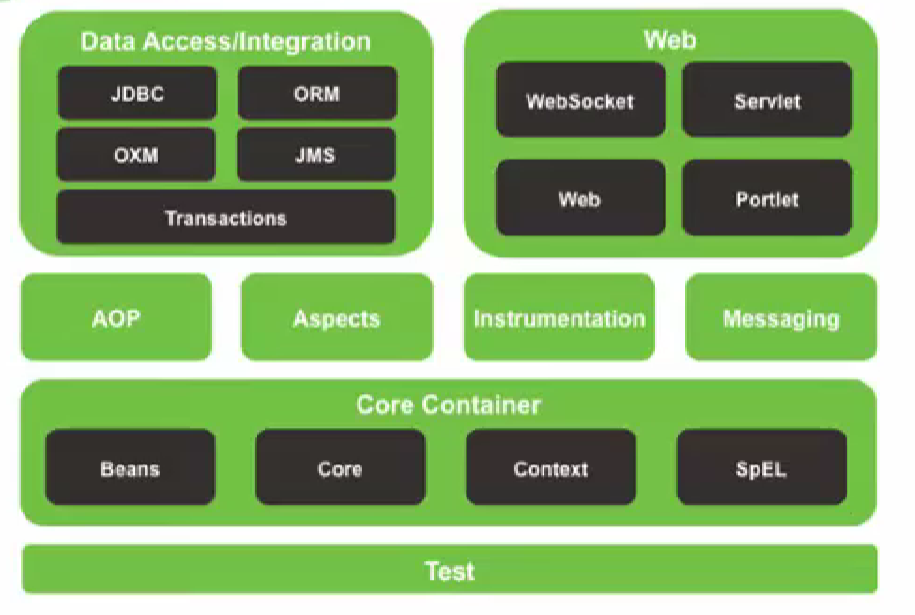
拓展:
- SpringBoot
- 一个快速开发的脚手架
- 基于SpringBoot可以快速的开发单个微服务
- 约定大于配置
- SpringCloud
- 基于SpringBoot实现的
多数公司在使用SpringBoot进行快速开发,学习SpringBoot的前提,需要完全掌握Spring及SpringMVC,承上启下!
spring弊端:发展了太久之后,违背了原来的理念!配置十分繁琐,容易出错,人称“配置地狱”,所以有了springboot,其更简单,更稳定健壮,功能更丰富。
开发步骤
IoC思路:
- 管理什么? —— Service 与 Dao
- 被管理的对象如何告知IoC容器? —— 配置
- 如何获得IoC容器? —— 接口
- 如何从容器中获取bean? —— 接口方法
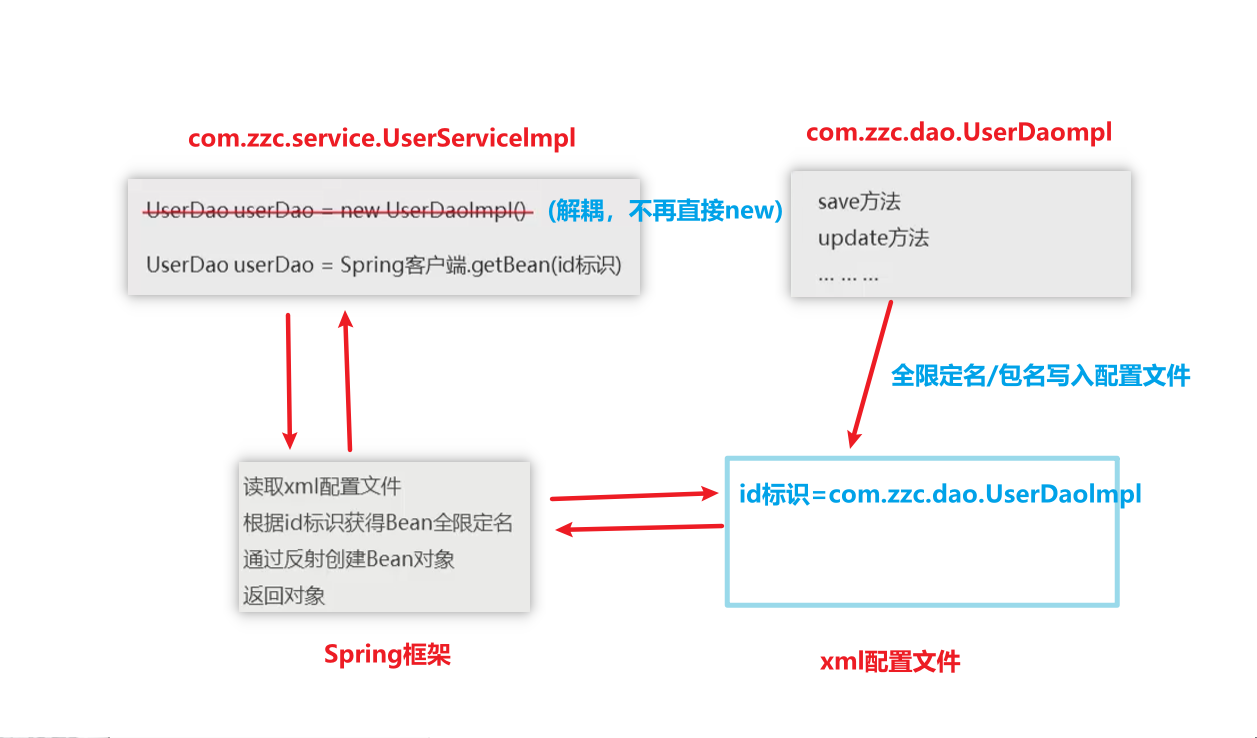
导入Spring开发的基本包坐标;
1
2
3
4
5<dependency>
<groupId>org.springframework</groupId>
<artifactId>spring-context</artifactId>
<version>5.0.5.RELEASE</version>
</dependency>编写Dao接口和实现类;
1
2
3
4
5package com.zzc.dao;
public interface UserDao {
public void save();
}1
2
3
4
5
6
7
8
9package com.zzc.dao.impl;
import com.zzc.dao.UserDao;
public class UserDaoImpl implements UserDao {
public void save() {
System.out.println("save running...");
}
}创建Spring核心配置文件;
在resources中新建spring config配置文件,一般命名为applicationContext.xml
在Spring配置文件中配置UserDaolmpl;
1
<bean id="useDao" class="com.zzc.dao.impl.UserDaoImpl"></bean>
使用Spring的API获得Bean实例
1
2
3
4
5
6
7public class UserDaoDemo {
public static void main(String[] args) {
ApplicationContext app = new ClassPathXmlApplicationContext("applicationContext.xml");
UserDao useDao = (UserDao) app.getBean("useDao");
useDao.save();
}
}
核心配置文件
引入其他配置文件
实际开发中,Spring的配置内容非常多,这就导致Spring配置很繁杂且体积很大,所以,可以将部分配置拆解到其他 配置文件中,而在Spring主配置文件通过import标签进行加载:
1 | <import resource="xxx.xml"/> |
Bean标签
- 用于配置对象交由Spring来创建;
- 默认情况下它调用的是类中的无参构造函数,如果没有则会创建失败。(反射)
属性:
id:Bean实例在Spring容器中的唯一标识
name:可以定义bean的别名,通过id和name都可以获取bean对象
class:Bean的全限定名称(全包名)
scope:指定对象的作用范围
取值范围 说明 singleton 默认值,单例的 prototype 多例的 request web项目中,spring创建一个Bean对象,将对象存入request域中 session web项目中,spring创建一个Bean对象,将对象存入session域中 global session web项目中,应用在Portlet环境,如果没有Portlet环境,那么global session相当于session Bean生命周期:
scope=”singleton”时,Bean对象在Spring核心配置文件读取时 实例化,即获取applicationContext对象时;
- 生命周期:应用加载,容器创建时,对象就被创建了,只要容器在,对象就一直存在;
当应用卸载,容器销毁时,对象也跟着销毁;
scope=”prototype”时,Bean对象在配置文件读取时不会实例化,而是在获取Bean对象时才实例化,即使用 getBean() 方法时;
- 生命周期:当使用对象时,创建新的对象实例, 当对象长时间不使用时,被java垃圾回收器回收。
关闭容器(实际应用中不用自己写):
1
2
3ClassPathXmlApplicationContext app = new ClassPathXmlApplicationContext("applicationContext.xml");
app.registerShutdownHook(); //方法一: 注册钩子关闭容器(放在哪都可以)
app.close(); //方法二: 直接关闭容器- 生命周期:应用加载,容器创建时,对象就被创建了,只要容器在,对象就一直存在;
init-method:指定类中的初始化方法名称
destory-menthod:指定类中销毁方法名称
如果不想写上面的初始化或销毁的属性,可以直接让 类实现InitializingBean和DisposableBean ,这样Spring就会识别。
autowire:自动装配(按指定的规则,如按类型,名称等自动装配)
注:
只能用于引用类型注入,不能对简单类型进行操作;
使用按类型装配(byType)必须保障容器中相同类型的bean唯一,推荐使用;
使用按类型装配(byName)必须保障容器中有指定名称的bean,因变量名与配置耦合,不推荐使用;
自动装配优先级低于setter和构造器注入;
Bean实例化的三种方式
无参构造方法(就是上面用的,最常用)
1
<bean id="useDao" class="com.zzc.dao.impl.UserDaoImpl"/>
工厂静态方法:
1
2
3
4
5public class StaticFactoryBean {
public static UserDao createUserDao(){
return new UserDaoImpl();
}
}1
2<bean id="userDao" class="com.zzc.factory.StaticFactoryBean"
factory-method="createUserDao" />工厂实例方法:
1
2
3
4
5public class DynamicFactoryBean {
public UserDao createUserDao(){
return new UserDaoImpl();
}
}1
2<bean id="factoryBean" class="com.zzc.factory.DynamicFactoryBean"/>
<bean id="userDao" factory-bean="factoryBean" factory-method="createUserDao"/>Spring提供了 FactoryBean 来简化工厂开发:
创建一个实现FactoryBean接口,重写方法:
1
2
3
4
5
6
7
8
9
10
11
12
13
14public class UserDaoFactoryBean implements FactoryBean<UserDao> {
//得到bean实例,代替原始实例工厂中创建对象的方法
public UserDao getObject() throws Exception {
return new UserDaoImpl();
}
//得到bean类型,返回所创建类的Class对象
public Class<?> getObjectType() {
return UserDao.class;
}
//是否是单例的,返回true为单例,false为多例的
public boolean isSingleton() {
return true;
}
}在配置文件中配置:
1
<bean id="userDao" class="com.zzc.factory.UserDaoFactoryBean"/>
依赖注入
依赖注入 Dependency Injection:它是 Spring 框架核心 IOC 的具体实现。
在编写程序时,通过控制反转,把对象的创建交给了 Spring,但是代码中不可能出现没有依赖的情况。
IOC 解耦只是降低他们的依赖关系,但不会消除。例如:业务层仍会调用持久层的方法。
那这种业务层和持久层的依赖关系,在使用 Spring 之后,就让 Spring 来维护了。 简单的说,就是坐等框架把持久层对象传入业务层,而不用我们自己去获取。
方法
例:将 UserDao 注入到 UserService 内部,有两种方式:
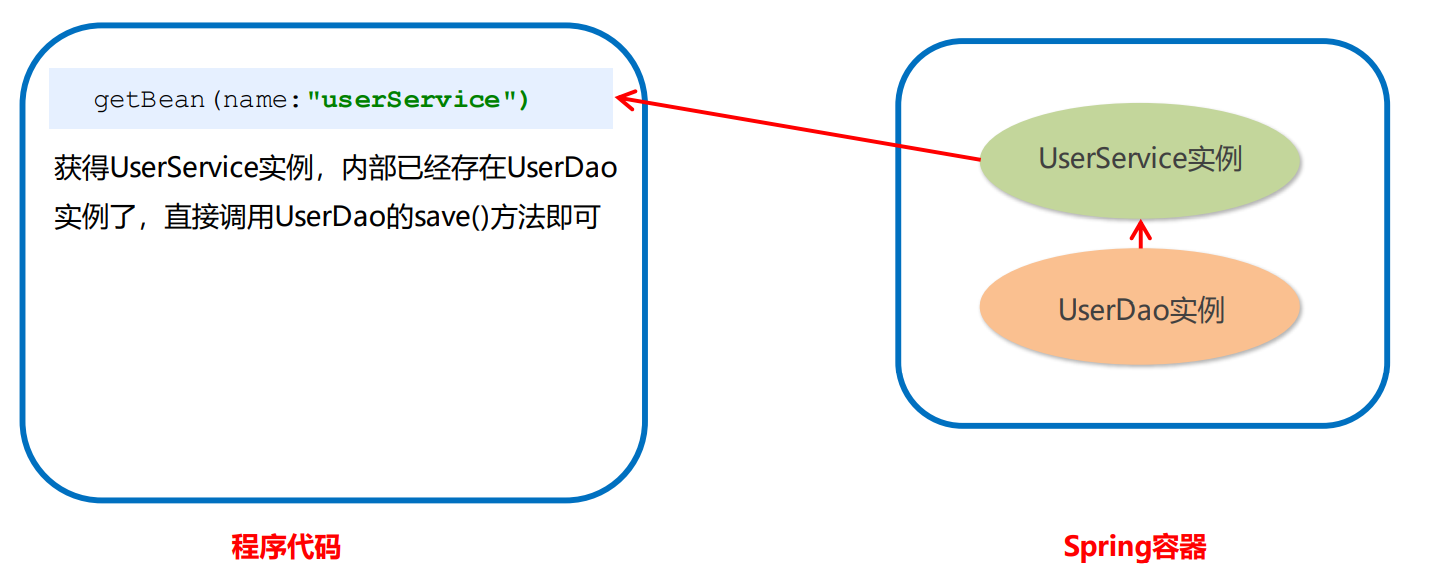
都是要有一个UserDao成员变量,用构造方法或set方法将UserDao实例引入, 其配置文件的书写格式不一样;
构造器方法
1
2
3
4
5
6
7
8
9
10
11
12
13
14
15public class UserServiceImpl implements UserService {
private UserDao userDao;
public UserServiceImpl() {
}
public UserServiceImpl(UserDao userDao) {
this.userDao = userDao;
}
public void save() {
userDao.save();
}
}1
2
3
4<bean id="userService" class="com.zzc.service.impl.UserServiceImpl">
<!-- 这里的name是形参的名字,不是成员变量的名字 -->
<constructor-arg name="userDao" ref="useDao"></constructor-arg>
</bean>setter方法
1
2
3
4
5
6
7
8
9
10
11
12public class UserServiceImpl implements UserService {
private UserDao userDao;
public void setUserDao(UserDao userDao){
this.userDao = userDao;
}
public void save() {
userDao.save();
}
}1
2
3
4<bean id="userService" class="com.zzc.service.impl.UserServiceImpl">
<!-- name是userService中的成员属性的名字,ref表示参照具体哪一个Bean -->
<property name="userDao" ref="useDao"></property>
</bean>注: property 中的 name 的值为 set方法(setUserDao)的 ”set“后的字符串,且首字母小写。 ref 的值为要注入的Bean的 id,value为简单类型注入的值,如字符数字等;
还可以使用p命名空间注入,其本质也是set方法注入,当要写很多注入时会比set方法注入的配置文件方面要方便;
先引入P命名空间:
1
xmlns:p="http://www.springframework.org/schema/p"
修改注入方式:
1
<bean id="userService" class="com.zzc.service.impl.UserServiceImpl" p:userDao-ref="userDao"/>
数据类型
有三种,下面用set方式展示注入:
普通数据类型
1
2
3
4
5<!-- userDaoImpl中有成员变量username(String)和age(Integer) -->
<bean id="userDao" class="com.zzc.dao.impl.UserDaoImpl">
<property name="username" value="李华"></property>
<property name="age" value="15"></property>
</bean>引用数据类型
1
2
3
4<!-- userService中有成员变量 useDao -->
<bean id="userService" class="com.zzc.service.impl.UserServiceImpl">
<property name="userDao" ref="useDao"></property>
</bean>集合数据类型
数组 int[] array
1
2
3
4
5
6
7
8
9<bean id="userDao" class="com.zzc.dao.impl.UserDaoImpl">
<property name="array">
<array>
<value>111</value>
<value>222</value>
<value>333</value>
</array>
</property>
</bean>List< String >
1
2
3
4
5
6
7
8
9
10<!-- userDaoImpl中有成员变量 strList<String> -->
<bean id="userDao" class="com.zzc.dao.impl.UserDaoImpl">
<property name="strList">
<list>
<value>aaa</value>
<value>bbb</value>
<value>ccc</value>
</list>
</property>
</bean>List< User >
1
2
3
4
5
6
7
8
9
10
11
12<!-- userDaoImpl中有成员变量 userList<User> -->
<bean id="u1" class="com.zzc.domain.User"/>
<bean id="u2" class="com.zzc.domain.User"/>
<bean id="userDao" class="com.zzc.dao.impl.UserDaoImpl">
<property name="userList">
<list>
<bean class="com.zzc.domain.User"/>
<ref bean="u1"/>
<ref bean="u2"/>
</list>
</property>
</bean>Map<Stirng, User>
1
2
3
4
5
6
7
8
9
10
11<!-- userDaoImpl中有成员变量 userMap<Stirng, User> -->
<bean id="u1" class="com.zzc.domain.User"/>
<bean id="u2" class="com.zzc.domain.User"/>
<bean id="userDao" class="com.zzc.dao.impl.UserDaoImpl">
<property name="userMap">
<map>
<entry key="user1" value-ref="u1"/>
<entry key="user2" value-ref="u2"/>
</map>
</property>
</bean>Properties
1
2
3
4
5
6
7
8
9
10<!-- userDaoImpl中有成员变量 Properties -->
<bean id="userDao" class="com.zzc.dao.impl.UserDaoImpl">
<property name="properties">
<props>
<prop key="p1">aaa</prop>
<prop key="p2">bbb</prop>
<prop key="p3">ccc</prop>
</props>
</property>
</bean>
小结
1 | <bean>标签 |
相关API
ApplicationContext的实现类
ClassPathXmlApplicationContext
它是从类的根路径下加载配置文件 推荐使用这种
FileSystemXmlApplicationContext
它是从磁盘的绝对路径上加载配置文件,配置文件可以在磁盘的任意位置。
AnnotationConfigApplicationContext
当使用注解配置容器对象时,需要使用此类来创建 spring 容器。它用来读取注解。
getBean的使用
- getBean(“id”) 根据id获取Bean实例
- getBean(class) 根据类的Class类型获取Bean实例,如 getBean(UsrService.class)
- getBean(“id”,class) 根据id并指定类型获取bean实例,不用强转
配置数据源
概述
数据源(链接池)的作用:
数据源(连接池)是提高程序性能如出现的 ;
事先实例化数据源,初始化部分连接资源 ;
使用连接资源时从数据源中获取 ;
使用完毕后将连接资源归还给数据源 ;
常见的数据源(连接池):DBCP、C3P0、BoneCP、Druid等
数据源的开发步骤:
- 导入数据源的坐标和数据库驱动坐标 ;
- 创建数据源对象 ;
- 设置数据源的基本连接数据 ;
- 使用数据源获取连接资源和归还连接资源;
手动配置数据源
jdbc.properties文件:
1 | jdbc.driver=com.mysql.jdbc.Driver |
测试:
1 | public class dataSourceTest { |
Spring配置数据源(XML)
可以将DataSource的创建权交由Spring容器去完成
- DataSource有无参构造方法,而Spring默认就是通过无参构造方法实例化对象的 ;
- DataSource要想使用需要通过set方法设置数据库连接信息,而Spring可以通过set方法进行字符串注入;
1 | <!-- 这里bean的class属性,填的是数据源对象的全限定名,即 DruidDataSource 的 --> |
1 | public void testDruidSpring() throws Exception{ |
抽取jdbc配置文件
让applicationContext.xml加载jdbc.properties配置文件获得连接信息。
需要先引入context命名空间和约束路径
- 命名空间:xmlns:context=”http://www.springframework.org/schema/context"
- 约束路径:http://www.springframework.org/schema/context http://www.springframework.org/schema/context/spring-context.xsd
约束路径写在 xsi:schemaLocation=“ ” 的双引号里面,即多个路径都写在这个双引号里面;
格式:
1
2<context:property-placeholder location="xx.properties"/>
<property name="" value="${key}"/>具体配置:
1
2
3
4
5
6
7<context:property-placeholder location="classpath:jdbc.properties"/>
<bean id="dataSource" class="com.alibaba.druid.pool.DruidDataSource">
<property name="DriverClassName" value="${jdbc.driver}"/>
<property name="Url" value="${jdbc.url}"/>
<property name="username" value="${jdbc.username}"/>
<property name="password" value="${jdbc.password}"/>
</bean>使用数据源的代码不变:
1
2
3
4
5
6
7public void testDruidSpring() throws Exception{
ApplicationContext app = new ClassPathXmlApplicationContext("applicationContext.xml");
DataSource dataSource = (DataSource) app.getBean("dataSource");
Connection connection = dataSource.getConnection();
System.out.println(connection);
connection.close();
}
如果使用自己的properties文件有变量的名字和当前系统的环境变量冲突,会以系统的环境变量为准,如果不想要,可以加上属性 system-properties-mode=”NEVER”,即不加载系统环境变量;
如果想加载多个properties文件,推荐写: location=”calsspath:*properties”
前面的只能导入当前工程的properties文件,而jar包里的文件读取不了,想全部加载,可以这样写:location=”calsspath*:*properties”
注解开发
Spring是轻代码而重配置的框架,配置比较繁重,影响开发效率,所以注解开发是一种趋势,注解代替xml配置 文件可以简化配置,提高开发效率。
原始注解
Spring原始注解主要代替 < Bean> 的配置
| 注解 | 说明 |
|---|---|
| @Component | 使用在类上用于实例化Bean |
| @Controller | 使用在web层类上用于实例化Bean |
| @Service | 使用在service层类上用于实例化Bean |
| @Repository | 使用在dao层类上用于实例化Bean |
| @Autowired | 使用在字段上用于根据类型依赖注入 |
| @Qualifier | 结合@Autowired 一起使用,用于根据名称进行依赖注入 |
| @Resourse | 相当于@Autowired+@Qualifier,按照名称进行注入 |
| @Value | 注入普通属性 |
| @Scope | 标注Bean的作用范围 |
| @PostConstruct | 使用在方法上标注该方法是Bean的初始化方法 |
| @PreDestory | 使用在方法上标注该方法是Bean的销毁方法 |
注:
使用注解,需要在在applicationContext.xml中配置组件扫描,作用是指定哪个包及其子包下的Bean 需要进行扫描以便识别使用注解配置。
1 | <context:component-scan base-package="com.zzc"></context:component-scan> |
使用:
@Component @Repository @Scope @PostConstruct
1 | //<bean id="useDao" class="com.zzc.dao.impl.UserDaoImpl" /> |
@Service @Autowired @Qualifier @Resource
1 | //<bean id="userService" class="com.zzc.service.impl.UserServiceImpl"> |
测试代码不变:
1 | public class UserController { |
@Value
1 |
|
新注解
使用 Spring配置类 来替代 Spring核心配置文件xxx.xml,这样,配置就都从配置类中加载就行(配置类在写好后改动不大,大都是改properties文件)。
| 注解 | 说明 |
|---|---|
| @Configuration | 用于指定当前类是一个Spring配置类,当创建容器时会从该类上加载注解 |
| @ComponentScan | 用于指定Spring在初始化容器时要扫描的包。 替代了 Spring的xml配置文件中的<context:component-scan base-package=”com.zzc”/> |
| @Bean | 使用在方法上,标注将该方法的返回值存储到Spring容器中 |
| @PropertySource | 用于加载 .properties文件中的配置 |
| @Import | 用于导入其他配置类 |
扫描后,只需要将对应的bean作为方法的形参,容器会根据类型自动装配对象;
使用:
@Confuguration @ComponentScan @Import
1 | //核心配置类 |
@PropertySource @value @Bean
1 | //抽取jdbc配置文件 |
测试:使用 AnnotationConfigApplicationContext (配置类.class)
1 | public class testConfiguration { |
Spring整合Junit
在测试类中,每个测试方法都需要获得ApplicationContext对象,然后再用getBean() 获得Bean对象;
为了省去这两行,解决思路:
- 让SpringJunit负责创建Spring容器,但是需要将配置文件的名称告诉它 ;
- 将需要进行测试Bean直接在测试类中进行注入
步骤:
导入spring集成 Junit的坐标
1
2
3
4
5
6
7
8
9
10
11
12<!--此处需要注意的是,spring5 及以上版本要求 junit 的版本必须是 4.12 及以上-->
<dependency>
<groupId>org.springframework</groupId>
<artifactId>spring-test</artifactId>
<version>5.0.2.RELEASE</version>
</dependency>
<dependency>
<groupId>junit</groupId>
<artifactId>junit</artifactId>
<version>4.12</version>
<scope>test</scope>
</dependency>使用@Runwith注解替换原来的运行期
1
2
3
4
public class SpringJunitTest {
}使用@ContextConfiguration指定配置文件或配置类
1
2
3
4
5
6
7
8
//加载spring核心配置文件
//@ContextConfiguration(value = {"classpath:applicationContext.xml"})
//加载spring核心配置类
public class SpringJunitTest {
}使用@Autowired注入需要测试的对象
创建测试方法进行测试
1
2
3
4
5
6
7
8
9
10
11
12
13
14
15
//加载spring核心配置类
public class SpringJunitTest {
private UserService userService;
private DataSource dataSource;
public void save() throws Exception{
userService.save();
System.out.println(dataSource.getConnection());
}
}
Spring集成web环境
应用上下文对象是通过new ClasspathXmlApplicationContext(spring配置文件) 或 AnnotationConfigApplicationContext(spring配置类) 方式获取的,但是每次从 容器中获得Bean时都要 new 一个 ,这样的弊端是配置 文件加载多次,应用上下文对象创建多次。
所以,在Web项目中,可以使用ServletContextListener 监听Web应用的启动,我们可以在Web应用启动时,就加载Spring的配置文件,创建应用上下文对象ApplicationContext,在将其存储到最大的域servletContext域 中,这样就可以在任意位置从域中获得应用上下文ApplicationContext对象了。
- 对此,Spring提供了一个监听器
ContextLoaderListener就是对上述功能的封装,该监 听器内部加载Spring配置文件,创建应用上下文对象,并存储到ServletContext域中,提供了一个客户端工具WebApplicationContextUtils供使用者获得应用上下文对象。
使用:
在web.xml中配置ContextLoaderListener监听器(导入spring-web坐标)
1
2
3
4
5
6<!-- 在pom.xml中-->
<dependency>
<groupId>org.springframework</groupId>
<artifactId>spring-web</artifactId>
<version>5.0.5.RELEASE</version>
</dependency>1
2
3
4
5
6
7
8
9
10
11
12<!--在web.xml中-->
<!--全局参数-->
<context-param>
<param-name>contextConfigLocation</param-name>
<param-value>classpath:applicationContext.xml</param-value>
</context-param>
<!--Spring的监听器-->
<listener>
<listener-class>
org.springframework.web.context.ContextLoaderListener
</listener-class>
</listener>使用WebApplicationContextUtils获得应用上下文对象ApplicationContex
1
2ApplicationContext applicationContext = WebApplicationContextUtils.getWebApplicationContext(servletContext);
Object obj = applicationContext.getBean("id");
AOP
Aspect Oriented Programming
意思为面向切面编程,指通过预编译方式和运行期动态代理实现程序功能的 统一维护。
AOP 是 OOP 的延续,是Spring框架中的一个重要内容,是函数式编程的一种衍生范型。
利用AOP可以对业务逻辑的各个部分进行隔离,从而使得业务逻辑各部分之间的耦合度降低,提高程序的可重用性,同时提高了开发的效率。
作用:在程序运行期间,在不修改源码的情况下对方法进行功能增强;
优势:减少重复代码,提高开发效率,并且便于维护;
底层实现:
AOP 的底层是通过 Spring 提供的的动态代理技术实现的。在运行期间,Spring通过动态代理技术动态的 生成代理对象,代理 对象方法执行时进行增强功能的介入,再去调用目标对象的方法,从而完成功能的增强。
底层: 动态代理
常用的动态代理技术:
- JDK代理:基于
接口的动态代理技术 - cglib代理:基于父类的动态代理技术
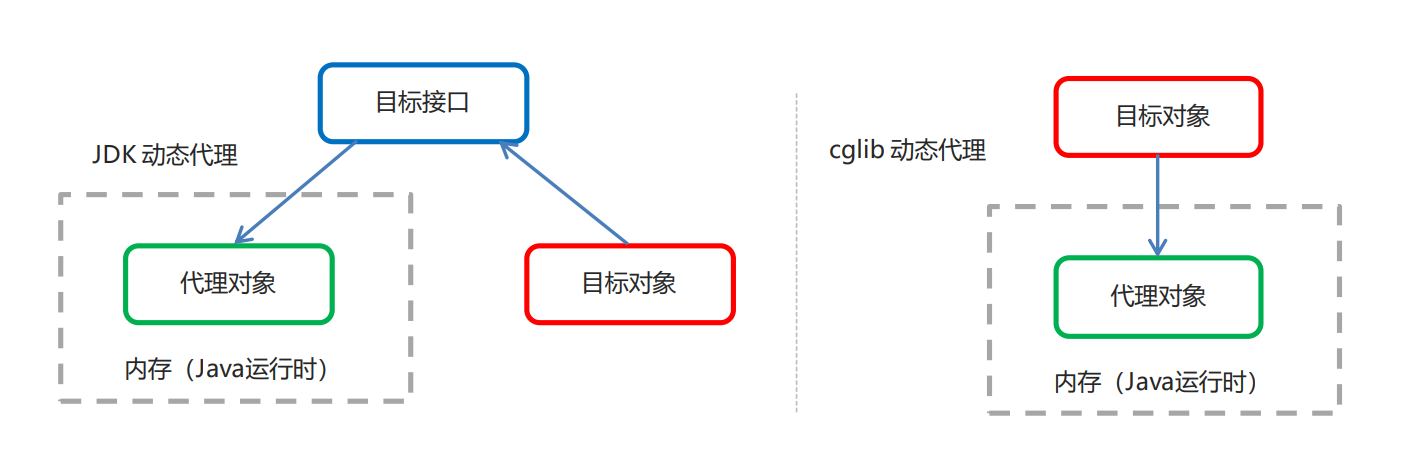
JDK动态代理
目标类接口
1
2
3public interface TargetInterface {
public void xxxMethod();
}目标类
1
2
3
4
5
6public class Target implements TargetInterface {
public void xxxMethod() {
System.out.println("Target running....");
}
}动态代理
1
2
3
4
5
6
7
8
9
10
11
12
13
14
15
16Target target = new Target(); //创建目标对象
//创建代理对象
TargetInterface xxx = (TargetInterface) Proxy.newProxyInstance(
target.getClass().getClassLoader(), //目标对象 类加载器
target.getClass().getInterfaces(), //目标对象 相同的接口字节码对象数据
new InvocationHandler() {
//调用代理对象的任何方法,实质执行的都是invoke方法
public Object invoke(Object proxy, Method method, Object[] args) throws Throwable {
System.out.println("前置增强代码...");
Object invoke = method.invoke(target, args); //执行目标方法
System.out.println("后置增强代码...");
return invoke;
}
}
);测试,调用代理对象
1
xxx.xxxMethod();
cglib动态代理
CGLIB是第三方提供的包,所以需要引入jar包的坐标:
1 | <dependency> |
(后面版本的spring包包含了cglib,可以不用导入了)
目标类
1
2
3
4
5public class Target {
public void xxxMethod() {
System.out.println("Target running....");
}
}动态代理
1
2
3
4
5
6
7
8
9
10
11
12
13Target target = new Target(); //创建目标对象
Enhancer enhancer = new Enhancer(); //创建增强器
enhancer.setSuperclass(Target.class); //设置父类
enhancer.setCallback(new MethodInterceptor() { //设置回调
public Object intercept(Object o, Method method, Object[] objects, MethodProxy methodProxy) throws Throwable {
System.out.println("前置代码增强....");
Object invoke = method.invoke(target, objects);
System.out.println("后置代码增强....");
return invoke;
}
});
Target xxx = (Target) enhancer.create(); //创建代理对象测试
1
xxx.xxxMethod();
AOP概念
Spring 的 AOP 实现底层就是对上面的动态代理的代码进行了封装,封装后我们只需要对需要关注的部分进行代码编写,并通过配置的方式完成指定目标的方法增强。
术语
AOP 的相关常用的术语如下:
- Target(目标对象):代理的目标对象 ;
- Proxy (代理类):一个类被 AOP 织入增强后,就产生一个结果代理类 ;
- Joinpoint(连接点):所谓连接点是指那些被拦截到的点(方法)。在spring中,这些点指的是方法,因为spring只支持方法类型的连接点 —— 指
可以增强的方法; - Pointcut(切入点):所谓切入点是指我们要对哪些 Joinpoint 进行拦截的定义 —— 指
将要增强的方法; - Advice(通知/ 增强):所谓通知是指拦截到 Joinpoint 之后所要做的事情就是
通知/增强; - Aspect(切面):是切入点和通知(引介)的结合 ——
将要增强的方法 和 增强 的结合; - Weaving(织入):是指把增强应用到目标对象来创建新的代理对象的过程。spring采用动态代理织入,而 AspectJ采用编译期织入和类装载期织入 —— 指
方法增强的过程;
切点表达式:
1 | execution([修饰符] 返回值类型 包名.类名.方法名(参数)) |
例如:
1 | execution(public void com.zzc.aop.Target.method()) |
书写规范:
- 切入点 通常描述接口,而不描述实现类;
- 访问控制修饰符 针对接口开发均采用public描述(可省略修饰符);
- 对于增删改类使用 精确的返回类型 可加速匹配,对查询类使用 *通配符 快速描述;
- 包名书写尽量不使用 .. 匹配,效率低;
- 接口名/类名 的模块相关的采用 * 匹配,例如: UserService写成 *Service,绑定业务层接口名;
- 方法名中的 动词精准匹配,名词 * 匹配,例如:getById 写成 getBy*,selectAll 写成 selectAll;
- 通常不适用异常作为匹配规则;
多个切面的执行顺序:
使用 @Oeder 注解 定义切面顺序。
1
2
3
4
5// 值越小优先级越高
public class LoggingAspect implements Ordered {
开发事项
需要编写的内容
- 编写核心业务代码(目标类的目标方法)
- 编写切面类,切面类中有通知(增强功能方法)
- 在配置文件中,配置织入关系,即将哪些通知与哪些连接点进行结合
AOP 技术实现的内容 :
Spring 框架监控切入点方法的执行。一旦监控到切入点方法被运行,使用代理机制,动态创建目标对象的 代理对象,根据通知类别,在代理对象的对应位置,将通知对应的功能织入,完成完整的代码逻辑运行。
AOP底层使用哪种代理方式?
在 spring 中,框架会根据目标类是否实现了接口来决定采用哪种动态代理的方式。
基于XML的AOP开发
XML配置AOP写法
aop织入配置:
1 | <aop:config> |
通知的配置语法:
1 | <aop:通知类型 method=“切面类中方法名” pointcut="切点表达式"></aop:通知类型> |
| 名称 | 标签 | 说明 |
|---|---|---|
| 前置通知 | < aop:before> | 用于配置前置通知。指定增强的方法在切入点方法之前执行 |
| 后置通知 | < aop:after-returning> | 用于配置后置通知。指定增强的方法在切入点方法之后执行 |
| 环绕通知 | < aop:around> | 用于配置环绕通知。指定增强的方法在切入点方法之前和之后都执行 |
| 异常抛出通知 | < aop:throwing> | 用于配置异常抛出通知。指定增强的方法在出现异常时执行 |
| 最终通知 | < aop:after> | 用于配置最终通知。无论增强方式执行是否有异常都会执行 |
1 | //环绕通知的方法 |
切点表达式的抽取:
如果有多个增强的切点表达式相同时,可以将切点表达式进行抽取,在增强中使用 pointcut-ref 属性代替 pointcut 属性来引用 抽取后的切点表达式。
1 | <aop:config> |
开发步骤
导入 AOP 相关坐标
1
2
3
4
5
6
7
8
9
10
11
12<!--导入spring的context坐标,context依赖aop-->
<dependency>
<groupId>org.springframework</groupId>
<artifactId>spring-context</artifactId>
<version>5.0.5.RELEASE</version>
</dependency>
<!-- aspectj的织入 -->
<dependency>
<groupId>org.aspectj</groupId>
<artifactId>aspectjweaver</artifactId>
<version>1.8.13</version>
</dependency>创建目标接口和目标类(内部有切点)
1
2
3public interface TargetInterface {
public void method();
}1
2
3
4
5
6public class Target implements TargetInterface {
public void method() {
System.out.println("Target running....");
}
}创建切面类(内部有增强方法)
1
2
3
4
5
6public class MyAspect {
//前置增强方法
public void before(){
System.out.println("前置代码增强.....");
}
}将目标类和切面类的对象创建权交给 spring
1
2
3
4<!--配置目标类-->
<bean id="target" class="com.zzc.aop.Target"></bean>
<!--配置切面类-->
<bean id="myAspect" class="com.zzc.aop.MyAspect"></bean>在 applicationContext.xml 中配置织入关系
先导入aop的命名空间:
1
2
3
4xmlns:aop="http://www.springframework.org/schema/aop"
http://www.springframework.org/schema/aop
http://www.springframework.org/schema/aop/spring-aop.xsd在applicationContext.xml中配置织入关系
1
2
3
4
5
6
7<aop:config>
<!-- 声明切面: 引用myAspect的Bean为切面对象 -->
<aop:aspect ref="myAspect">
<!-- 切面:切点+通知; 配置Target的method方法执行时要进行myAspect的before方法前置增强-->
<aop:before method="before" pointcut="execution(public void com.zzc.aop.Target.method())"></aop:before>
</aop:aspect>
</aop:config>测试代码
1
2
3
4
5
6
7
8
9
10
public class AopTest {
private TargetInterface target;
public void test1(){
target.method();
}
}
基于注解的AOP开发
注解写法
@EnableAspectJAutoProxy
配置类注解,开启注解格式AOP功能;
@Aspect
类注解,设置当前类为AOP切面类;
@Pointcut
方法注解,设置切入点方法,写的是 切入点表达式;
注解通知的类型:
| 名称 | 标签 | 说明 |
|---|---|---|
| 前置通知 | @Before | 用于配置前置通知。指定增强的方法在切入点方法之前执行 |
| 后置通知 | @AfterReturning | 用于配置后置通知。指定增强的方法在切入点方法之后执行 |
| 环绕通知 | @Around | 用于配置环绕通知。指定增强的方法在切入点方法之前和之后都执行 |
| 异常抛出通知 | @AfterThrowing | 用于配置异常抛出通知。指定增强的方法在出现异常时执行 |
| 最终通知 | @After | 用于配置最终通知。无论增强方式执行是否有异常都会执行 |
1 | //环绕通知 |
**获取切入点方法的 —— **
参数:
JoinPoint:前置,后置,返回后,抛出异常后通知,要设为方法的第一个形参;
ProceedingJoinPoint:环绕通知
方法是 getArgs()
返回值:返回后通知,环绕通知;
如: Object ret = pjp.proceed();
运行异常信息: 抛出异常后通知,环绕通知;
切点表达式的抽取:
同 xml 配置 aop 一样,可以将切点表达式抽取。抽取方式是在切面内定义方法,在该方法上使用@Pointcut注解定义切点表达式,然后在在增强注解中进行引用。具体如下:
1 | @ |
开发步骤
导入坐标
1
2
3
4
5
6
7
8
9
10
11<dependency>
<groupId>org.springframework</groupId>
<artifactId>spring-context</artifactId>
<version>5.0.5.RELEASE</version>
</dependency>
<!-- aspectj的织入 -->
<dependency>
<groupId>org.aspectj</groupId>
<artifactId>aspectjweaver</artifactId>
<version>1.8.13</version>
</dependency>创建目标接口和目标类(内部有切点)
1
2
3public interface TargetInterface {
public void method();
}1
2
3
4
5
6
7
public class Target implements TargetInterface {
public void method() {
System.out.println("Target running....");
}
}创建切面类(内部有增强方法)
1
2
3
4
5
6
7
public class MyAspect {
//前置增强方法
public void before(){
System.out.println("前置代码增强.....");
}
}在切面类中使用注解配置织入关系
1
2
3
4
5
6
7
8
9
10
11
12
13
public class MyAspect {
//定义切入点,这里是个空方法,起什么名字都行
//@pointcut("execution(* com.zzc.aop.*.*(..))")
private void pt(){}
public void before(){
System.out.println("前置代码增强.....");
}
}或者,将 “execution(…)” 直接写在 @Before 中,不写@pointcut也行
主配置类开启注解格式AOP功能:@EnableAspectJAutoProxy
1
2
3
4
5
public class SpringConfig {
}测试
1
2
3
4
5
6
7public class App {
public static void main(String[] args) {
ApplicationContext ctx = new AnnotationConfigApplicationContext(SpringConfig.class);
Target target = ctx.getBean(Target.class);
target.method();
}
}
声明式事务控制
前置
编程式事务控制 三大相关对象:
PlatformTransactionManager接口 是spring的事务管理器,它里面提供了我们常用的操作事务的方法。
方法:
- TransactionStatus getTransaction(TransactionDefination defination) :获取事务的状态信息
- void commit(TransactionStatus status) :提交事务
- void rollback(TransactionStatus status):回滚事务
这个接口,不同的 Dao 层技术则有不同的实现类,例如:Dao层技术是
- 是jdbc或mybatis时 :org.springframework.jdbc.datasource.DataSourceTransactionManager ;
- 是hibernate时:org.springframework.orm.hibernate5.HibernateTransactionManage
TransactionDefinition 是事务的定义信息对象。
方法:
int getIsolationLevel() :获得事务的隔离级别
事务隔离级别:
- ISOLATION_DEFAULT
- ISOLATION_READ_UNCOMMITTED
- ISOLATION_READ_COMMITTED
- ISOLATION_REPEATABLE_READ
- ISOLATION_SERIALIZABLE
int getPropogationBehavior() :获得事务的传播行为
事务传播行为:
- REQUIRED:
required| 如果当前没有事务,就新建一个事务,如果已经存在一个事务中,加入到这个事务中。一般的选择(默认值) - SUPPORTS:
supports| 支持当前事务,如果当前没有事务,就以非事务方式执行(没有事务) - MANDATORY:
mandatory| 使用当前的事务,如果当前没有事务,就抛出异常 - REQUERS_NEW:
requers_new| 新建事务,如果当前在事务中,把当前事务挂起。 - NOT_SUPPORTED:
not_supported| 以非事务方式执行操作,如果当前存在事务,就把当前事务挂起 - NEVER:
never| 以非事务方式运行,如果当前存在事务,抛出异常 - NESTED:
nested| 如果当前存在事务,则在嵌套事务内执行。如果当前没有事务,则执行 REQUIRED 类似的操作 - 超时时间:默认值是-1,没有超时限制。如果有,以秒为单位进行设置
- 是否只读:建议查询时设置为只读
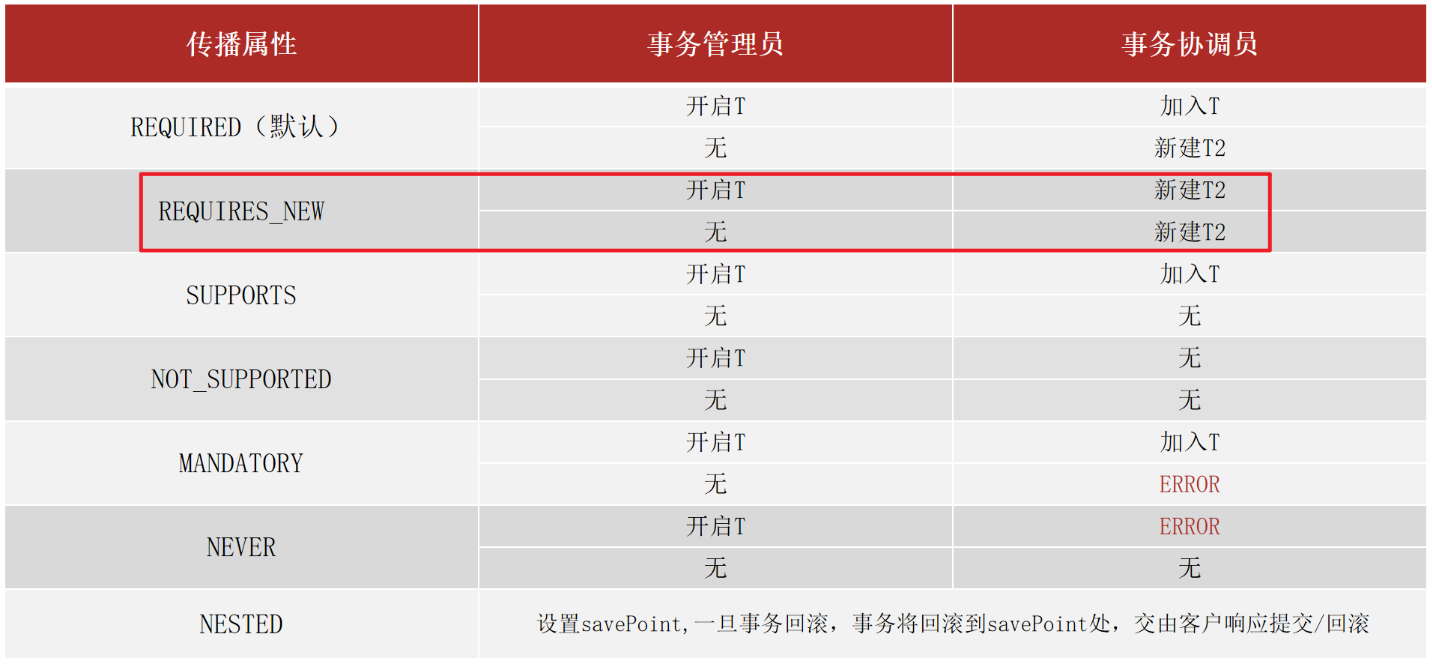
- REQUIRED:
int getTimeout():获得超时时间
boolean isReadOnly() :是否只读
TransactionStatus 接口提供的是事务具体的运行状态。
概述
- Spring 声明式事务控制底层就是AOP。
Spring 的声明式事务,顾名思义就是采用声明的方式来处理事务。这里所说的声明,就是指 使用配置文件或注解 的方式进行声明 ,以声明式的处理事务 来代替 代码式的处理事务。
作用:
事务管理不侵入开发的组件。具体来说,业务逻辑对象就不会意识到正在事务管理之中,事实上也应该如 此,因为事务管理是属于系统层面的服务,而不是业务逻辑的一部分,如果想要改变事务管理策划的话, 也只需要在定义文件中重新配置即可- 在不需要事务管理的时候,只要在设定文件上修改一下,即可移去事务管理服务,无需改变代码重新编译 ,这样
维护起来极其方便。
实现:
切点 就是 业务方法
通知 就是 事务控制方法
切面织入
角色与属性
事务角色:
- 事务管理员:发起事务方,在Spring中通常指代业务层开启事务的方法
- 事务协调员:加入事务方,在Spring中通常指代数据层方法,也可以是业务层方法
注意:
目前的事务管理是基于
DataSourceTransactionManager和SqlSessionFactoryBean使用的是同一个数据源。
事务属性:
事务属性都可以在@Transactional注解的参数上进行设置。
| 属性 | 作用 | 示例 |
|---|---|---|
| readOnly | 设置是否为只读事务 | readOnly=true 只读事务 |
| timeout | 设置事务超时时间 | timeout=-1 永不超时 |
| rollbackFor | 设置事务回滚异常(class) | rollbackFor={NullPointException.class} |
| rollbackForClassName | 设置事务回滚异常(String) | |
| noRollbackFor | 设置事务不回滚异常(class) | |
| noRollbackForClassName | 设置事务不回滚异常(String) | |
| isolation | 设置事务隔离级别 | isolation=Isolation.DEFAULT |
| propagation | 设置事务传播行为 | propagation = Propagation.REQUIRES_NEW |
rollbackFor: 并不是所有异常都会回滚事务,所以需要对一些异常额外设置事务回滚异常。
事务传播行为:
XML实现
引入tx命名空间
1
2
3xmlns:tx="http://www.springframework.org/schema/tx"
http://www.springframework.org/schema/tx
http://www.springframework.org/schema/tx/spring-tx.xsd配置事务增强
1
2
3
4
5
6
7
8
9
10
11
12<!--平台事务管理器, 指明DAO层用了哪种技术-->
<bean id="transactionManager"
class="org.springframework.jdbc.datasource.DataSourceTransactionManager">
<property name="dataSource" ref="dataSource"></property>
</bean>
<!--事务增强配置-->
<tx:advice id="txAdvice" transaction-manager="transactionManager">
<tx:attributes>
<tx:method name="*"/>
</tx:attributes>
</tx:advice>其中 < tx:method > 代表切点方法的 事务参数 的配置,如:
1
2
3
4
5
6<tx:advice id="txAdvice" transaction-manager="transactionManager">
<tx:attributes>
<tx:method name="transfer" isolation="REPEATABLE_READ" propagation="REQUIRED" timeout="-1"
read-only="false"/>
</tx:attributes>
</tx:advice>- name:切点方法名称
- isolation:事务的隔离级别
- propogation:事务的传播行为
- timeout:超时时间
- read-only:是否只读
配置事务AOP织入
1
2
3
4<!--事务的aop增强-->
<aop:config>
<aop:advisor advice-ref="txAdvice" pointcut="execution(*com.zzc.service.impl.*.*(..))"></aop:advisor>
</aop:config>或者:
1
2
3
4
5<!--事务的aop增强-->
<aop:config>
<aop:pointcut id="myPointcut" expression="execution(*com.zzc.service.impl.*.*(..))"/>
<aop:advisor advice-ref="txAdvice" pointcut-ref="myPointcut"></aop:advisor>
</aop:config>测试
注解实现
在需要被事务管理的方法上添加注解,标明事务
1
2
3
4public interface AccountService{
public void transfer(String out,String in ,Double money);
}Spring注解式事务 通常添加在业务层接口中,而不会添加到业务层实现类中,降低耦合;
添加到接口或类上,它的所有方法都会开启事务;
在JdbcConfig类中配置事务管理器
1
2
3
4
5
6
7
8
9
10
11
12
13
14
15
16
17
18
19
20
21
22
23
24
25
26
27
28public class JdbcConfig {
private String driver;
private String url;
private String userName;
private String password;
public DataSource dataSource(){
DruidDataSource ds = new DruidDataSource();
ds.setDriverClassName(driver);
ds.setUrl(url);
ds.setUsername(userName);
ds.setPassword(password);
return ds;
}
//配置事务管理器,mybatis使用的是jdbc事务
public PlatformTransactionManager transactionManager(DataSource dataSource){
DataSourceTransactionManager transactionManager = new DataSourceTransactionManager();
transactionManager.setDataSource(dataSource);
return transactionManager;
}
}注意:事务管理器要根据使用技术进行选择,Mybatis框架使用的是JDBC事务,可以直接使用
DataSourceTransactionManager开启事务注解
1
2
3
4
5
6
7
SpringMVC
SpringMVC就是一个Spring内置的 实现了MVC模型的 Web框架。
它通过一套注解,让一个简单的 Java 类成为处理请求的控制器,而无须实现任何接口。
SpringMVC底层就是Servlet,SpringMVC就是对Servlet进行深层次的封装。
MVC框架,它解决WEB开发中常见的问题(参数接收、文件上传、表单验证、国际化等等),而且使用简单,与Spring无缝集成。
开发步骤
需求:客户端发起请求,服务器端接收请求,执行逻辑并进行视图跳转。
开发步骤:
注解方式
导入SpringMVC相关坐标
1
2
3
4
5
6
7
8
9
10
11
12
13
14
15
16
17
18
19<!--Spring坐标-->
<dependency>
<groupId>org.springframework</groupId>
<artifactId>spring-context</artifactId>
<version>5.0.5.RELEASE</version>
</dependency>
<!--SpringMVC坐标-->
<dependency>
<groupId>org.springframework</groupId>
<artifactId>spring-webmvc</artifactId>
<version>5.0.5.RELEASE</version>
</dependency>
<!--Servlet坐标-->
<dependency>
<groupId>javax.servlet</groupId>
<artifactId>servlet-api</artifactId>
<version>2.5</version>
<scope>provided</scope>
</dependency>创建主配置类
1
2
3
4
public class SpringMvcConfig {
}创建Controller类
1
2
3
4
5
6
7
8
9
10
public class UserController {
public String save(){
System.out.println("user save ...");
return "{'info':'springmvc'}";
}
}使用配置类替换web.xml
web.xml可以删除,换成ServletContainersInitConfig
1
2
3
4
5
6
7
8
9
10
11
12
13
14
15
16
17
18
19
20
21
22
23
24
25
26
27
28
29
30
31
32
33
34
35
36
37
38
39
40//实现一
public class ServletContainersInitConfig extends AbstractDispatcherServletInitializer {
//加载springmvc配置类
protected WebApplicationContext createServletApplicationContext() {
//初始化WebApplicationContext对象
AnnotationConfigWebApplicationContext ctx = new AnnotationConfigWebApplicationContext();
//加载指定配置类
ctx.register(SpringMvcConfig.class);
return ctx;
}
//设置由springmvc控制器处理的请求映射路径
protected String[] getServletMappings() {
return new String[]{"/"};
}
//加载spring配置类
protected WebApplicationContext createRootApplicationContext() {
AnnotationConfigWebApplicationContext ctx = new AnnotationConfigWebApplicationContext();
ctx.register(SpringConfig.class);
return ctx;
}
}
//实现二
//也可以继承AbstractAnnotationConfigDispatcherServletInitializer,实现更方便,作用和上面 的代码一样
public class ServletContainersInitConfig extends AbstractAnnotationConfigDispatcherServletInitializer {
protected Class<?>[] getRootConfigClasses() {
return new Class[]{SpringConfig.class};
}
protected Class<?>[] getServletConfigClasses() {
return new Class[]{SpringMvcConfig.class};
}
protected String[] getServletMappings() {
return new String[]{"/"};
}
}运行tomcat,测试
XML方式
导入SpringMVC相关坐标
1
2
3
4
5
6
7
8
9
10
11
12
13
14
15
16
17
18
19
20
21
22
23
24
25
26<!--Spring坐标-->
<dependency>
<groupId>org.springframework</groupId>
<artifactId>spring-context</artifactId>
<version>5.0.5.RELEASE</version>
</dependency>
<!--SpringMVC坐标-->
<dependency>
<groupId>org.springframework</groupId>
<artifactId>spring-webmvc</artifactId>
<version>5.0.5.RELEASE</version>
</dependency>
<!--Servlet坐标-->
<dependency>
<groupId>javax.servlet</groupId>
<artifactId>servlet-api</artifactId>
<version>2.5</version>
<scope>provided</scope>
</dependency>
<!--Jsp坐标-->
<dependency>
<groupId>javax.servlet.jsp</groupId>
<artifactId>jsp-api</artifactId>
<version>2.0</version>
</dependency>在web.xml 中配置SpringMVC核心控制器DispathcerServlet
1
2
3
4
5
6
7
8
9
10
11
12
13<servlet>
<servlet-name>DispatcherServlet</servlet-name>
<servlet-class>org.springframework.web.servlet.DispatcherServlet</servlet-class>
<init-param>
<param-name>contextConfigLocation</param-name>
<param-value>classpath:spring-mvc.xml</param-value>
</init-param>
<load-on-startup>1</load-on-startup>
</servlet>
<servlet-mapping>
<servlet-name>DispatcherServlet</servlet-name>
<url-pattern>/</url-pattern>
</servlet-mapping>创建Controller类和视图页面
1
2
3
4
5
6public class QuickController {
public String quickMethod(){
System.out.println("quickMethod running.....");
return "index.jsp";
}
}1
2
3
4
5<html>
<body>
<h2>Hello SpringMVC!</h2>
</body>
</html>使用注解配置Controller类中业务方法的映射地址
1
2
3
4
5
6
7
8
public class QuickController {
public String quickMethod(){
System.out.println("quickMethod running.....");
return "index";
}
}新建配置SpringMVC核心文件 spring-mvc.xml
1
2
3
4
5
6
7
8
9
10
11
12
13<beans xmlns="http://www.springframework.org/schema/beans"
xmlns:mvc="http://www.springframework.org/schema/mvc"
xmlns:context="http://www.springframework.org/schema/context"
xmlns:xsi="http://www.w3.org/2001/XMLSchema-instance"
xsi:schemaLocation="http://www.springframework.org/schema/beans
http://www.springframework.org/schema/beans/spring-beans.xsd
http://www.springframework.org/schema/mvc
http://www.springframework.org/schema/mvc/spring-mvc.xsd
http://www.springframework.org/schema/context
http://www.springframework.org/schema/context/spring-context.xsd">
<!--配置注解扫描-->
<context:component-scan base-package="com.zzc"/>
</beans>客户端发起请求
执行流程
- 用户发送请求至 前端控制器DispatcherServlet。
- DispatcherServlet收到请求,调用HandlerMapping处理器映射器。
- 处理器映射器找到具体的处理器(可以根据xml配置、注解进行查找),生成处理器对象及处理器拦截器(如果有则生成) 一并返回给DispatcherServlet。
- DispatcherServlet调用HandlerAdapter处理器适配器。
- HandlerAdapter经过适配调用具体的处理器(Controller,也叫后端控制器)。
- Controller执行完成返回ModelAndView。
- HandlerAdapter将controller执行结果ModelAndView返回给DispatcherServlet。
- DispatcherServlet将ModelAndView传给ViewReslover视图解析器。
- ViewReslover解析后返回具体View。
- DispatcherServlet根据View进行渲染视图(即将模型数据填充至视图中)。
- DispatcherServlet响应用户
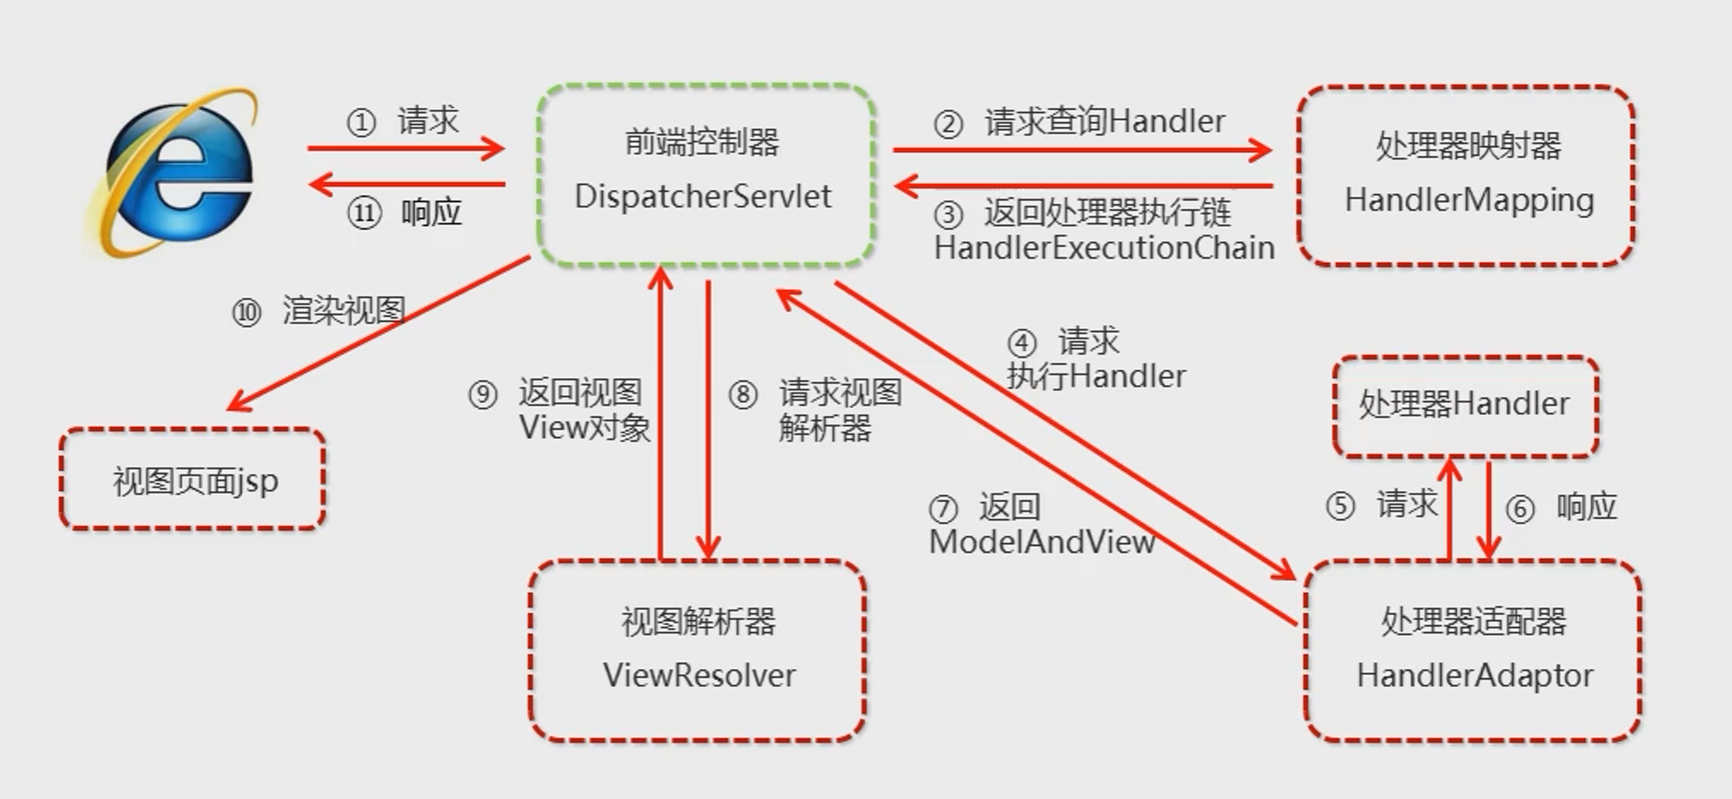
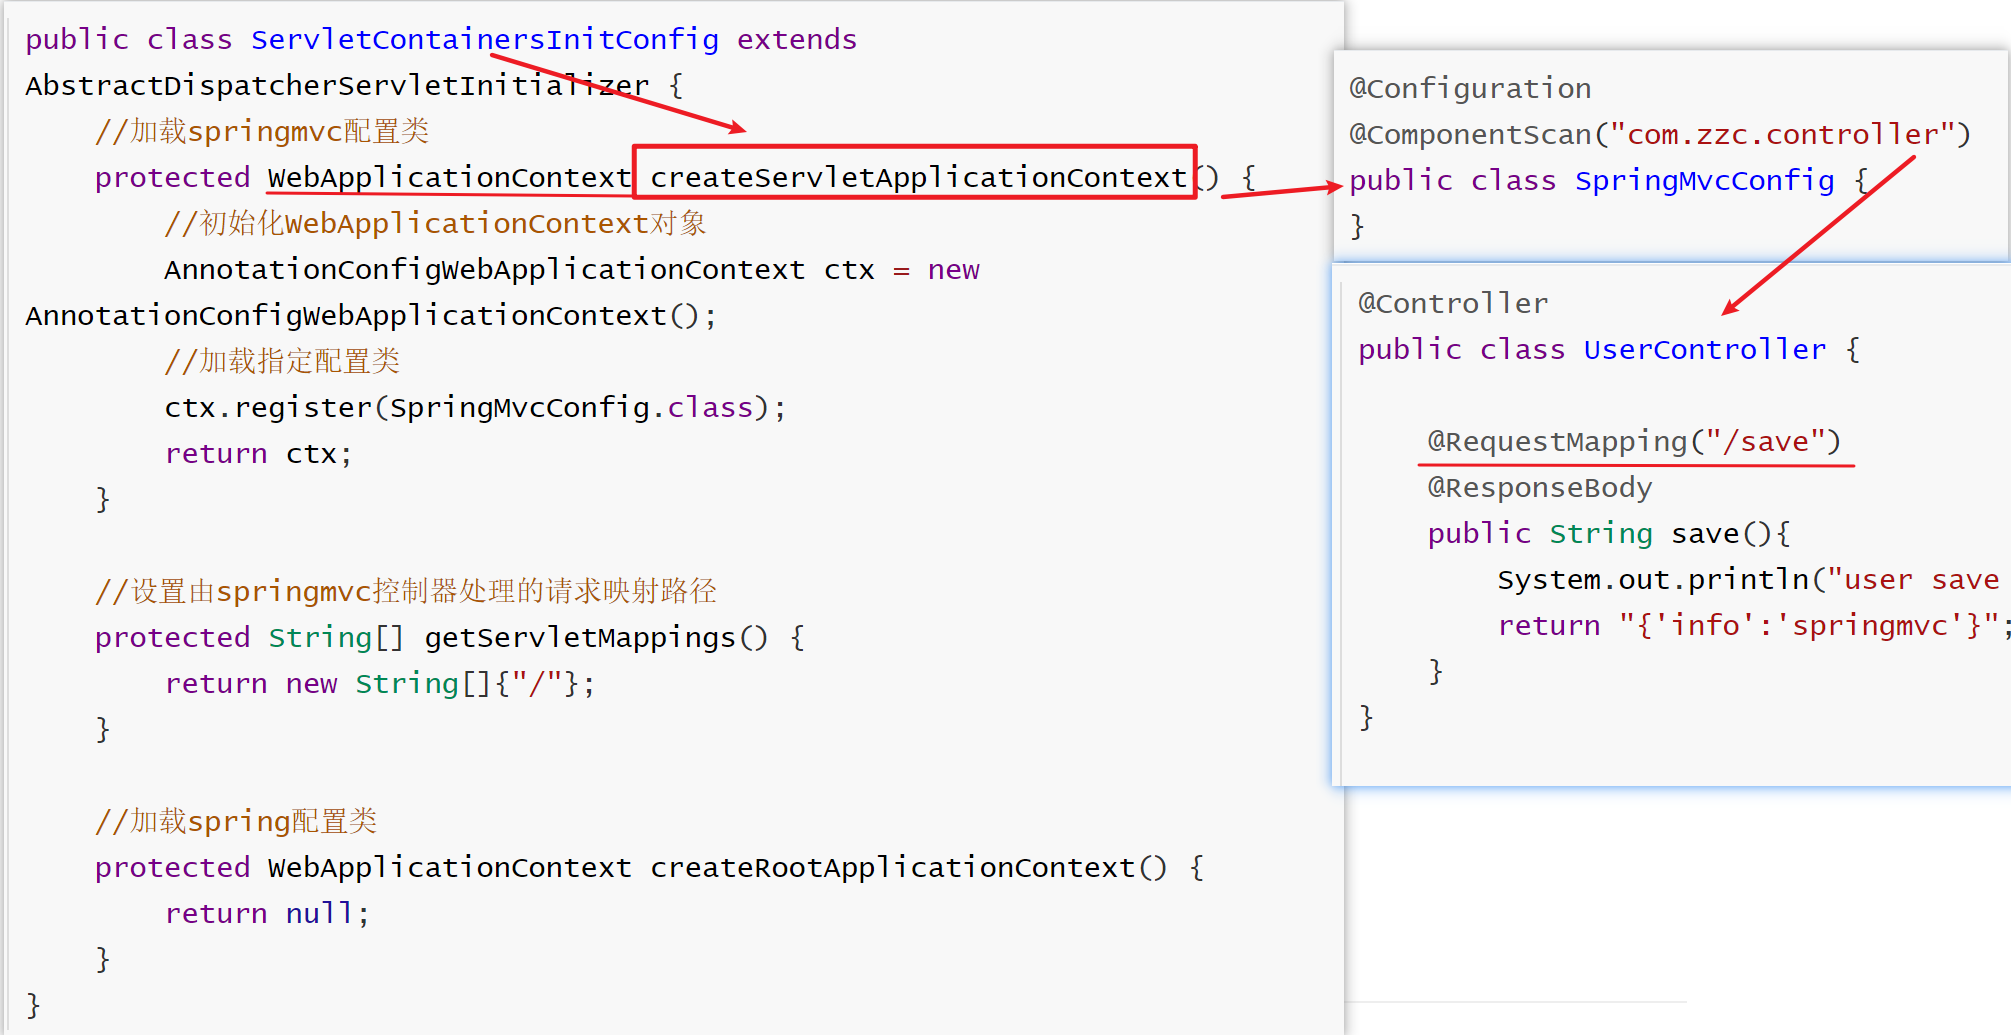
启动服务器初始化过程:
服务器启动,执行ServletContainersInitConfig类,初始化web容器
- 功能类似于以前的 web.xml
执行createServletApplicationContext方法,创建了WebApplicationContext对象
- 该方法加载SpringMVC的配置类SpringMvcConfig来初始化SpringMVC的容器
加载SpringMvcConfig配置类
执行@ComponentScan加载对应的bean
- 扫描指定包及其子包下所有类上的注解,如Controller类上的@Controller注解
加载UserController,每个@RequestMapping的名称对应一个具体的方法
- 此时就建立了
/save和 save方法的对应关系
- 此时就建立了
执行getServletMappings方法,设定SpringMVC拦截请求的路径规则
/代表所拦截请求的路径规则,只有被拦截后才能交给SpringMVC来处理请求
单次请求过程:
- 发送请求
http://localhost/save - web容器发现该请求满足SpringMVC拦截规则,将请求交给SpringMVC处理
- 解析请求路径/save
- 由/save匹配执行对应的方法save()
- 上面的第五步已经将请求路径和方法建立了对应关系,通过/save就能找到对应的save方法
- 执行save()
- 检测到有@ResponseBody直接将save()方法的返回值作为响应体返回给请求方
组件解析
前端控制器:DispatcherServlet
用户请求到达前端控制器,它就相当于 MVC 模式中的 C,DispatcherServlet 是整个流程控制的中心,由它调用其它组件处理用户的请求,DispatcherServlet 的存在降低了组件之间的耦合性。
处理器映射器:HandlerMapping HandlerMapping
负责根据用户请求 找到Handler,即处理器,SpringMVC 提供了不同的映射器实现不同的映射方式,例如:配置文件方式,实现接口方式,注解方式等。
处理器适配器:HandlerAdapter
通过 HandlerAdapter 对处理器进行执行,这是适配器模式的应用,通过扩展适配器可以对更多类型的处理 器进行执行。
处理器:Handler
它就是我们开发中要编写的具体业务控制器。由 DispatcherServlet 把用户请求转发到 Handler。由 Handler 对具体的用户请求进行处理。
视图解析器:View Resolver
View Resolver 负责将处理结果生成 View 视图,View Resolver 首先根据逻辑视图名解析成物理视图名,即 具体的页面地址,再生成 View 视图对象,最后对 View 进行渲染将处理结果通过页面展示给用户。
视图:View
SpringMVC 框架提供了很多的 View 视图类型的支持,包括:jstlView、freemarkerView、pdfView等。最 常用的视图就是 jsp。一般情况下需要通过页面标签或页面模版技术将模型数据通过页面展示给用户,需要由程 序员根据业务需求开发具体的页面
注解解析
@RequestMapping
作用:用于建立请求 URL 和处理请求方法之间的对应关系
位置:
- 类上,请求URL 的第一级访问目录。此处不写的话,就相当于应用的根目录
- 方法上,请求 URL 的第二级访问目录,与类上的使用@ReqquestMapping标注的一级目录一起组成访问虚拟路径
属性:
value:用于指定请求的URL。它和path属性的作用是一样的
method:用于指定请求的方式
params:用于指定限制请求参数的条件。它支持简单的表达式。要求请求参数的key和value必须和配置的一模一样 ;
例如:
params = {“accountName”},表示请求参数必须有
accountName params = {“moeny!100”},表示请求参数中money不能是10
1 |
|
@ComponentScan
类注解,位于类定义上方;
作用:设置spring配置类扫描路径,加载使用注解格式定义的bean
属性:
- excludeFilters —— 排除扫描路径中加载的bean,需要指定类别(type)和具体项(classes)
- includeFilters —— 加载指定的bean,需要指定类别(type)和具体项(classes)
XML的
MVC命名空间引入
命名空间:xmlns:context=”http://www.springframework.org/schema/context"
xmlns:mvc=”http://www.springframework.org/schema/mvc"
约束地址:http://www.springframework.org/schema/context
http://www.springframework.org/schema/context/spring-context.xsd
http://www.springframework.org/schema/mvc
http://www.springframework.org/schema/mvc/spring-mvc.xsd
组件扫描
SpringMVC基于Spring容器,所以在进行SpringMVC操作时,需要将Controller存储到Spring容器中,如果使用@Controller注解标注的话,就需要使用 <context:component-scan base-package=”com.zzc.controller”/> 进行组件扫描。
还可以指定扫描 某目录下指定的注解,如:
1 | <context:component-scan base-package="com.zzc.controller"> |
如果是不扫描 某目录下指定的注解,将 include-filter 改为 exclude-filter
视图解析器
SpringMVC有默认组件配置,默认组件都是DispatcherServlet.properties配置文件中配置的,该配置文件地址 org/springframework/web/servlet/DispatcherServlet.properties,该文件中配置了默认的视图解析器,如下:
1 | org.springframework.web.servlet.ViewResolver=org.springframework.web.servlet.view.InternalResourceViewResolver |
- redirect: 重定向前缀
- forward: 转发前缀(默认)
如:
1 |
|
可以修改视图解析器的前后缀:
1 | <bean id="viewResolver" class="org.springframework.web.servlet.view.InternalResourceViewResolver"> |
bean加载控制
设一个项目目录结构:com.zzc.
- config目录
- SpringConfig
- SpringMvcConfig
- JdbcConfig
- MybatisConfig
- controller目录:放SpringMVC的controller类
- service目录:service接口和实现类
- dao目录:dao/Mapper接口和实现类
以上类需要被容器管理成对象:
- SpringMVC加载其相关bean(表现层bean),也就是controller包下的类
- Spring控制的bean
- 业务bean(Service)
- 功能bean(DataSource,SqlSessionFactoryBean,MapperScannerConfigurer等)
所以需要区分各自的加载范围:
方式一:Spring加载的bean设定扫描范围为精准范围,例如service包、dao包等
1
2
3
4
public class SpringConfig {
}做开发的时候,Dao最终是交给
MapperScannerConfigurer对象来进行扫描处理的,所以SpringConfig只需要将其扫描到service包即可。方式二:Spring加载的bean设定扫描范围为com.zzc,排除掉controller包中的bean
1
2
3
4
5
6
7
8
9
public class SpringConfig {
}excludeFilters属性:设置扫描加载bean时,排除的过滤规则
type属性:设置排除规则,当前使用按照bean定义时的注解类型进行排除
- ANNOTATION:按照注解排除
- ASSIGNABLE_TYPE:按照指定的类型过滤
- ASPECTJ:按照Aspectj表达式排除,基本上不会用
- REGEX:按照正则表达式排除
- CUSTOM:按照自定义规则排除
一般只用到第一种ANNOTATION
classes属性:设置排除的具体注解类,当前设置排除@Controller定义的bean
方式三:不区分Spring与SpringMVC的环境,加载到同一个环境中[了解即可]
数据响应
SpringMVC的数据响应方式有两种:
- 页面跳转
- 直接返回字符串
- 通过ModelAndView对象返回
- 回写数据
- 直接返回字符串
- 返回对象或集合
页面跳转
直接返回字符串:此种方式会将返回的字符串与视图解析器的前后缀拼接后跳转;
通过ModelAndView对象返回;
1
2
3
4
5
6
7
8
9
10
11
12
13
14
15
16
17
18
19
20
21
22
23
24
25
26
27
28
29
30
31
32
33
34
35
36
37
38
39
40
41
public class UserController {
//直接返回字符串
public String save1(){
return "/success.jsp";
}
//通过ModelAndView对象
public ModelAndView save2(){
ModelAndView mav = new ModelAndView();
//设置模型数据
mav.addObject("username","zhangsan");
//设置视图名称
mav.setViewName("/success.jsp");
return mav;
}
//ModelAndView对象作为参数
public ModelAndView save3(ModelAndView mav){
//设置模型数据
mav.addObject("username","lisi");
//设置视图名称
mav.setViewName("/success.jsp");
return mav;
}
//模型和视图分离
public String save4(Model model){
model.addAttribute("username","wangwu");
return "success.jsp";
}
//也可以用request存储数据,不常用(request是框架直接注入的)
public String save5(HttpServletRequest request){
request.setAttribute("username","zz");
return "success.jsp";
}
}
回写数据
直接回写字符串,需要添加注解 @ResponseBody,以告知SpringMVC框架,这个方法返回的字符串不是跳转 而是直接在http响应体中返回。
1
2
3
4
5
public String save7(){
return "hello SpringMVC";
}开发中往往要将复杂的java对象转换成json格式的字符串, 可以使用json转换工具jackson进行转换,导入jackson坐标。
1
2
3
4
5
6
7
8
9
10
11
12
13
14
15
16
17
18<!--jackson-->
<dependency>
<groupId>com.fasterxml.jackson.core</groupId>
<artifactId>jackson-core</artifactId>
<version>2.9.0</version>
</dependency>
<dependency>
<groupId>com.fasterxml.jackson.core</groupId>
<artifactId>jackson-annotations</artifactId>
<version>2.9.0</version>
</dependency>
<!-- 可以只导下面这个依赖,会自动导入前两个 -->
<dependency>
<groupId>com.fasterxml.jackson.core</groupId>
<artifactId>jackson-databind</artifactId>
<version>2.9.0</version>
</dependency>相应的配置类:
1
2
3
4
5
6
7
8
9
10
11
12
13
14
15
16
17
18
19
20
21
22
23
24
25
26
27
28public class ServletContainersInitConfig extends AbstractAnnotationConfigDispatcherServletInitializer {
protected Class<?>[] getRootConfigClasses() {
return new Class[0];
}
protected Class<?>[] getServletConfigClasses() {
return new Class[]{SpringMvcConfig.class};
}
protected String[] getServletMappings() {
return new String[]{"/"};
}
//乱码处理
protected Filter[] getServletFilters() {
CharacterEncodingFilter filter = new CharacterEncodingFilter();
filter.setEncoding("UTF-8");
return new Filter[]{filter};
}
}
//开启json数据类型自动转换
public class SpringMvcConfig {
}代码:
实现返回对应对象的json数据,需要依赖==@ResponseBody==注解和==@EnableWebMvc==注解,然后数据直接返回,
1
2
3
4
5
6
7
8
public User save9() {
User user = new User();
user.setName("zhangsan");
user.setAge(18);
return user;
}
获得请求数据
资源放行
SpringMVC的前端控制器 DispatcherServlet的url-pattern配置的是”/“,代表对所有的资源都进行过滤操作,如果要放行某类资源,可以通过以下两种 方式指定放行静态资源:
注解方式:
让SpringMVC放行对应的静态资源
1
2
3
4
5
6
7
8
9
10
11
12
public class SpringMvcSupport extends WebMvcConfigurationSupport {
//设置静态资源访问过滤,当前类需要设置为配置类,并被扫描加载
protected void addResourceHandlers(ResourceHandlerRegistry registry) {
//当访问/pages/????时候,从/pages目录下查找内容
registry.addResourceHandler("/pages/**").addResourceLocations("/pages/");
registry.addResourceHandler("/js/**").addResourceLocations("/js/");
registry.addResourceHandler("/css/**").addResourceLocations("/css/");
registry.addResourceHandler("/plugins/**").addResourceLocations("/plugins/");
}
}该配置在config目录下,记得让SpringMVC扫描
1
2
3
4
5
public class SpringMvcConfig {
}xml方式,在spring-mvc.xml配置文件中指定放行的资源
1 | <!-- 当指定路径为"/js/**"时,就会到"/js/"下寻找 --> |
使用标签(交给tomcat自动寻找)
1
<mvc:default-servlet-handler/>
四种类型参数
客户端请求参数的格式是:name=value&name=value… …
服务器端要获得请求的参数,有时还需要进行数据的封装,SpringMVC可以接收如下类型的参数:
- 基本类型参数
1 | http://localhost:8080/quick10?username=zhangsan&age=12 |
1 |
|
POJO类型参数
1
http://localhost:8080/quick11?username=zhangsan&age=12
1
2
3
4
5
public void save11(User user) {
System.out.println(user);
}数组类型参数
1
http://localhost:8080/quick12?strs=aaa&strs=xxx
1
2
3
4
5
public void save12(String[] strs) {
System.out.println(Arrays.toString(strs));
}集合类型参数
1
http://localhost:8080/quick12?likes=aaa&likes=xxx
1
2
3
4
5
6//只需在形参前面加上@RequsetParam,而url与传递数组参数的一样。
public void save12( List<String> likes) {
System.out.println(likes);
}或者(以前的)另一种方式,需要先将参数包装到一个POJO中才可以
1
2
3
4
5
6
7<form action="${pageContext.request.contextPath}/quick13" method="post">
<input type="text" name="userList[0].username"><br>
<input type="text" name="userList[0].age"><br>
<input type="text" name="userList[1].username"><br>
<input type="text" name="userList[1].age"><br>
<input type="submit" value="提交"><br>
</form>1
2
3
4
5
6//参数Vo是View Object的意思,里面有一个list
public void save13(Vo vo) throws IOException {
System.out.println(vo.getUserList());
}
当使用ajax提交时,可以指定contentType为 json形式,那么在方法参数位置使用 **@RequestBody **可以 直接接收集合数据而无需使用POJO进行包装。
1
2
3
4
5
6
7
8
9
10
11
12<script>
//模拟数据
var userList = new Array();
userList.push({username: "zhangsan",age: "20"});
userList.push({username: "lisi",age: "20"});
$.ajax({
type: "POST",
url: "/quick14",
data: JSON.stringify(userList),
contentType : 'application/json;charset=utf-8'
});
</script>1
2
3
4
5
public void quickMethod13( List<User> userList) throws IOException {
System.out.println(userList);
}
@RequestBody处的参数类型,要根据前端传的数据来定。
如果前端传了 { aa:bb, cc:dd}, 就需要定义一个包含有aa,cc两个属性的数据类型,来进行接收。
请求数据乱码问题
当post请求时,数据会出现乱码,
注解方式:
在配置类中重写getServletFilters()方法
1 | public class ServletContainersInitConfig extends AbstractAnnotationConfigDispatcherServletInitializer { |
xml方式:
在web.xml 中设置一个过滤器来进行编码的过滤。
1 | <filter> |
参数绑定注解@requestParam
当请求的参数名称与Controller的业务方法参数名称不一致时,就需要通过**@RequestParam**注解显示的绑定。
(这样前端发送的参数的名字 只需和@RequestParam中的value值相同,
不用和后端定义的参数名字一样了)
1 | <form action="${pageContext.request.contextPath}/quick14" method="post"> |
1 |
|
@RequestParam的属性:
- value:请求参数名称
- required:此在指定的请求参数是否必须包括,默认是true,提交时如果没有此参数则报错
- defaultValue:当没有指定请求参数时,则使用指定的默认值赋值
JSON数据传输参数
现在比较流行的开发方式为异步调用。前后台以异步方式进行交换,传输的数据使用的是JSON;
对于JSON数据类型,我们常见的有三种:
- json普通数组([“value1”,”value2”,”value3”,…])
- json对象({key1:value1,key2:value2,…})
- json对象数组([{key1:value1,…},{key2:value2,…}])
使用:
首先要添加依赖
1
2
3
4
5<dependency>
<groupId>com.fasterxml.jackson.core</groupId>
<artifactId>jackson-databind</artifactId>
<version>2.9.0</version>
</dependency>开启SpringMVC注解支持: @EnableWebMvc
1
2
3
4
5
6
//开启json数据类型自动转换
public class SpringMvcConfig {
}参数前添加 @RequestBody
普通数组:
1
2//前端数据发送
["value1","value2","value3",...]1
2
3
4
5
6
7
8//后端数据接收
//使用@RequestBody注解将外部传递的json数组数据映射到形参的集合对象中作为数据
public String listParamForJson( List<String> likes){
System.out.println("list common(json)参数传递 list ==> "+likes);
return "{'module':'list common for json param'}";
}对象:
1
2
3
4
5
6
7
8
9//User类中有name,age,address(province,city)三个成员参数
{
"name":"itcast",
"age":15,
"address":{
"province":"beijing",
"city":"beijing"
}
}1
2
3
4
5
6
public String pojoParamForJson( User user){
System.out.println("pojo(json)参数传递 user ==> "+user);
return "{'module':'pojo for json param'}";
}对象数组:
1
2
3
4[
{"name":"itcast","age":15},
{"name":"zzc","age":12}
]1
2
3
4
5
6
public String listPojoParamForJson( List<User> list){
System.out.println("list pojo(json)参数传递 list ==> "+list);
return "{'module':'list pojo for json param'}";
}
@RequestBody与@RequestParam:
区别
- @RequestParam用于接收url地址传参,表单传参【application/x-www-form-urlencoded】
- @RequestBody用于接收json数据【application/json】
应用
- 后期开发中,发送json格式数据为主,@RequestBody应用较广
- 如果发送非json格式数据,选用@RequestParam接收请求参数
Restful风格的参数
REST —— Representational State Transfer,表现形式状态转换,即约定了 访问网络资源的格式。
(根据REST风格对资源进行访问称为RESTful)
Restful是一种软件架构风格、设计风格,而不是标准,只是提供了一组设计原则和约束条件。主要用于客户端和服务器交互类的软件,基于这个风格设计的软件可以更简洁,更有层次,更易于实现缓存机制等。
Restful风格的请求是使用“url+请求方式”表示一次请求目的的,HTTP 协议里面四个表示操作方式的动词如下:
- GET:用于获取资源
- POST:用于新增/保存资源
- PUT:用于修改/更新资源
- DELETE:用于删除资源
例如:
/users/1 GET : 得到 id = 1 的 user
/users/1 DELETE: 删除 id = 1 的 user
/users/1 PUT: 更新 id = 1 的 user
/users POST: 新增 user
可以看到,url可以是相同的,而执行的行为根据请求方式的不同进行区分,不仅简洁,更是隐藏了 资源的访问行为,无法通过地址得知对资源是何种操作。
注:
描述模块的名称通常使用复数,表示此类资源,而非单个资源,如:users
原理:
spring-mvc默认不支持rest(只能处理get、post请求)。需要配置HiddenHttpMethodFilter以支持Rest,HiddenHttpMethodFilter原理是把HttpServletRequest包装成HttpServletRequestWrapper,重写(override)其getMethod()方法。
在业务方法中我们可以使用**@PathVariable**注解进行占位符的匹配获取工作,在@RequestMapping中设置method以限定请求方式。
1 | http://localhost:8080/quick20/zhangsan&12 |
1 | //使用@PathVariable占位,method = RequestMethod.GET限定只能为get请求; |
关于接收参数,有三个注解@RequestBody、@RequestParam、@PathVariable
- 区别
- @RequestParam用于接收url地址传参或表单传参
- @RequestBody用于接收json数据
- @PathVariable用于接收路径参数,使用{参数名称}描述路径参数
- 应用
- 后期开发中,发送请求参数超过1个时,以json格式为主,@RequestBody应用较广
- 如果发送非json格式数据,选用@RequestParam接收请求参数
- 采用RESTful进行开发,当参数数量较少时,例如1个,可以采用@PathVariable接收请求路径变量,通常用于传递id值
自定义类型转换器
SpringMVC 默认已经提供了一些常用的类型转换器,但有一些类型没有提供转换器的就需要自定义,例如:日期类型的数据就需要自定义转换器。
注解方式:日期类型有一个专门的用于转换日期格式的注解 @DateTimeFormat
1 | http://localhost/dataParam?date=2088/08/08&date1=2088-08-08&date2=2088/08/08 8:08:08 |
1 |
|
XML方式:
自定义类型转换器的开发步骤:
- 定义转换器类实现Converter接口
- 在配置文件中声明转换器
- 在< annotation-driven>中引用转换器
1 | public class DateConverter implements Converter<String,Date> { |
在spring-mvc.xml中声明
1 | <bean id="converterService" |
1 | <mvc:annotation-driven conversion-service="converterService"/> |
上传文件
客户端要求:
- 表单项 type=”file“
- 提交方式 method=”post”
- 表单的 enctype属性是多部分表单形式,即 enctype=”multipart/form-data”
1 | <form action="${pageContext.request.contextPath}/quick20" method="post" enctype="multipart/form-data"> |
服务端:
导入fileupload和io坐标
1
2
3
4
5
6
7
8
9
10<dependency>
<groupId>commons-fileupload</groupId>
<artifactId>commons-fileupload</artifactId>
<version>1.2.2</version>
</dependency>
<dependency>
<groupId>commons-io</groupId>
<artifactId>commons-io</artifactId>
<version>2.4</version>
</dependency>配置文件上传解析器
在spring-mvc.xml中配置:
1
2
3
4
5
6
7
8
9<bean id="multipartResolver"
class="org.springframework.web.multipart.commons.CommonsMultipartResolver">
<!--上传文件总大小-->
<property name="maxUploadSize" value="5242800"/>
<!--上传单个文件的大小-->
<property name="maxUploadSizePerFile" value="5242800"/>
<!--上传文件的编码类型-->
<property name="defaultEncoding" value="UTF-8"/>
</bean>编写文件上传代码
单文件:
1
2
3
4
5
6
7
8
public void quickMethod20(String name,MultipartFile uploadFile) throws IOException {
//获得文件名称
String originalFilename = uploadFile.getOriginalFilename();
//保存文件
uploadFile.transferTo(new File("C:\\upload\\"+originalFilename));
}多文件(客户端表单 添加多个文件上传按钮)
1
2
3
4
5
6
7
8
public void quickMethod21(String name,MultipartFile[] uploadFiles) throws IOException {
for (MultipartFile uploadFile : uploadFiles){
String originalFilename = uploadFile.getOriginalFilename();
uploadFile.transferTo(new File("C:\\upload\\"+originalFilename));
}
}
拦截器interceptor
Spring MVC 的拦截器类似于 Servlet 开发中的过滤器 Filter,用于对处理器进行预处理和后处理。
拦截器也是AOP思想的具体实现。
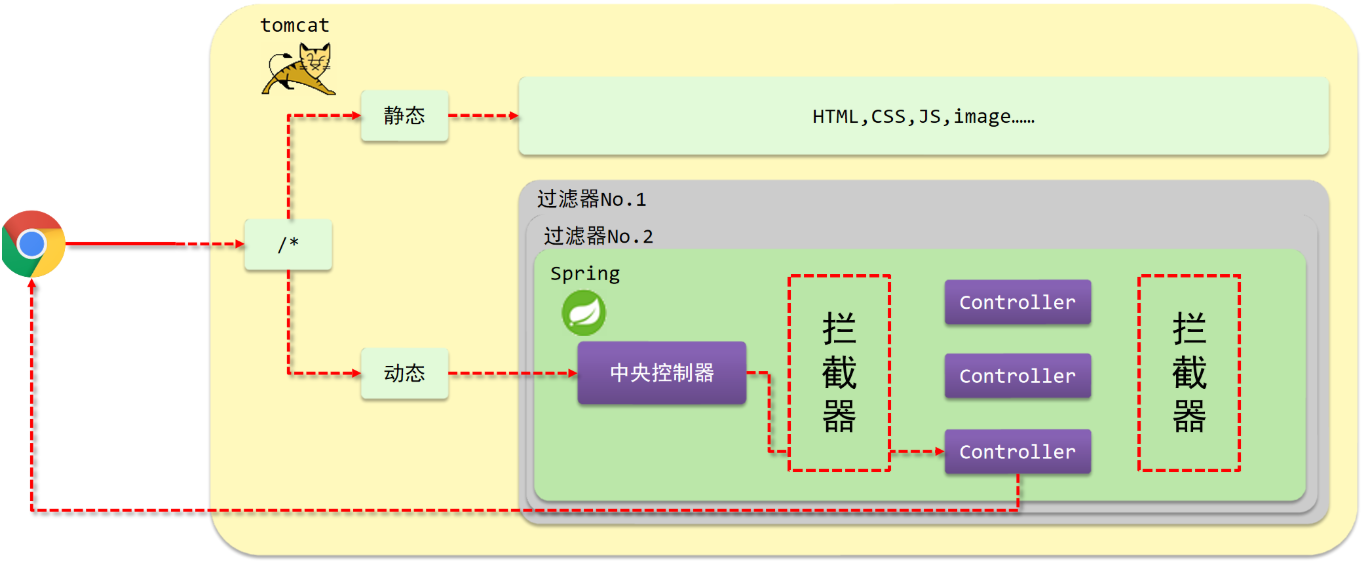
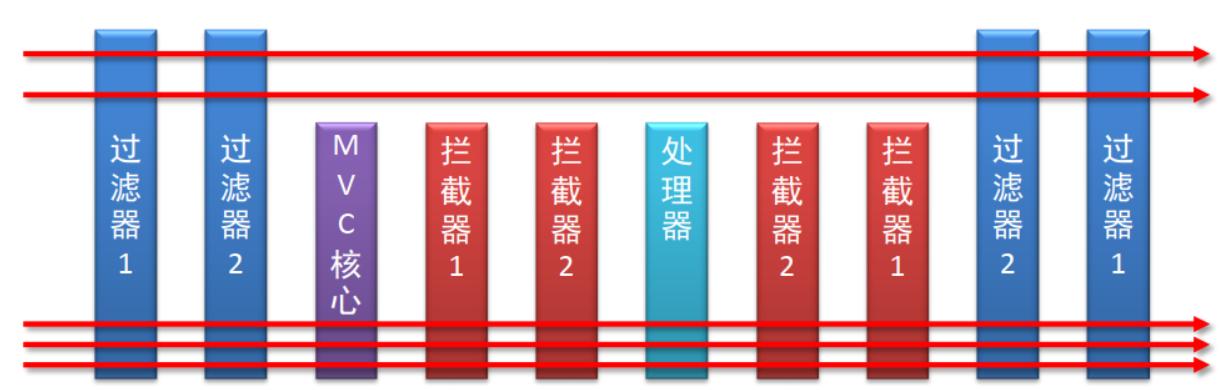
| 区别 | 过滤器(Filter) | 拦截器(interceptor) |
|---|---|---|
| 使用范围 | 是 servlet 规范中的一部分,任何 Java Web 工程都可以使用 | 只有使用了 SpringMVC 框架的工程才能用 |
| 拦截范围 | 在 url-pattern 中配置了 /* 之后, 可以对所有要访问的资源拦截 |
在<mvc:mapping path=“”/>中配置了 /** 之 后,可以对所有资源进行拦截,但是可以通过<mvc:exclude-mapping path=“”/>标签排除不需要拦截的资源 |
方法:
| 方法名 | 说明 |
|---|---|
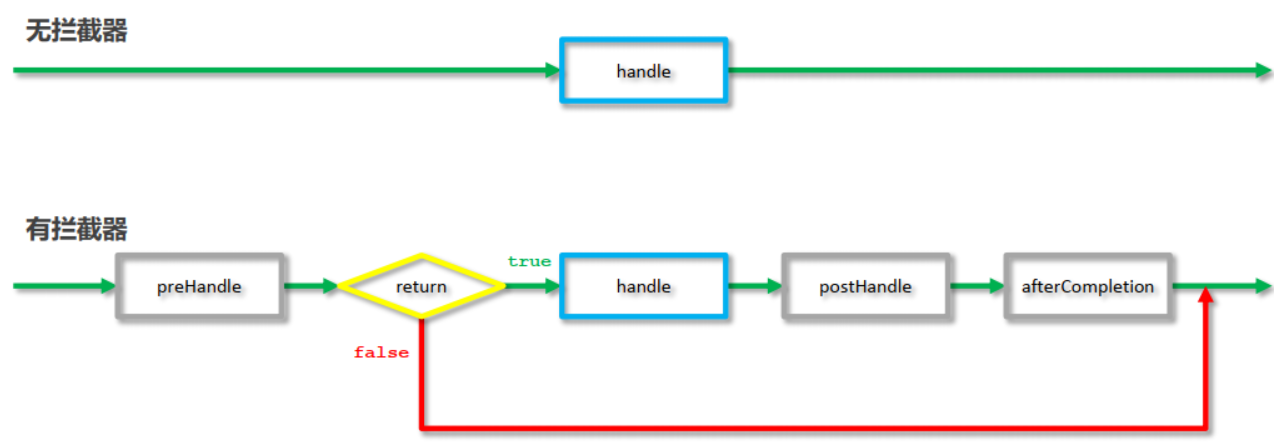
| preHandle() | 方法将在请求处理之前进行调用,该方法的返回值是布尔值Boolean类型的, 当它返回为false 时,表示请求结束,后续的Interceptor 和Controller 都不会 再执行;当返回值为true 时就会继续调用下一个Interceptor 的preHandle 方 法 |
| postHandle() | 该方法是在当前请求进行处理之后被调用,前提是preHandle 方法的返回值为 true 时才能被调用,且它会在DispatcherServlet 进行视图返回渲染之前被调 用,所以我们可以在这个方法中对Controller 处理之后的ModelAndView 对象 进行操作 |
| afterComplrtion() | 该方法将在整个请求结束之后,也就是在DispatcherServlet 渲染了对应的视图 之后执行,前提是preHandle 方法的返回值为true 时才能被调用 |
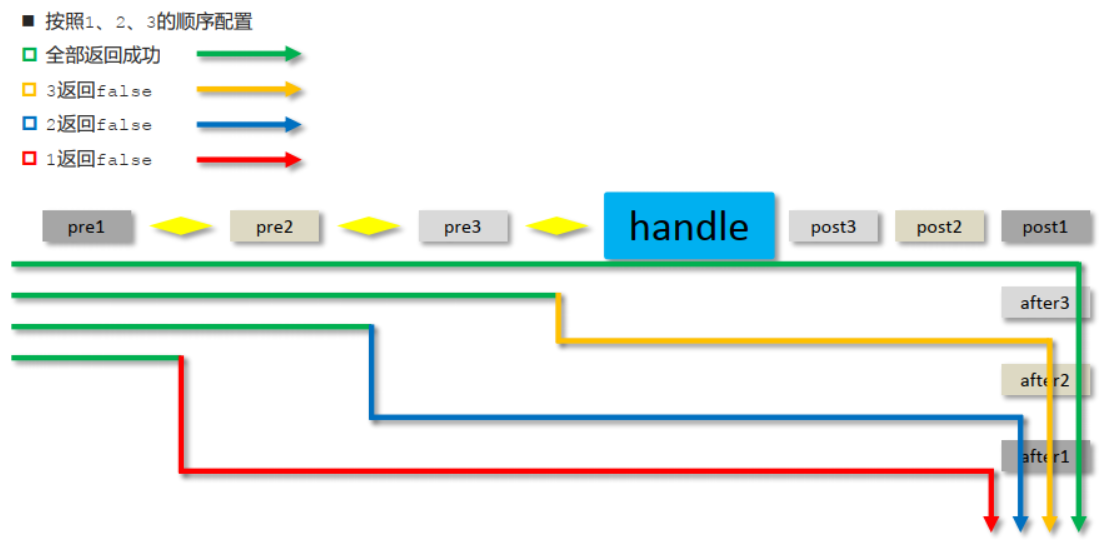
将拦截器按一定的顺序联结成一条链,这条链称为拦截器链(Interceptor Chain)。在访问被拦截的方 法或字段时,拦截器链中的拦截器就会按其之前定义的顺序被调用。
使用:
创建拦截器类,实现HandlerInterceptor接口
(**注意:**拦截器类要被SpringMVC容器扫描到。)
1
2
3
4
5
6
7
8
9
10
11
12
13
14
15
16
public class ProjectInterceptor implements HandlerInterceptor {
//拦截前运行
public boolean preHandle(HttpServletRequest request, HttpServletResponse response, Object handler) {
System.out.println("preHandle running...");//拦截逻辑
return true; // true放行,false不放行
}
//拦截后运行
public void postHandle(HttpServletRequest request, HttpServletResponse response, Object handler, ModelAndView modelAndView) {
System.out.println("postHandle running...");
}
//在整个请求结束之后运行
public void afterCompletion(HttpServletRequest request, HttpServletResponse response, Object handler, Exception ex) {
System.out.println("afterCompletion running...");
}
}XML配置拦截器
1
2
3
4
5
6
7<!--配置拦截器-->
<mvc:interceptors>
<mvc:interceptor>
<mvc:mapping path="/**"/>
<bean class="com.zzc.interceptor.MyHandlerInterceptor1"/>
</mvc:interceptor>
</mvc:interceptors>配置拦截器类
(注意: SpringMvcSupport类要被SpringMVC容器扫描到。)
1
2
3
4
5
6
7
8
9
10
11
12
13
14
15
16
17
18
19
public class SpringMvcSupport extends WebMvcConfigurationSupport {
//需要拦截器类,spring容器注入
private ProjectInterceptor projectInterceptor;
//放行/配置 前端页面
protected void addResourceHandlers(ResourceHandlerRegistry registry) {
registry.addResourceHandler("/pages/**").addResourceLocations("/pages/");
}
//放行/配置拦截器
protected void addInterceptors(InterceptorRegistry registry) {
//配置拦截器
registry.addInterceptor(projectInterceptor).addPathPatterns("/books,"/books/*"" );
}
}SpringMvcSupport的内容也可以写在 SpringMVC配置类SpringMvcConfig中,只要实现 WebMvcConfigurer 接口并重写相同的方法即可。 但这样侵入性较强,SpringMvcConfig与容器有绑定。
测试拦截器的拦截效果
异常处理
处理思路:
系统中异常包括两类:预期异常和运行时异常RuntimeException,前者通过捕获异常从而获取异常信息,后者主要通过规范代码开发、测试等手段减少运行时异常的发生。
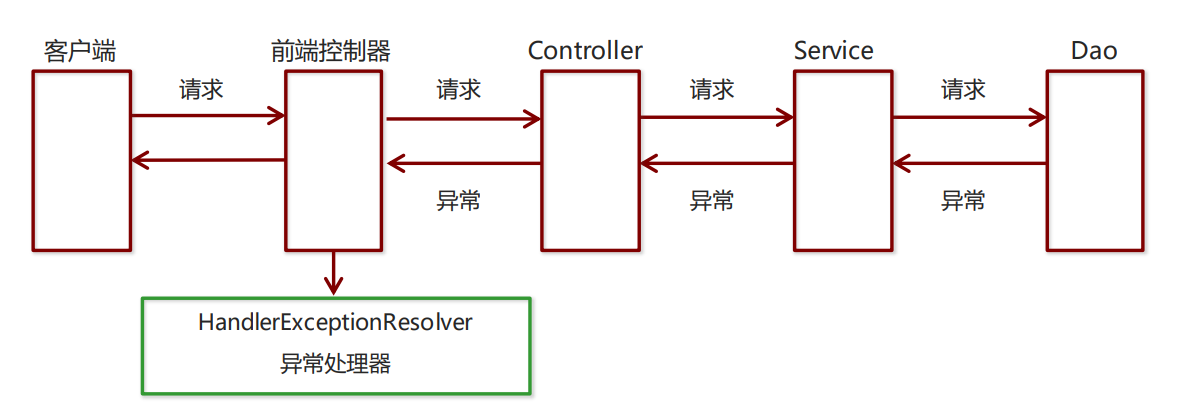
系统的Dao、Service、Controller出现异常都通过throws Exception向上抛出,最后由SpringMVC前端控制器交由异常处理器进行异常处理,如下图:
注解方式:
例子详情见 SSM整合-统一异常处理
具体会使用到 @ControllerAdvice + @ExceptionHandler 这两个注解 。
1 |
|
这种异常处理方式下,会给所有或者指定的 Controller 织入异常处理的逻辑(AOP),当 Controller 中的方法抛出异常的时候,由被@ExceptionHandler 注解修饰的方法进行处理。
XML方式:
两种处理方式:
使用 Spring MVC 提供的简单异常处理器SimpleMappingExceptionResolver
1
2
3
4
5
6
7
8
9
10<bean class=“org.springframework.web.servlet.handler.SimpleMappingExceptionResolver”>
<property name=“defaultErrorView” value=“error”/> <!-- 未知异常,则跳默认错误视图 -->
<property name=“exceptionMappings”>
<map>
<!-- key值为异常类型, value值为错误视图 -->
<entry key="com.zzc.exception.MyException" value="error"/>
<entry key="java.lang.ClassCastException" value="error"/>
</map>
</property>
</bean>实现Spring的异常处理接口HandlerExceptionResolver 自定义自己的异常处理器。
创建异常处理器类实现HandlerExceptionResolver
1
2
3
4
5
6
7
8
9
10
11
12
13
14
15
16public class MyExceptionResolver implements HandlerExceptionResolver {
public ModelAndView resolveException(HttpServletRequest request, HttpServletResponse response, Object handler, Exception ex) {
//创建ModelAndView对象
ModelAndView modelAndView = new ModelAndView();
//处理异常的代码实现
if(e instanceof MyException){
...
}else if(e instanceof ClassCastException){
...
}
//添加异常时显示的视图
modelAndView.setViewName("exceptionPage");
return modelAndView;
}
}配置异常处理器
1
2<bean id="exceptionResolver"
class="com.zzc.exception.MyExceptionResolver"/>编写异常页面
测试异常跳转
MyBatis
MyBatis是一款优秀的持久层框架,用于简化 JDBC开发。
JavaEE三层框架(MVC):
- 表现层:页面展示
- 业务层:逻辑处理
- 持久层:数据持久化(将数据保存到数据库)
框架:相当于一个半成品软件,是一套可重用的,通用的、软件基础代码模型。
在框架的基础之上构建软件编写更加高效、规范、通用、可扩展。
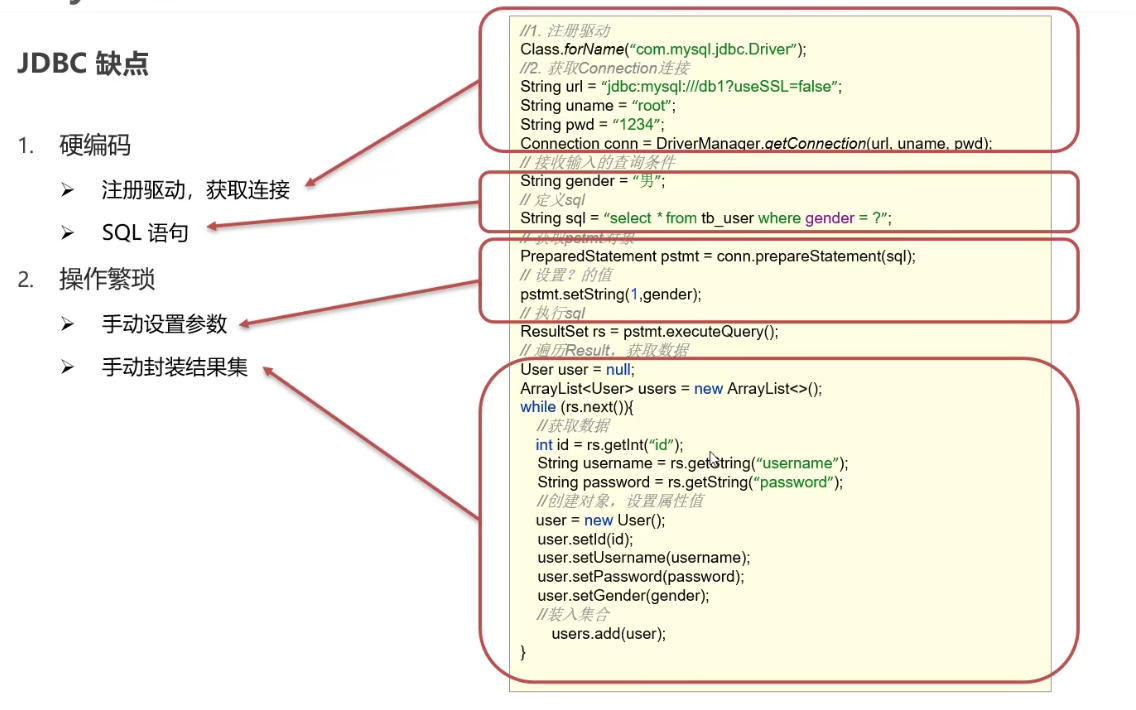
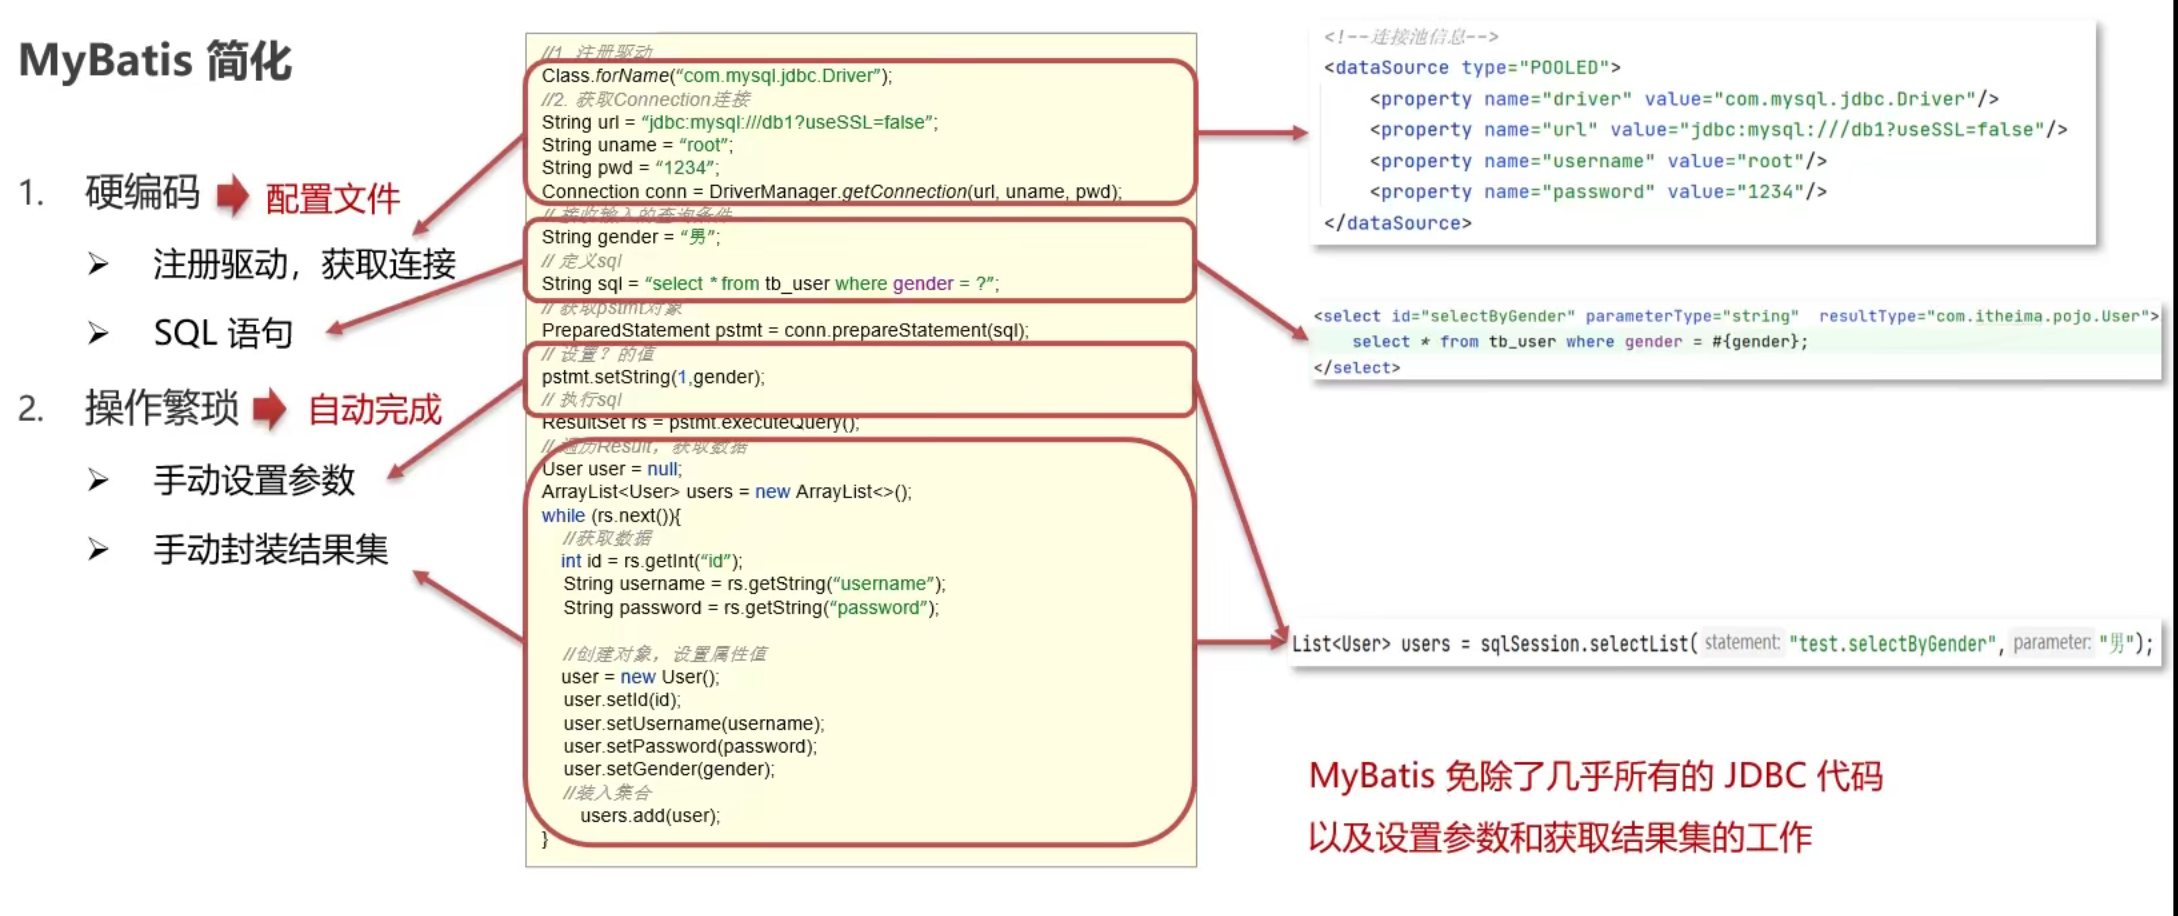
开发步骤
- 添加MyBatis的坐标
1 | <!--mybatis坐标--> |
其他坐标:
1 | <!--单元测试坐标--> |
创建user数据表
user(id, username, password)
编写User实体类
1
2
3
4
5
6public class User {
private int id;
private String username;
private String password;
//省略get和set方法
}编写映射文件UserMapper.xml
1
2
3
4
5
6
7
8
9
10
11
12
13
14
15
16
17
18
19
20
21
22
<mapper namespace="userMapper">
<!-- 多条sql语句 -->
<select id="findAll" resultType="com.zzc.domain.User">
select * from User
</select>
<insert id="add" parameterType="com.zzc.domain.User">
insert into user values(#{id},#{username},#{password})
</insert>
<update id="update" parameterType="com.zzc.domain.User">
update user set username=#{username},password=#{password} where id=#{id}
</update>
<delete id="delete" parameterType="java.lang.Integer">
delete from user where id=#{id}
</delete>
</mapper>编写核心文件SqlMapConfig.xml
1
2
3
4
5
6
7
8
9
10
11
12
13
14
15
16
17
18
19
20
<configuration>
<environments default="development">
<environment id="development">
<transactionManager type="JDBC"/>
<dataSource type="POOLED">
<property name="driver" value="com.mysql.jdbc.Driver"/>
<property name="url" value="jdbc:mysql://localhost:3306/test"/>
<property name="username" value="root"/>
<property name="password" value="zzc"/>
</dataSource>
</environment>
</environments>
<mappers>
<mapper resource="com.zzc.mapper/UserMapper.xml"/>
</mappers>
</configuration>注:
- 普通mapper.xml中的路径以 . 分隔( . 之后会有选项路径出现)
- 核心配置文件SqlMapConfig.xml , 选择映射文件路径时,则要看文件的来自源根的路径——右键,复制路径可以kan’dao
编写测试类 (可以使用spring进行优化)
1
2
3
4
5
6
7
8
9
10
11
12
13
14
15
16
17
18
19
20
21
22
23
24
25//加载核心配置文件
InputStream resourceAsStream = Resources.getResourceAsStream("SqlMapConfig.xml");
//获得sqlSession工厂对象
SqlSessionFactory sqlSessionFactory = new SqlSessionFactoryBuilder().build(resourceAsStream);
//获得sqlSession对象
SqlSession sqlSession = sqlSessionFactory.openSession();
//执行sql查询语句
List<User> userList = sqlSession.selectList("userMapper.findAll");
//打印结果
System.out.println(userList);
//sql插入语句
User user = new User(6, "zzc", "1234");
sqlSession.insert("userMapper.add", user);
sqlSession.commit();
//sql修改语句
User user = new User(1, "zzl", "1");
sqlSession.update("userMapper.update", user);
sqlSession.commit();
//sql删除语句
sqlSession.update("userMapper.delete",6);
sqlSession.commit();
//释放资源
sqlSession.close();
配置文件
映射文件
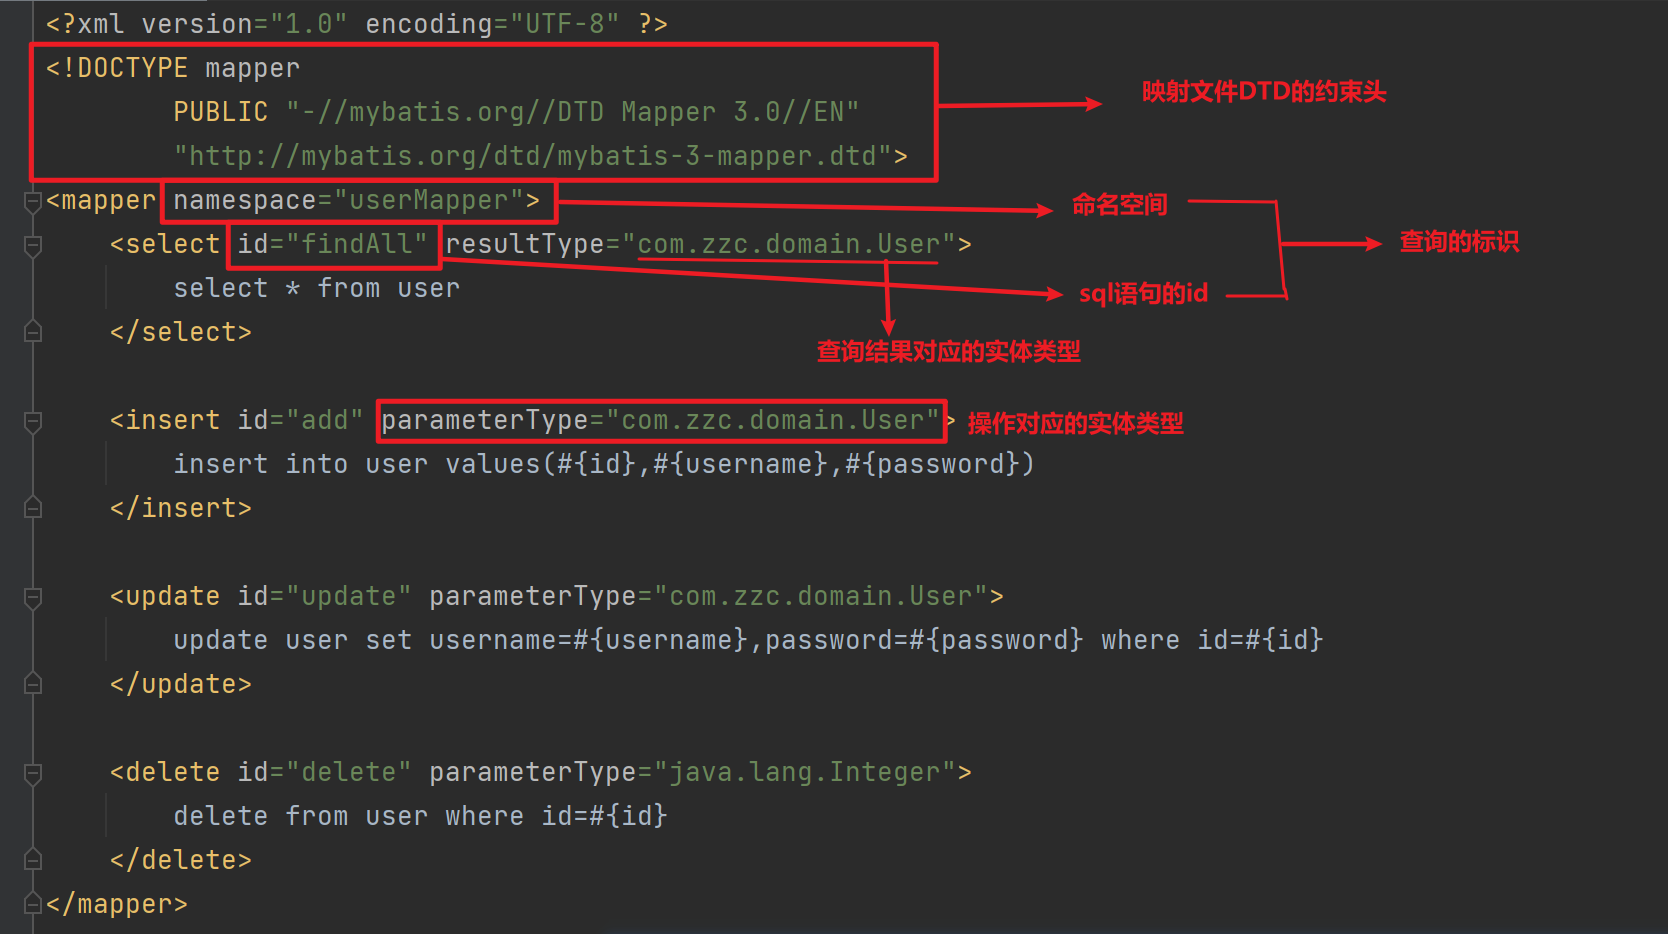
sql动态语句:
<if>
select * from user where id=? or username=? or password=? 相当于:
1
2
3
4
5
6
7
8
9
10
11
12select * from user
<where>
<if test="id!=0">
and id=#{id}
</if>
<if test="username!=null">
and username=#{username}
</if>
<if test="password">
and password=#{password}
</if>
</where><foreach>
select * from user where id in(?,?,?……) 相当于:
1
2
3
4
5
6
7
8
9
10
11
12<select id="findByIds" parameterType="list" resultType="user">
select * from User
<where>
<foreach collection="array"
open="id in("
close=")"
item="id"
separator=",">
#{id}
</foreach>
</where>
</select>标签用于遍历集合,它的属性:
- collection:代表要遍历的集合元素,注意编写时不要写#{}
- 传入为数组,值写“array”,列表,值写“list”,map,值写“_parameter”。
- open:代表语句的开始部分
- close:代表结束部分
- item:代表遍历集合的每个元素,生成的变量名
- index:索引属性名,当遍历数组列表时是当前索引值,遍历Map时为键值key。
- sperator:代表分隔符
(其中collection属性,根据传进来的数据,数组——array,集合——list 。。。)
- collection:代表要遍历的集合元素,注意编写时不要写#{}
<choose><when><otherwise>
相当于swith…case…default。
1
2
3
4
5
6
7
8
9
10
11
12
13
14<select id="findUser">
select * from User where 1=1
<choose>
<when test=" age != null ">
and age > #{age}
</when>
<when test=" name != null ">
and name like concat(#{name},'%')
</when>
<otherwise>
and sex = '男'
</otherwise>
</choose>
</select><where>
<where>只在子元素有返回内容时才会插入WHERE语句,常用于配合 if 标签。另外,可以只能去除子元素首个满足条件语句开头的 and 和 or。
1
2
3
4
5
6
7
8
9
10
11<select id="findUser">
select * from User
<where>
<if test=" age != null ">
and age > #{age}
</if>
<if test=" name != null ">
and name like concat(#{name},'%')
</if>
</where>
</select><set>
set标签会自动去除末尾无用的逗号,且set标签中至少得有一个条件成立,否则会报错。
update user
set age = #{age},
username = #{username},
password = #{password}
where id =#{id}1
2
3
4
5
6
7
8
9
10
11
12
13
14
15<update id="updateUser">
update user
<set>
<if test="age !=null">
age = #{age},
</if>
<if test="username !=null">
username = #{username},
</if>
<if test="password !=null">
password = #{password},
</if>
</set>
where id =#{id}
</update><bind>
bind标签可以创建一个变量,并绑定到上下文,即供上下文使用。
以下例子是利用bind构建模糊查询的语句拼接。
1
2
3
4
5<select id="selecUser">
<bind name="myName" value="'%' + _parameter.getName() + '%'" />
SELECT * FROM user
WHERE name LIKE #{myName}
</select><sql>和<include> :sql语句复用
sql标签用于定义要复用的片段,include用于使用这些片段。
简单复用
1
2
3
4<!-- 可复用的字段语句块 -->
<sql id="userColumns">
id,username,password
</sql>1
2
3
4
5
6
7
8
9
10
11
12
13
14
15<!-- 查询时简单复用 -->
<select id="selectUsers" resultType="map">
select
<include refid="userColumns"></include>
from user
</select>
<!-- 插入时简单复用 -->
<insert id="insertUser" resultType="map">
insert into user(
<include refid="userColumns"></include>
)values(
#{id},#{username},#{password}
)
</insert>支持属性传递
1
2
3
4<!-- 可复用的字段语句块 -->
<sql id="userColumns">
${pojo}.id,${pojo}.username
</sql>1
2
3
4
5
6
7
8
9
10
11<!-- 查询时复用 -->
<select id="selectUsers" resultType="map">
select
<include refid="userColumns">
<property name="pojo" value="u1"/>
</include>,
<include refid="userColumns">
<property name="pojo" value="u2"/>
</include>
from user u1 cross join user u2
</select>可以嵌套,属性可以穿透传递
1
2
3
4
5
6
7
8
9
10
11
12
13
14
15
16
17
18
19
20<!-- 简单语句块 -->
<sql id="sql1">
${prefix}_user
</sql>
<!-- 嵌套语句块 -->
<sql id="sql2">
from
<include refid="${include_target}"/>
</sql>
<!-- 查询时引用嵌套语句块 -->
<select id="select" resultType="map">
select
id, username
<include refid="sql2">
<property name="prefix" value="t"/>
<property name="include_target" value="sql1"/>
</include>
</select>
sql片段抽取:
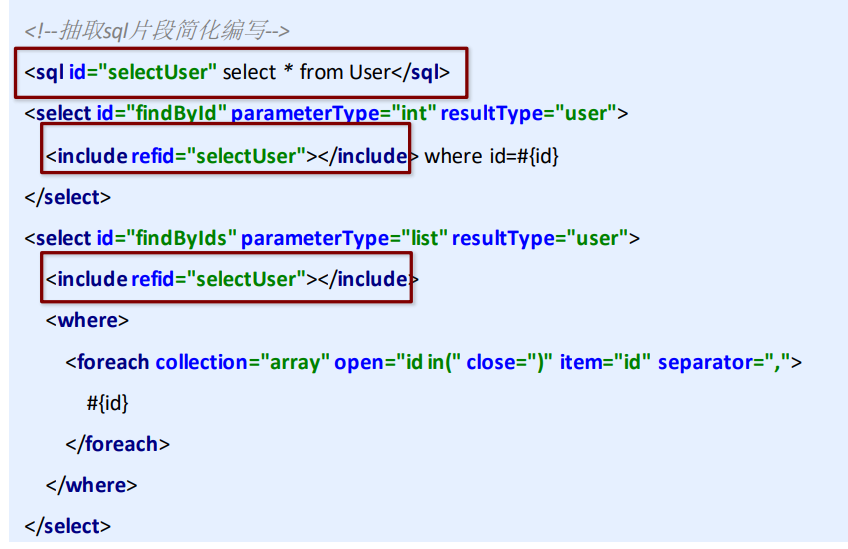
核心配置文件
层级关系:
configuration配置properties属性settings设置typeHandleres类型处理器objectFactory对象工厂plugins插件environments环境environment环境变量transactionManager事务管理器dataSource数据源
databaseldProvider数据库厂商标识mappers映射器
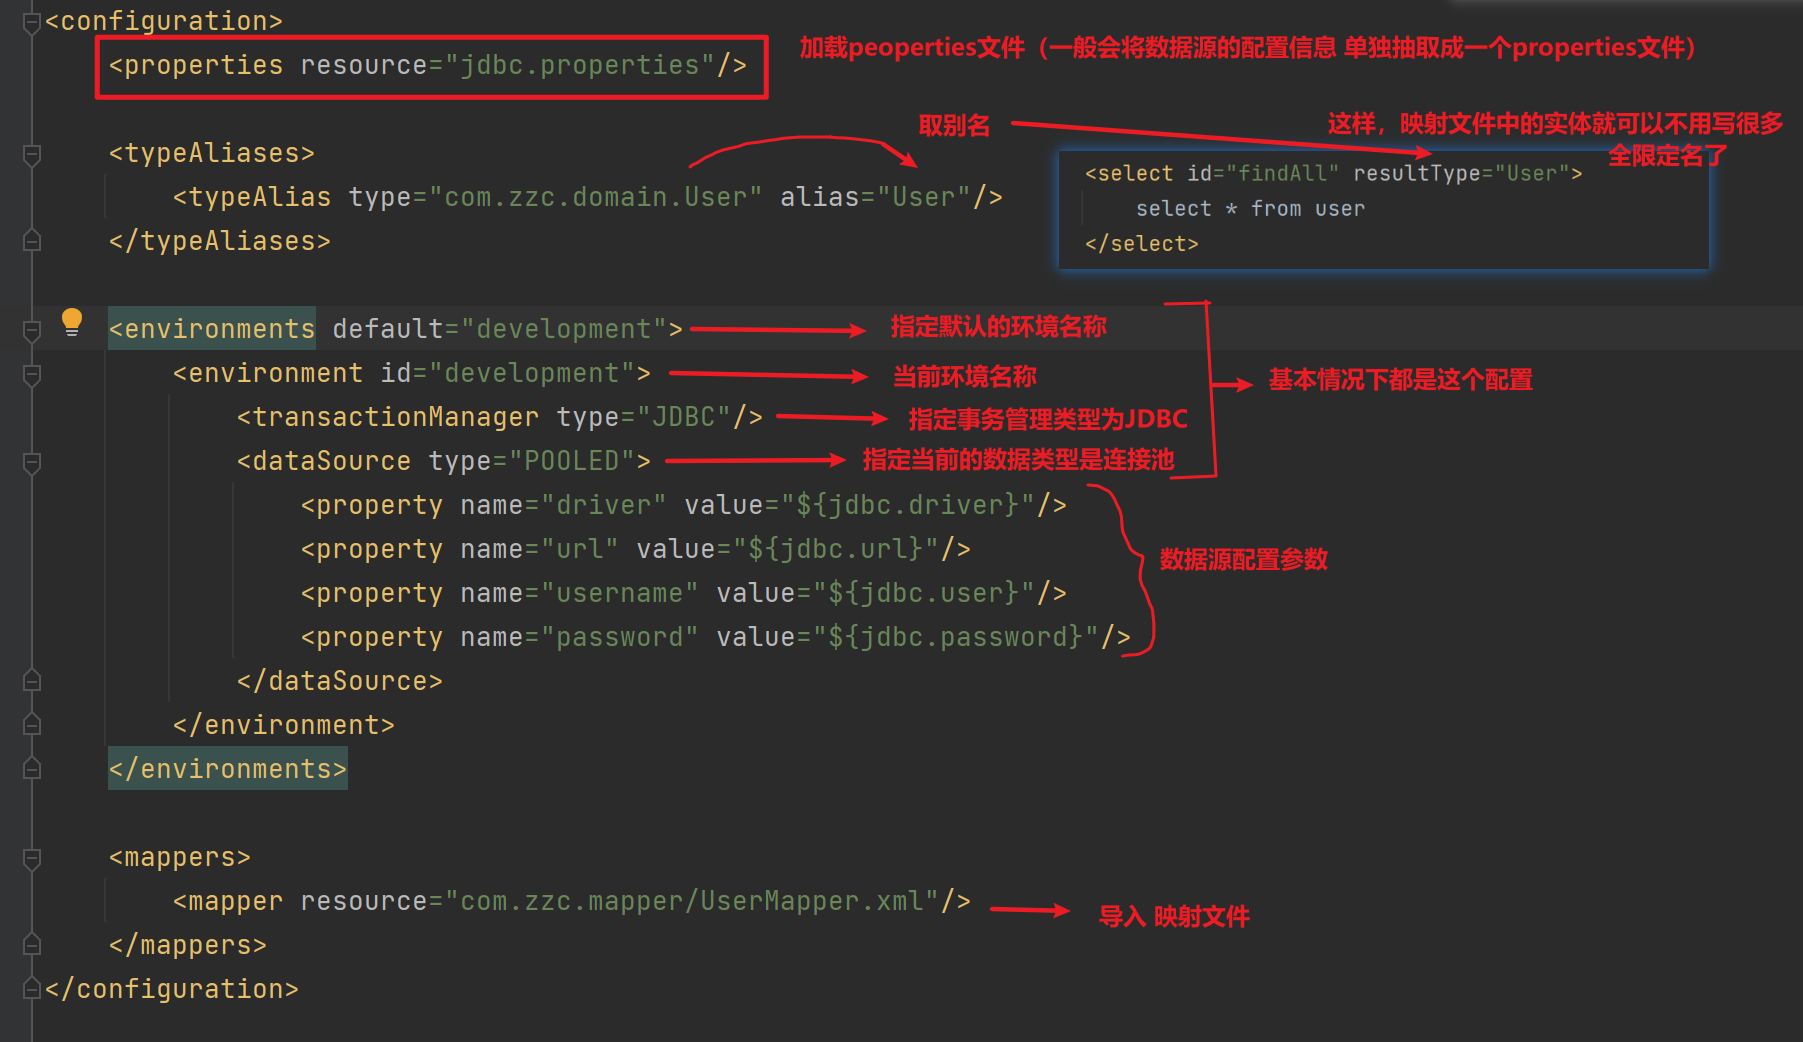
mapper标签:
- 使用相对于类路径的资源引用,例如: < mapper resource=”org.mybatis.builder.AuthorMapper.xml”/>
- 使用完全限定资源定位符(URL),例如: < mapper url=”file:///var/mappers/AuthorMapper.xml”/>
- 使用映射器接口实现类的完全限定类名,例如: < mapper class=”org.mybatis.builder.AuthorMapper”/>
- 将包内的映射器接口实现全部注册为映射器,例如:< package name=”org.mybatis.builder”/>
typeAliases标签:
mybatis设置了一些常用类型的别名:
String的别名为string,Long别名为long,Integer别名为int,Double别名为double,Boolean别名为boolean ……….
typeHandlers标签
MyBatis 不论在在预处理语句(PreparedStatement)中设置一个参数时,还是从结果集中取出一个值时, 都会用 类型处理器将获取的值以合适的方式转换成 Java 类型。
但遇到不支持或非标准的类型,就需要重写类型处理器:
定义转换类继承类BaseTypeHandler
覆盖4个未实现的方法,其中:
setNonNullParameter 是java程序设置数据到数据库的回调方法,
getNullableResult 是查询时 mysql的字符串类型转换成 java的Type类型的方法1
2
3
4
5
6
7
8
9
10
11
12
13
14
15public class MyDateTypeHandler extends BaseTypeHandler<Date> {
public void setNonNullParameter(PreparedStatement preparedStatement, int i, Date date, JdbcType type) {
preparedStatement.setString(i,date.getTime()+"");
}
public Date getNullableResult(ResultSet resultSet, String s) throws SQLException {
return new Date(resultSet.getLong(s));
}
public Date getNullableResult(ResultSet resultSet, int i) throws SQLException {
return new Date(resultSet.getLong(i));
}
public Date getNullableResult(CallableStatement callableStatement, int i) throws SQLException {
return callableStatement.getDate(i);
}
}在MyBatis核心配置文件中进行注册
1
2
3
4<!--注册类型自定义转换器-->
<typeHandlers>
<typeHandler handler="com.zzc.typeHandlers.MyDateTypeHandler"></typeHandler>
</typeHandlers>测试转换是否正确
1
2user.setBirthday(new Date());
userMapper.add2(user);
plugins标签
MyBatis可以使用第三方的插件来对功能进行扩展,分页助手PageHelper是将分页的复杂操作进行封装,使用简单的方式即 可获得分页的相关数据 开发步骤:
导入通用PageHelper的坐标
1
2
3
4
5
6
7
8
9
10
11<!-- 分页助手 -->
<dependency>
<groupId>com.github.pagehelper</groupId>
<artifactId>pagehelper</artifactId>
<version>3.7.5</version>
</dependency>
<dependency>
<groupId>com.github.jsqlparser</groupId>
<artifactId>jsqlparser</artifactId>
<version>0.9.1</version>
</dependency>在mybatis核心配置文件中配置PageHelper插件
1
2
3
4<plugin interceptor="com.github.pagehelper.PageHelper">
<!-- 指定方言 -->
<property name="dialect" value="mysql"/>
</plugin>如果是spring整合mybatis的注解方式,则在mybatisConfig配置类中设置:
1
2
3
4
5
6
7
8
9
10
11
12
13
14
15
16
17
18
19
public SqlSessionFactoryBean sqlSessionFactory(DataSource dataSource) {
SqlSessionFactoryBean factoryBean = new SqlSessionFactoryBean();
//设置数据源
factoryBean.setDataSource(dataSource);
//设置模型类的别名扫描
factoryBean.setTypeAliasesPackage("com.czzc.pojo");
//mybatis分页
PageHelper pageHelper = new PageHelper();
Properties props = new Properties();
props.setProperty("dialect", "mysql");
props.setProperty("reasonable", "true");
props.setProperty("supportMethodsArguments", "true");
props.setProperty("returnPageInfo", "check");
props.setProperty("params", "count=countSql");
pageHelper.setProperties(props); //添加插件
factoryBean.setPlugins(new Interceptor[]{pageHelper});
return factoryBean;
}测试分页数据获取
1
2
3
4
5
6
7
8
9
10
public void testPageHelper(){
//设置分页参数
PageHelper.startPage(1,2);
List<User> select = userMapper2.select(null);
for(User user : select){
System.out.println(user);
}
}
获得分页相关的其他参数:
1 | //其他分页的数据 |
相关API
SqlSessionFactory build(InputStream inputStream):通过加载mybatis的核心文件的输入流的形式构建一个SqlSessionFactory对象
(其中, Resources 工具类,这个类在 org.apache.ibatis.io 包中。Resources 类帮助你从类路径下、文件系统或 一个 web URL 中加载资源文件。)
1 | //加载核心配置文件 |
SqlSessionFactory工厂对象创建 SqlSession 实例:
- openSession() —— 开启一个事务,但事务不会自动提交;
- openSession(boolean autoCommit) —— 开启一个事务,如果参数为true,则会自动提交;
SqlSession会话对象:
执行语句:
- < T> selectOne(String statement, Object parameter)
- < E> List< E> selectList(String statement, Object parameter)
- int insert(String statement, Object parameter)
- int update(String statement, Object parameter)
- int delete(String statement, Object parameter)
操作事务:
- void commit()
- void rollback()
Dao层实现
传统开发方式
编写UserDao接口
1
2
3public interface UserDao {
List<User> findAll() throws IOException;
}编写UserDaoImpl实现
1
2
3
4
5
6
7
8
9
10
11public class UserDaoImpl implements UserDao {
public List<User> findAll() throws IOException {
InputStream resourceAsStream = Resources.getResourceAsStream("SqlMapConfig.xml");
SqlSessionFactory sqlSessionFactory = new SqlSessionFactoryBuilder().build(resourceAsStream);
SqlSession sqlSession = sqlSessionFactory.openSession();
List<User> userList = sqlSession.selectList("userMapper.findAll");
sqlSession.close();
return userList;
}
}测试
1
2
3
4
5
6
public void testTraditionDao() throws IOException {
UserDao userDao = new UserDaoImpl();
List<User> all = userDao.findAll();
System.out.println(all);
}
代理开发方式
Mapper 接口开发方法只需要程序员编写 Mapper接口(相当于Dao 接口),由Mybatis 框架根据接口定义创建接口的动态代理对象,代理对象的方法体和上边Dao接口实现类方法一样。
Mapper 接口开发需要遵循以下规范:
- Mapper.xml文件中的namespace与mapper接口的全限定名相同;
- Mapper接口方法名和Mapper.xml中定义的每个statement的id相同;
- Mapper接口方法的输入参数类型和mapper.xml中定义的每个sql的parameterType的类型相同;
- Mapper接口方法的输出参数类型和mapper.xml中定义的每个sql的resultType的类型相同;
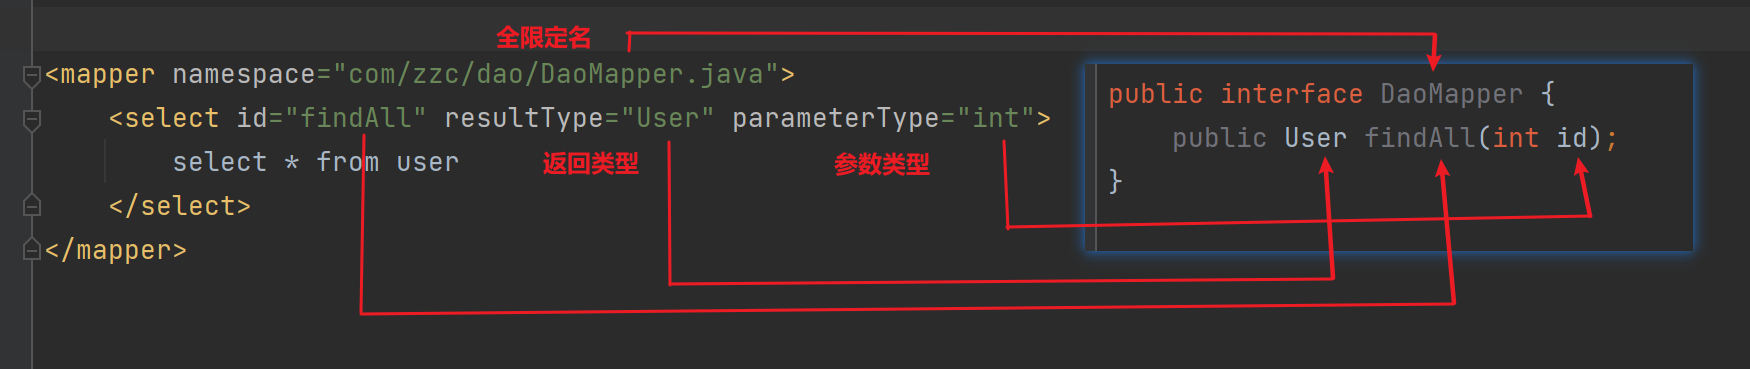
编写mapper接口:
1
2
3public interface DaoMapper {
public User findById(int id);
}编写映射文件:
1
2
3
4
5<mapper namespace="com/zzc/dao/DaoMapper.java">
<select id="findById" resultType="User" parameterType="int">
select * from user
</select>
</mapper>测试:
1
2
3
4
5
6
7
8
9
10
11
12
public void testProxyDao() throws IOException {
InputStream resourceAsStream = Resources.getResourceAsStream("SqlMapConfig.xml");
SqlSessionFactory sqlSessionFactory = new SqlSessionFactoryBuilder().build(resourceAsStream);
SqlSession sqlSession = sqlSessionFactory.openSession();
//获得MyBatis框架生成的UserMapper接口的实现类
DaoMapper daoMapper = sqlSession.getMapper(DaoMapper.class);
User user = doaMapper.findById(1);
System.out.println(user);
sqlSession.close();
}
多表操作
使用 resultMap标签, 主要用于解决实体类属性名与数据库表中字段名不一致的情况,可以将查询结果映射成实体对象。
1 | <resultMap id="" type=""> |
其中id 和result 元素有以下属性:
- property: 写实体的属性名称, 用于映射到列结果。如果 POJO 的属性和 SQL 字段名(column元素)是相同的,那么 MyBatis 就会映射到 POJO 上;
- column:对应sql字段;
- javaType:配置 Java 类型。可以是特定的类完全限定名或 MyBatis 上下文的别名;
- jdbcType:配置数据库类型。这是 JDBC 类型,MyBatis 已经为我们做了限定,基本支持所有常用数据库类型;
- typeHandler:类型处理器。允许你用特定的处理器来覆盖 MyBatis 默认的处理器。需要指定 jdbcType 和 javaType 相互转化的规则;
一对一查询:
创建Order和User实体
1
2
3
4
5
6
7
8
9
10
11
12
13public class Order {
private int id;
private Date ordertime;
private double total;
//代表当前订单从属于哪一个客户
private User user;
}
public class User {
private int id;
private String username;
private String password;
private Date birthday;
}创建OrderMapper接口
1
2
3public interface OrderMapper {
List<Order> findAll();
}配置OrderMapper.xml
1
2
3
4
5
6
7
8
9
10
11<mapper namespace="com.zzc.mapper.OrderMapper">
<resultMap id="orderMap" type="com.zzc.domain.Order">
<result column="uid" property="user.id"></result>
<result column="username" property="user.username"></result>
<result column="password" property="user.password"></result>
<result column="birthday" property="user.birthday"></result>
</resultMap>
<select id="findAll" resultMap="orderMap">
select * from orders o,user u where o.uid=u.id
</select>
</mapper>其中的resultMap还可以这样配:
1
2
3
4
5
6
7
8
9
10
11
12<resultMap id="orderMap" type="com.zzc.domain.Order">
<result property="id" column="id"></result>
<result property="ordertime" column="ordertime"></result>
<result property="total" column="total"></result>
<!-- association中的property是指order中的user属性 -->
<association property="user" javaType="com.zzc.domain.User">
<result column="uid" property="id"></result>
<result column="username" property="username"></result>
<result column="password" property="password"></result>
<result column="birthday" property="birthday"></result>
</association>
</resultMap>测试
一对多查询:
修改User实体:
1
2
3
4
5
6
7
8
9public class User {
private int id;
private String username;
private String password;
private Date birthday;
//添加一个列表
//代表当前用户具备哪些订单
private List<Order> orderList;
}配置UserMapper.xml
1
2
3
4
5
6
7
8
9
10
11
12
13
14
15
16<mapper namespace="com.zzc.mapper.UserMapper">
<resultMap id="userMap" type="com.zzc.domain.User">
<result column="id" property="id"></result>
<result column="username" property="username"></result>
<result column="password" property="password"></result>
<result column="birthday" property="birthday"></result>
<collection property="orderList" ofType="com.zzc.domain.Order">
<result column="oid" property="id"></result>
<result column="ordertime" property="ordertime"></result>
<result column="total" property="total"></result>
</collection>
</resultMap>
<select id="findAll" resultMap="userMap">
select *,o.id oid from user u left join orders o on u.id=o.uid
</select>
</mapper>测试
多对多查询:
和一对多相似,主要区别在 sql 语句是查一张表还是多张表,而配置文件和一对多差不多。
开发例子:
1 |
|
注解开发
Spring整合MyBatis
只用MyBatis的话,在service实现类中,需要多次新建session工厂
未整合前环境
添加依赖
1
2
3
4
5
6
7
8
9
10
11
12
13
14
15
16
17
18
19
20
21
22<dependencies>
<dependency>
<groupId>org.springframework</groupId>
<artifactId>spring-context</artifactId>
<version>5.2.10.RELEASE</version>
</dependency>
<dependency>
<groupId>com.alibaba</groupId>
<artifactId>druid</artifactId>
<version>1.1.16</version>
</dependency>
<dependency>
<groupId>org.mybatis</groupId>
<artifactId>mybatis</artifactId>
<version>3.5.6</version>
</dependency>
<dependency>
<groupId>mysql</groupId>
<artifactId>mysql-connector-java</artifactId>
<version>5.1.47</version>
</dependency>
</dependencies>根据数据表 创建类
1
2
3
4
5
6
7public class Account implements Serializable {
private Integer id;
private String name;
private Double money;
//setter...getter...toString...方法略
}创建Dao接口
1
2
3
4
5
6
7
8
9
10
11
12
13
14
15
16
17public interface AccountDao {
void save(Account account);
void delete(Integer id);
void update(Account account);
List<Account> findAll();
Account findById(Integer id);
}创建Service接口和实现类
1
2
3
4
5
6
7
8
9
10
11
12
13
14
15
16
17
18
19
20
21
22
23
24
25
26
27
28
29
30
31
32
33
34
35
36
37
38
39
40public interface AccountService {
void save(Account account);
void delete(Integer id);
void update(Account account);
List<Account> findAll();
Account findById(Integer id);
}
public class AccountServiceImpl implements AccountService {
private AccountDao accountDao;
public void save(Account account) {
accountDao.save(account);
}
public void update(Account account){
accountDao.update(account);
}
public void delete(Integer id) {
accountDao.delete(id);
}
public Account findById(Integer id) {
return accountDao.findById(id);
}
public List<Account> findAll() {
return accountDao.findAll();
}
}添加jdbc.properties文件
添加Mybatis核心配置文件
1
2
3
4
5
6
7
8
9
10
11
12
13
14
15
16
17
18
19
20
21
22
23
24
25
26
27
28
<configuration>
<!--读取外部properties配置文件-->
<properties resource="jdbc.properties"></properties>
<!--别名扫描的包路径-->
<typeAliases>
<package name="com.zzc.domain"/>
</typeAliases>
<!--数据源-->
<environments default="mysql">
<environment id="mysql">
<transactionManager type="JDBC"></transactionManager>
<dataSource type="POOLED">
<property name="driver" value="${jdbc.driver}"></property>
<property name="url" value="${jdbc.url}"></property>
<property name="username" value="${jdbc.username}"></property>
<property name="password" value="${jdbc.password}"></property>
</dataSource>
</environment>
</environments>
<!--映射文件扫描包路径-->
<mappers>
<package name="com.zzc.dao"></package>
</mappers>
</configuration>测试类
1
2
3
4
5
6
7
8
9
10
11
12
13
14
15
16
17
18
19
20public class App {
public static void main(String[] args) throws IOException {
// 1. 创建SqlSessionFactoryBuilder对象
SqlSessionFactoryBuilder sqlSessionFactoryBuilder = new SqlSessionFactoryBuilder();
// 2. 加载SqlMapConfig.xml配置文件
InputStream inputStream = Resources.getResourceAsStream("SqlMapConfig.xml.bak");
// 3. 创建SqlSessionFactory对象
SqlSessionFactory sqlSessionFactory = sqlSessionFactoryBuilder.build(inputStream);
// 4. 获取SqlSession
SqlSession sqlSession = sqlSessionFactory.openSession();
// 5. 执行SqlSession对象执行查询,获取结果User
AccountDao accountDao = sqlSession.getMapper(AccountDao.class);
Account ac = accountDao.findById(1);
System.out.println(ac);
// 6. 释放资源
sqlSession.close();
}
}
思路
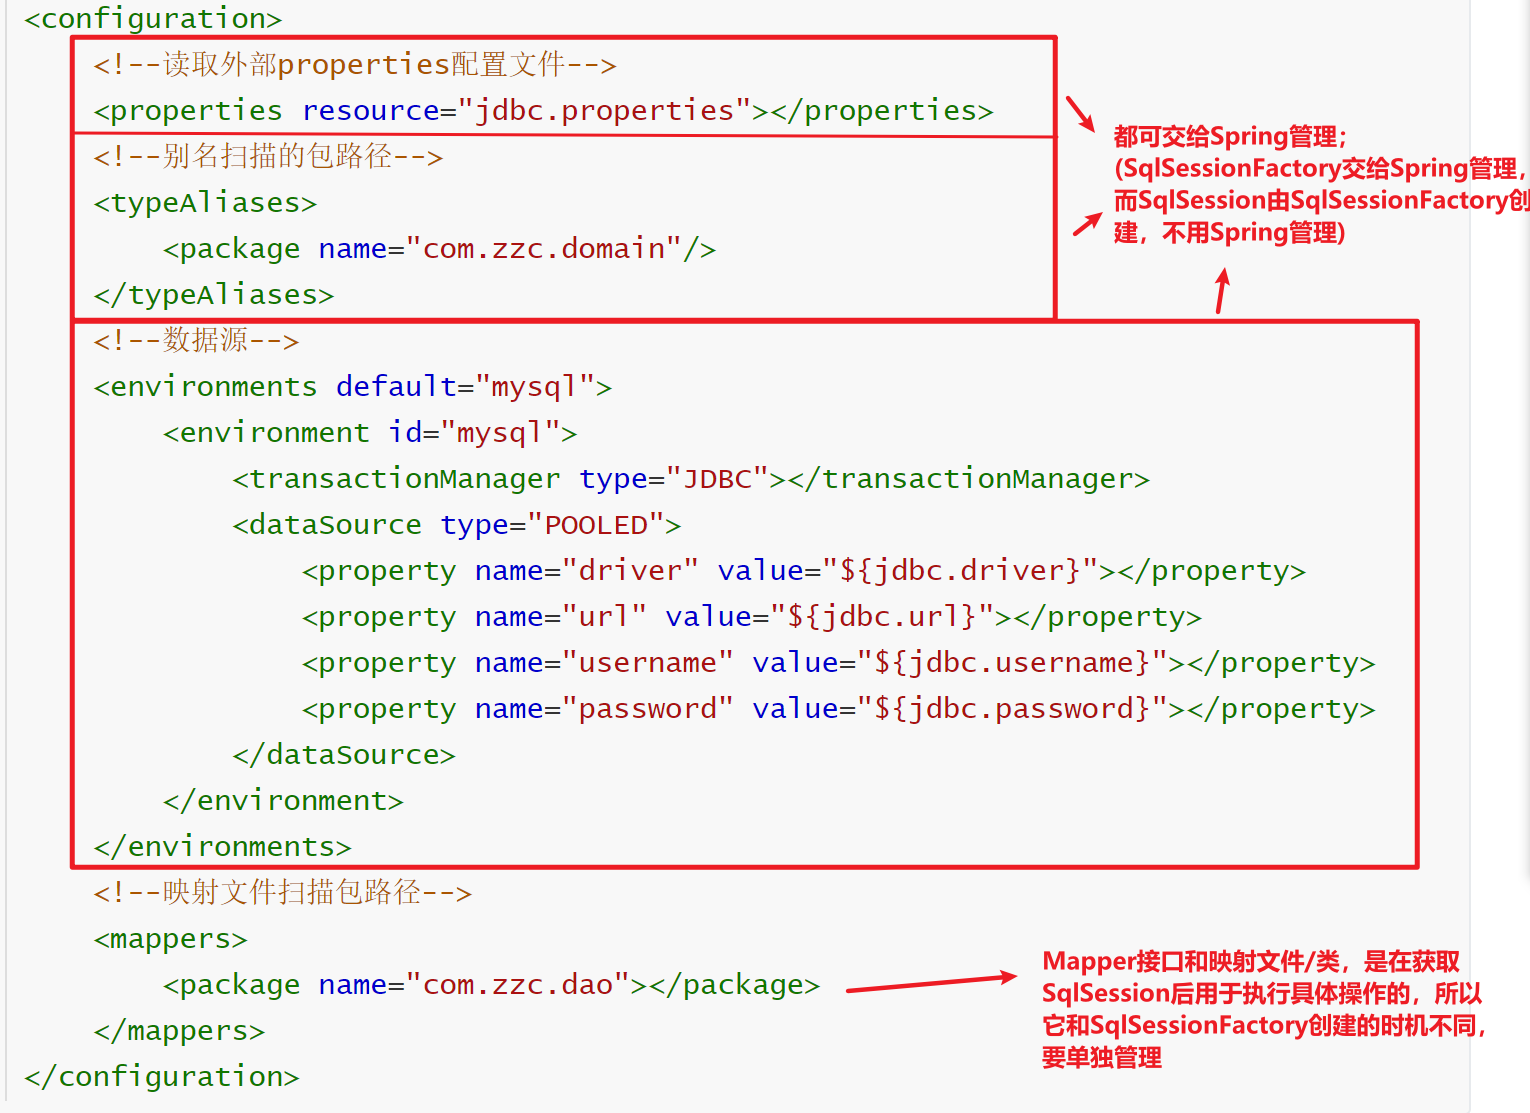
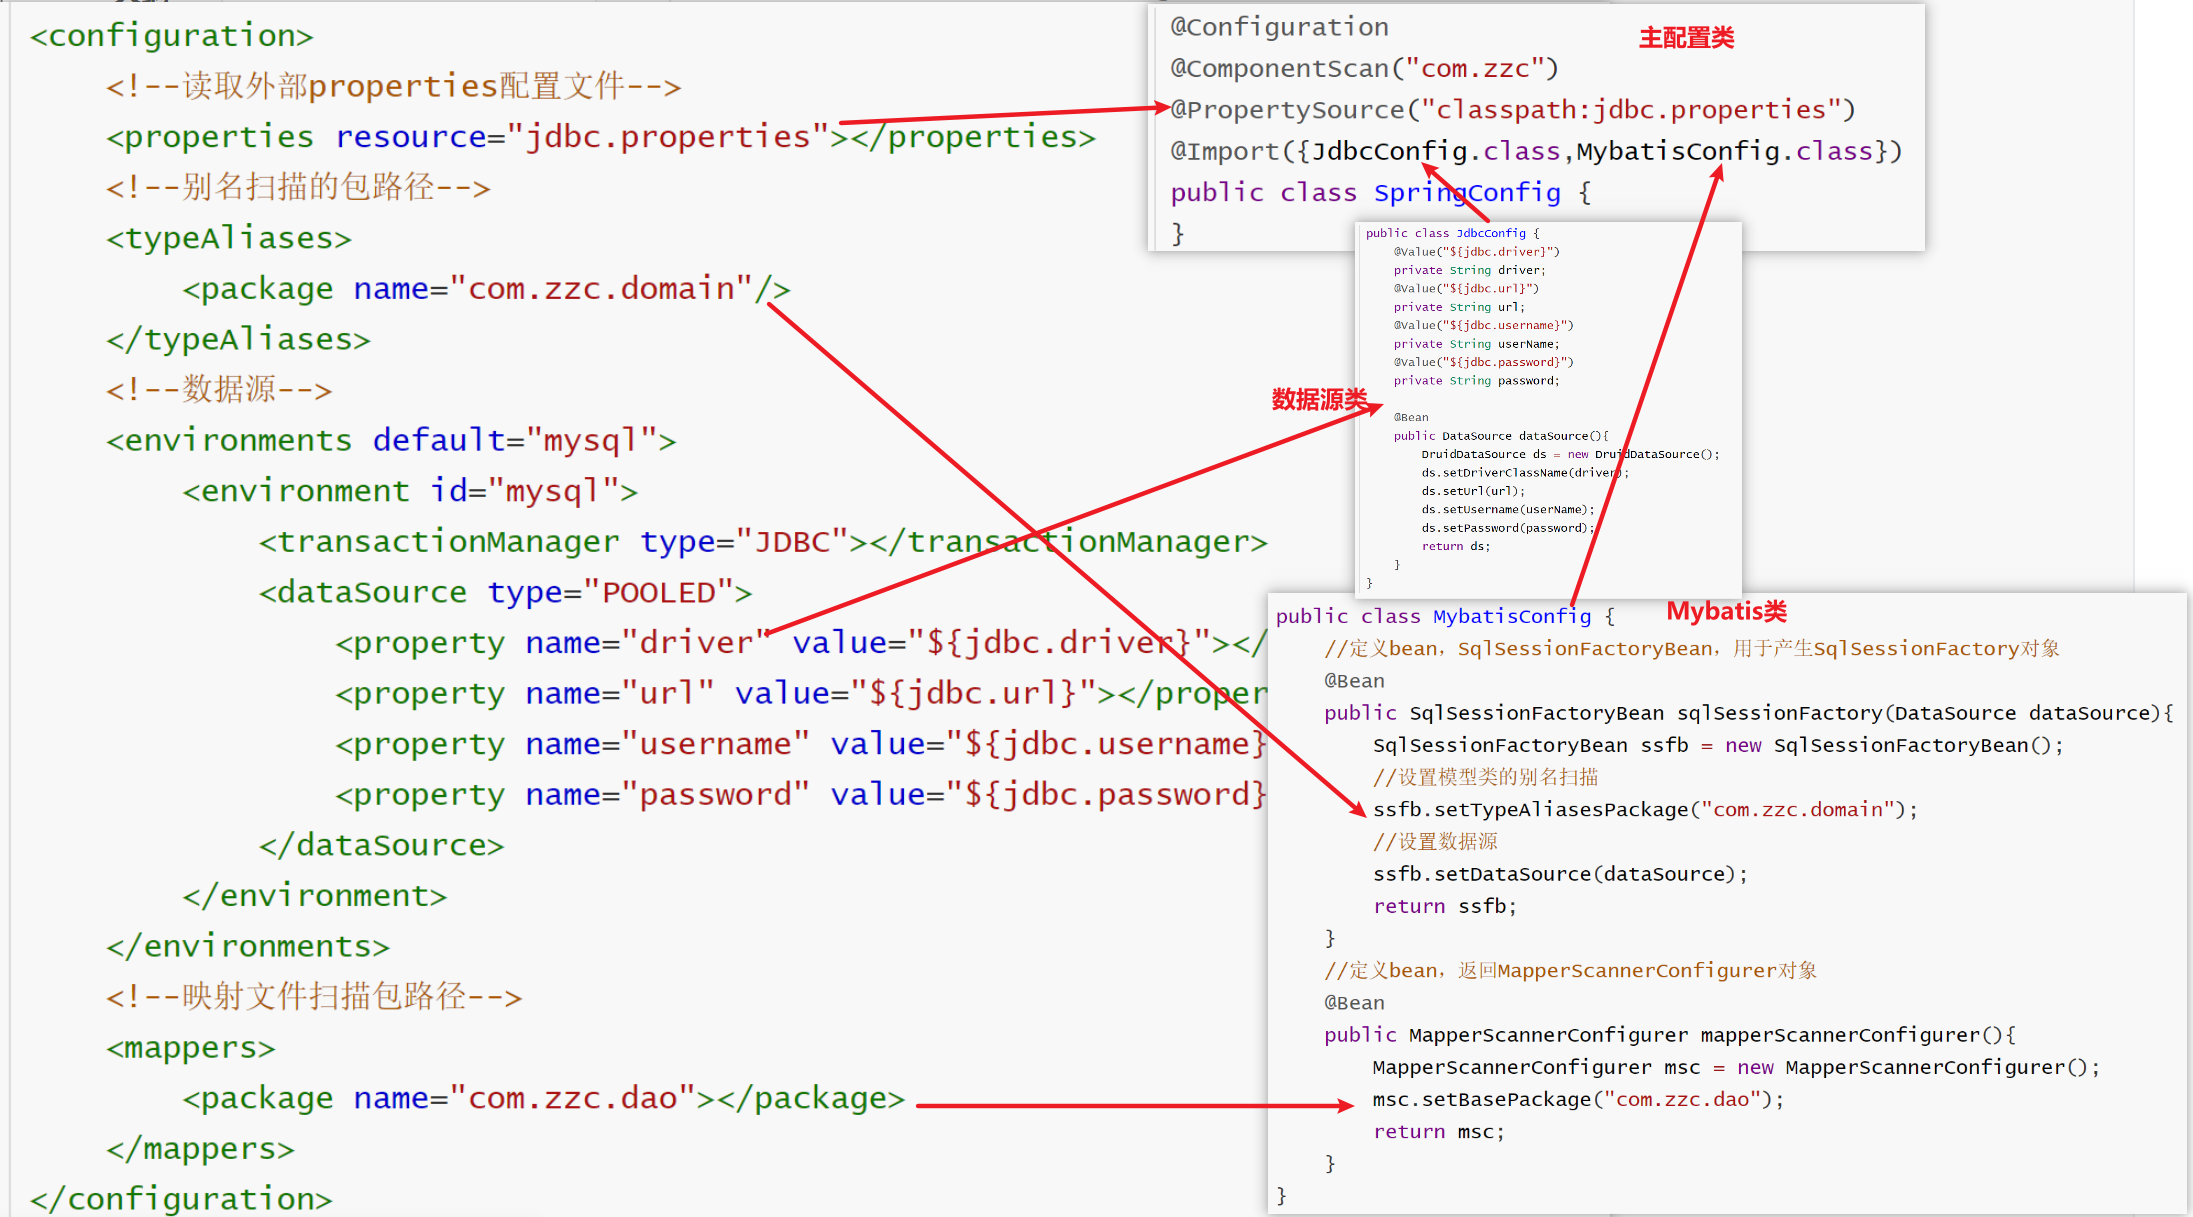
注解方式
主要用到的两个类分别是:
- SqlSessionFactoryBean
- MapperScannerConfigurer
导入需要的jar包
1
2
3
4
5
6
7
8
9
10
11
12
13
14
15<dependency>
<!--Spring操作数据库需要该jar包-->
<groupId>org.springframework</groupId>
<artifactId>spring-jdbc</artifactId>
<version>5.2.10.RELEASE</version>
</dependency>
<dependency>
<!--
Spring与Mybatis整合的jar包
这个jar包mybatis在前面,是Mybatis提供的
-->
<groupId>org.mybatis</groupId>
<artifactId>mybatis-spring</artifactId>
<version>1.3.0</version>
</dependency>创建Spring主配置类
1
2
3
4
5
6//配置类注解
//包扫描,主要扫描的是项目中的AccountServiceImpl类
public class SpringConfig {
}创建数据源的配置类
1
2
3
4
5
6
7
8
9
10
11
12
13
14
15
16
17
18
19
20public class JdbcConfig {
private String driver;
private String url;
private String userName;
private String password;
public DataSource dataSource(){
DruidDataSource ds = new DruidDataSource();
ds.setDriverClassName(driver);
ds.setUrl(url);
ds.setUsername(userName);
ds.setPassword(password);
return ds;
}
}在主配置类中读properties文件,并引入数据源配置类
1
2
3
4
5
6
public class SpringConfig {
}创建Mybatis配置类并配置SqlSessionFactory
1
2
3
4
5
6
7
8
9
10
11
12
13
14
15
16
17
18
19
20
21
22
23public class MybatisConfig {
//定义bean,SqlSessionFactoryBean,用于产生SqlSessionFactory对象
public SqlSessionFactoryBean sqlSessionFactory(DataSource dataSource){
SqlSessionFactoryBean ssfb = new SqlSessionFactoryBean();
//设置模型类的别名扫描
ssfb.setTypeAliasesPackage("com.zzc.domain");
//设置数据源
ssfb.setDataSource(dataSource);
return ssfb;
}
//定义bean,返回MapperScannerConfigurer对象
public MapperScannerConfigurer mapperScannerConfigurer(){
MapperScannerConfigurer msc = new MapperScannerConfigurer();
msc.setBasePackage("com.zzc.dao");
return msc;
}
}SqlSessionFactoryBean中的方法需要DataSource类型参数,而当前Spring容器中已经创建了Druid数据源,类型为DataSource,即容器中已经有这个对象了,且使用@Bean时,所以可以在形参列表直接写上DataSource类型的参数。
MapperScannerConfigurer 中的 basePackage 就是用于设置说扫描的包路径。
主配置类中引入Mybatis配置类
1
2
3
4
5
6
public class SpringConfig {
}测试:
1
2
3
4
5
6
7
8
9
10
11public class App {
public static void main(String[] args) {
ApplicationContext ctx = new AnnotationConfigApplicationContext(SpringConfig.class);
AccountService accountService = ctx.getBean(AccountService.class);
Account ac = accountService.findById(1);
System.out.println(ac);
}
}
XML方法
1 | <!--配置MyBatis的SqlSessionFactory--> |
修改service实现类代码
1 |
|
SSM整合
整合过程
(1)创建工程
大体框架:
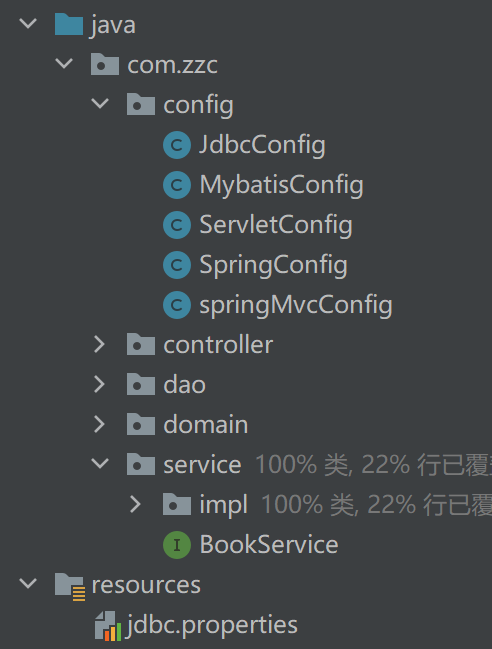
dao也可改为mapper,domain可改为pojo
另外,还是一些常用的包名:
dto: 即数据传输对象,此包存放要发给前端的对象类型(即前端需要的类型和后端提供的类型有不一样的地方,需要一个将后端提供的类型转为 dto,再发给前端);
constants:常数,此包存放常数类型;
utils:实用工具类,此包存放一个工具类,如一些被重复使用的代码,可封装为工具类;
(2)SSM整合
Spring
SpringConfig
1
2
3
4
5
6
7//表示该类为配置类
//直接写“com.zzc”会误扫描到其他包
//引入Mybatis相关配置类
//开启注解式事务驱动,在Service层要管理事务
public class SpringConfig {
}
MyBatis
MybatisConfig
1
2
3
4
5
6
7
8
9
10
11
12
13
14
15
16
17
18
19
20public class MybatisConfig {
//构建SqlSessionFactoryBean并设置别名扫描与数据源
public SqlSessionFactoryBean sqlSessionFactory(DataSource dataSource) {
SqlSessionFactoryBean factoryBean = new SqlSessionFactoryBean();
//设置数据源
factoryBean.setDataSource(dataSource);
//设置模型类的别名扫描
factoryBean.setTypeAliasesPackage("com.zzc.domain");
return factoryBean;
}
//构建MapperScannerConfigurer并设置DAO层的包扫描
public MapperScannerConfigurer mapperScannerConfigurer() {
MapperScannerConfigurer msc = new MapperScannerConfigurer();
msc.setBasePackage("com.zzc.dao");
return msc;
}J
}JdbcConfig
1
2
3
4
5
6
7
8
9
10
11
12
13
14
15
16
17
18
19
20
21
22
23
24
25
26
27
28public class JdbcConfig {
private String driver;
private String url;
private String username;
private String password;
public DataSource dataSource(){
DruidDataSource dataSource = new DruidDataSource();
dataSource.setDriverClassName(driver);
dataSource.setUrl(url);
dataSource.setUsername(username);
dataSource.setPassword(password);
return dataSource;
}
public PlatformTransactionManager transactionManager(DataSource dataSource){
DataSourceTransactionManager ds = new DataSourceTransactionManager();
ds.setDataSource(dataSource);
return ds;
}
}jdbc.properties
1
2
3
4jdbc.driver=com.mysql.jdbc.Driver
jdbc.url=jdbc:mysql://localhost:3306/test
jdbc.username=root
jdbc.password=zzc
SpringMVC
ServletConfig
1
2
3
4
5
6
7
8
9
10
11
12
13
14
15
16
17
18
19
20
21
22
23
24public class ServletConfig extends AbstractAnnotationConfigDispatcherServletInitializer {
protected Class<?>[] getRootConfigClasses() {
return new Class[]{SpringConfig.class};
}
protected Class<?>[] getServletConfigClasses() {
return new Class[]{springMvcConfig.class};
}
protected String[] getServletMappings() {
return new String[]{"/"};
}
//设置过滤器,处理中文乱码
protected Filter[] getServletFilters() {
CharacterEncodingFilter filter = new CharacterEncodingFilter();
filter.setEncoding("UTF-8");
return new Filter[]{filter};
}
}SpringMvcConfig
1
2
3
4
5//标识为配置类
//扫描Controller包
//开启SpringMVC注解支持
public class springMvcConfig {
}
(3)功能模块
创建数据库
表与实体类
1
2
3
4
5
6
7
8public class Book {
private Integer id;
private String type;
private String name;
private String description;
.......
}dao(接口 + 实现类)
1
2
3
4
5
6
7
8
9
10
11
12
13
14
15
16public interface BookDao {
public void save(Book book);
public void update(Book book);
public void delete(Integer id);
public Book getByID(Integer id);
public List<Book> getAll();
}如果参数列表有多个参数,需要@param(“key”)来指定对应的值,“key”就是sql语句中的变量名,“value”就是参数实际的值。
service(接口 + 实现类)
业务层接口测试(整合Junit)
1
2
3
4
5
6
7
8
9
public interface BookService {
public boolean save(Book book);
public boolean update(Book book);
public boolean delete(Integer id);
public Book getByID(Integer id);
public List<Book> getAll();
}1
2
3
4
5
6
7
8
9
10
11
12
13
14
15
16
17
18
19
20
21
22
23
24
25
26
27
28
29
30
31
32
33
public class BookServiceImpl implements BookService {
private BookDao bookDao;
public boolean save(Book book) {
bookDao.save(book);
return true;
}
public boolean update(Book book) {
bookDao.update(book);
return true;
}
public boolean delete(Integer id) {
bookDao.delete(id);
return true;
}
public Book getByID(Integer id) {
return bookDao.getByID(id);
}
public List<Book> getAll() {
return bookDao.getAll();
}
}1
2
3
4
5
6
7
8
9
10
11
12
13//测试类
public class BookServiceTest {
private BookService bookService;
public void testGetAll() {
List<Book> all = bookService.getAll();
System.out.println(all);
}
}
controller
表现层接口测试
1
2
3
4
5
6
7
8
9
10
11
12
13
14
15
16
17
18
19
20
21
22
23
24
25
26
27
28
29
30
31
public class BookController {
private BookService bookService;
public boolean save( Book book) {
return bookService.save(book);
}
public boolean update( Book book) {
return bookService.update(book);
}
public boolean delete( Integer id) {
return bookService.delete(id);
}
public Book getByID( Integer id) {
return bookService.getByID(id);
}
public List<Book> getAll() {
return bookService.getAll();
}
}
统一结果封装
后端返回给前端的应该是同一的数据格式,因此,这里可以统一一个结果类Result(code,data,msg) ,将数据封装到data中,操作结果封装到code属性中,封装特殊信息到message(msg)属性中;
封装结果类Result:
1 | public class Result { |
定义返回Code码
1 | public class Code { |
修改Controller类的返回值:
1 | //统一每个控制器方法的返回值 |
统一异常处理
项目的各个地方都有可能出现异常,这些可能出现的异常都需要进行处理。
异常的种类及出现异常的原因:
- 框架内部抛出的异常:因使用不合规导致
- 数据层抛出的异常:因外部服务器故障导致(例如:服务器访问超时)
- 业务层抛出的异常:因业务逻辑书写错误导致(例如:遍历业务书写操作,导致索引异常等)
- 表现层抛出的异常:因数据收集、校验等规则导致(例如:不匹配的数据类型间导致异常)
- 工具类抛出的异常:因工具类书写不严谨不够健壮导致(例如:必要释放的连接长期未释放等)
各个层级都会出现异常,所以,让所有异常都抛到最上面的表现层进行处理。
异常处理器
通过 异常分类 区分不同的异常,使用AOP编写异常处理方法,SpringMVC提供了异常处理器:
1 | //@RestControllerAdvice用于标识当前类为REST风格对应的异常处理器 |
确保SpringMvcConfig能够扫描到异常处理器类
- @RestControllerAdvice
- 类注解,位于Rest风格开发的控制器增强类上方;
- 此注解自带@ResponseBody注解与@Component注解,具备对应的功能;
- @ExceptionHandler
- 方法注解,专用于异常处理的控制器方法上;
- 作用:设置指定异常的处理方案,出现异常后终止原始控制器执行,并转入当前方法执行。
异常分类
- 业务异常(BusinessException)
- 规范的用户行为产生的异常
- 用户在页面输入内容的时候未按照指定格式进行数据填写,如在年龄框输入的是字符串
- 不规范的用户行为操作产生的异常
- 如用户故意传递错误数据
- 规范的用户行为产生的异常
系统异常(SystemException)
- 项目运行过程中可预计但无法避免的异常
- 比如数据库或服务器宕机
- 项目运行过程中可预计但无法避免的异常
其他异常(Exception)
- 编程人员未预期到的异常,如:用到的文件不存在
对应的解决方案:
- 业务异常(BusinessException)
- 发送对应消息传递给用户,提醒规范操作
- 常见的就是提示用户名已存在或密码格式不正确等
- 发送对应消息传递给用户,提醒规范操作
- 系统异常(SystemException)
- 发送固定消息传递给用户,安抚用户
- 系统繁忙,请稍后再试
- 系统正在维护升级,请稍后再试
- 发送特定消息给运维人员,提醒维护
- 可以发送短信、邮箱或者是公司内部通信软件
- 记录日志
- 发消息和记录日志对用户来说是不可见的,属于后台程序
- 发送固定消息传递给用户,安抚用户
- 其他异常(Exception)
- 发送固定消息传递给用户,安抚用户
- 发送特定消息给编程人员,提醒维护(纳入预期范围内)
- 一般是程序没有考虑全,比如未做非空校验等
- 记录日志
具体实现
- 自定义异常类:
- 让自定义异常类继承
RuntimeException的好处是,后期在抛出这两个异常的时候,就不用在try…catch…或throws了 - 自定义异常类中添加
code属性的原因是为了更好的区分异常是来自哪个业务的
1 | //自定义异常处理器,用于封装异常信息,对异常进行分类 |
- 将其他异常包成自定义异常:
具体的包装方式有:
- 方式一:
try{}catch(){}在catch中重新throw我们自定义异常即可。 - 方式二:直接throw自定义异常即可
1 | public Book getById(Integer id) { |
- 处理类中 处理自定义异常
1 | //@RestControllerAdvice用于标识当前类为REST风格对应的异常处理器 |
前后台协议联调
首先,SpringMVC设置“/”过滤所有文件,要对前端页面文件放行:
(需要让SpringMVC配置类扫描下面这个 SpringMvcSupport)
1 |
|
前端html文件:
1 |
|
SSM样本例子
项目结构:
java
- com.zzc
- config
- controller
- dto
- mapper
- pojo
- service
- utils
resources
- jdbc.properties
pom.xml
pom.xml文件
新建maven的webapp项目,补全项目结构。
pom.xml所需依赖如下如下:
1 | <dependencies> |
tomcat依赖如下:
1 | <build> |
jdbc.properties
1
2
3
4jdbc.driver=com.mysql.jdbc.Driver
jdbc.url=jdbc:mysql://localhost:3306/javaeetest
jdbc.username=root
jdbc.password=zzc
config
jdbcConfig
1
2
3
4
5
6
7
8
9
10
11
12
13
14
15
16
17
18
19
20
21
22
23
24
25
26
27
28
29
30
31
32
33
34
35
36import com.alibaba.druid.pool.DruidDataSource;
import org.springframework.beans.factory.annotation.Value;
import org.springframework.context.annotation.Bean;
import org.springframework.jdbc.datasource.DataSourceTransactionManager;
import org.springframework.transaction.PlatformTransactionManager;
import javax.sql.DataSource;
public class JdbcConfig {
private String driver;
private String url;
private String username;
private String password;
public DataSource dataSource(){
DruidDataSource dataSource = new DruidDataSource();
dataSource.setDriverClassName(driver);
dataSource.setUrl(url);
dataSource.setUsername(username);
dataSource.setPassword(password);
return dataSource;
}
public PlatformTransactionManager transactionManager(DataSource dataSource){
DataSourceTransactionManager ds = new DataSourceTransactionManager();
ds.setDataSource(dataSource);
return ds;
}
}MybatisConfig
1
2
3
4
5
6
7
8
9
10
11
12
13
14
15
16
17
18
19
20
21
22
23
24
25
26
27
28
29
30
31
32
33
34
35
36
37
38
39import org.mybatis.spring.SqlSessionFactoryBean;
import org.mybatis.spring.mapper.MapperScannerConfigurer;
import org.springframework.context.annotation.Bean;
import javax.sql.DataSource;
public class MybatisConfig {
//定义bean,SqlSessionFactoryBean,用于产生SqlSessionFactory对象
public SqlSessionFactoryBean sqlSessionFactory(DataSource dataSource) {
SqlSessionFactoryBean factoryBean = new SqlSessionFactoryBean();
//设置数据源
factoryBean.setDataSource(dataSource);
//设置模型类的别名扫描
factoryBean.setTypeAliasesPackage("com.czzc.pojo");
//mybatis分页
PageHelper pageHelper = new PageHelper();
Properties props = new Properties();
props.setProperty("dialect", "mysql");
props.setProperty("reasonable", "true");
props.setProperty("supportMethodsArguments", "true");
props.setProperty("returnPageInfo", "check");
props.setProperty("params", "count=countSql");
pageHelper.setProperties(props); //添加插件
factoryBean.setPlugins(new Interceptor[]{pageHelper});
//开启下划线与驼峰的字段映射
SqlSessionFactory sqlSessionFactory = factoryBean.getObject();
sqlSessionFactory.getConfiguration().setMapUnderscoreToCamelCase(true);
return sqlSessionFactory;
}
//定义bean,返回MapperScannerConfigurer对象
public MapperScannerConfigurer mapperScannerConfigurer() {
MapperScannerConfigurer msc = new MapperScannerConfigurer();
msc.setBasePackage("com.zzc.mapper");
return msc;
}
}ServletConfig
1
2
3
4
5
6
7
8
9
10
11
12
13
14
15
16
17
18
19
20
21
22
23
24
25
26
27
28
29
30import org.springframework.web.filter.CharacterEncodingFilter;
import org.springframework.web.servlet.support.AbstractAnnotationConfigDispatcherServletInitializer;
import javax.servlet.Filter;
public class ServletConfig extends AbstractAnnotationConfigDispatcherServletInitializer {
protected Class<?>[] getRootConfigClasses() {
return new Class[]{SpringConfig.class};
}
protected Class<?>[] getServletConfigClasses() {
return new Class[]{springMvcConfig.class};
}
protected String[] getServletMappings() {
return new String[]{"/"};
}
//设置过滤器,处理中文乱码
protected Filter[] getServletFilters() {
CharacterEncodingFilter filter = new CharacterEncodingFilter();
filter.setEncoding("UTF-8");
return new Filter[]{filter};
}
}SpringConfig
1
2
3
4
5
6
7
8
9
10
11
12
13import org.springframework.context.annotation.ComponentScan;
import org.springframework.context.annotation.Configuration;
import org.springframework.context.annotation.Import;
import org.springframework.context.annotation.PropertySource;
//直接写“com.zzc”会误扫描到其他包
public class SpringConfig {
}SpringMvcConfig
1
2
3
4
5
6
7
8
9
10
11import org.springframework.context.annotation.ComponentScan;
import org.springframework.context.annotation.Configuration;
import org.springframework.web.servlet.config.annotation.EnableWebMvc;
public class springMvcConfig {
}springMvcSupport
1
2
3
4
5
6
7
8
9
10
11
12
13
14
15
16
17
18
19
20
21
22
23
24
25
26
27
28import com.czzc.controller.Interceptor.ProjectInterceptor;
import org.springframework.beans.factory.annotation.Autowired;
import org.springframework.context.annotation.Configuration;
import org.springframework.web.servlet.config.annotation.InterceptorRegistry;
import org.springframework.web.servlet.config.annotation.ResourceHandlerRegistry;
import org.springframework.web.servlet.config.annotation.WebMvcConfigurationSupport;
public class SpringMvcSupport extends WebMvcConfigurationSupport {
private ProjectInterceptor projectInterceptor;
protected void addResourceHandlers(ResourceHandlerRegistry registry) {
registry.addResourceHandler("/pages/**").addResourceLocations("/pages/");
registry.addResourceHandler("/css/**").addResourceLocations("/css/");
registry.addResourceHandler("/js/**").addResourceLocations("/js/");
registry.addResourceHandler("/plugins/**").addResourceLocations("/plugins/");
}
protected void addInterceptors(InterceptorRegistry registry) {
registry.addInterceptor(projectInterceptor).addPathPatterns("/books","/books/*");
registry.addInterceptor(projectInterceptor).addPathPatterns("/userlogin","/userlogin/*");
registry.addInterceptor(projectInterceptor).addPathPatterns("/user","/user/*");
}
}
dto
Result
1
2
3
4
5
6
7
8
9
10
11
12
13
14
15
16
17
18
19
20
21
22
23
24public class Result {
private Integer code;
private Object data;
private String msg;
public static Result ok(){
return new Result(200, "", "");
}
public static Result ok(Object data){
return new Result(200, data, "");
}
public static Result ok(Object data, String msg){
return new Result(200, data, msg);
}
public static Result fail(String errorMsg){
return new Result(404, "", errorMsg);
}
public Result(Integer code, Object data, String msg) {
this.code = code;
this.data = data;
this.msg = msg;
}
}
entity
User
1
2
3
4
5
6
7
8
9
10
11
12
13
14
15
16
17
18
19
20
21import java.sql.Timestamp;
public class User {
private Integer userId;
private String account;
private String password;
private String userName;
private String realName;
private String wechat;
private String phone;
private String email;
private String info;
private Integer lockFlag;
private Integer delFlag;
private Timestamp createTime;
private Timestamp updataTime;
private Integer version;
mapper
UserMapper
1
2
3
4
5
6
7
8
9
10
11
12
13
14import com.czzc.pojo.User;
import org.apache.ibatis.annotations.Insert;
import org.apache.ibatis.annotations.Select;
import java.util.List;
public interface UserMapper {
int save(User user);
List<User> getAll();
}
如果参数列表有多个参数,需要@param(“key”)来指定对应的值,“key”就是sql语句中的变量名,“value”就是参数实际的值。
其他Mapper
1
2
3
4
5
6
7
8
9
10
11
12
13
14
15
16
17
18
19
20
21
22
23public interface ManagerMapper {
int save(User user);
List<User> getAll();
User selectOneByAccount(String account);
Integer updateUserByAccount(User user);
Integer changeLockedByAccount(String account);
Integer deleteUserByAccount(String account);
Integer insertUser(User user);
}
service
userService
1
2
3
4public interface UserService {
Boolean save(User user);
List<User> getAll();
}userServiceImpl
1
2
3
4
5
6
7
8
9
10
11
12
13
14
15
16
public class UserServiceImpl implements UserService {
private UserMapper userMapper;
public Boolean save(User user) {
return userMapper.save(user) > 0;
}
public List<User> getAll() {
System.out.println("");
return userMapper.getAll();
}
}
controller
UserController
1
2
3
4
5
6
7
8
9
10
11
12
13
14
15
16
17
18
19
20
21
22import com.czzc.dto.Result;
import com.czzc.pojo.User;
import com.czzc.service.UserService;
import org.springframework.beans.factory.annotation.Autowired;
import org.springframework.web.bind.annotation.GetMapping;
import org.springframework.web.bind.annotation.RequestMapping;
import org.springframework.web.bind.annotation.RestController;
import java.util.List;
public class UserController {
private UserService userService;
public Result getAll(){
List<User> list = userService.getAll();
return Result.ok(list);
}
}拦截器 Intercepter
1
2
3
4
5
6
7
8
9
10
11
12
13
14
15
16
17
18
19
20
21
22
23
24
25
26
27
28
29
30
31
public class ProjectInterceptor implements HandlerInterceptor {
//拦截前运行
public boolean preHandle(HttpServletRequest request, HttpServletResponse response, Object handler) {
System.out.println("拦截前运行");//拦截逻辑
String token = request.getHeader("Authorization");
System.out.println("token = " + token);
if (token == null || token.equals("undefined") || token.length() == 0 ){
System.out.print("token为空");
return true;
}
if (TokenHandler.check(token)){ // 有对应的token才给放行
UserLoginDto user = new UserLoginDto();
user.setAccount(TokenHandler.getAccount(token));
System.out.println("loginUser: " + user.getAccount());
UserHolder.saveUser(user);
return true;
}
System.out.println("token验证失败");
return false;
}
//拦截后运行
public void postHandle(HttpServletRequest request, HttpServletResponse response, Object handler, ModelAndView modelAndView) {
System.out.println("拦截后运行");
}
//在整个请求结束之后运行
public void afterCompletion(HttpServletRequest request, HttpServletResponse response, Object handler, Exception ex) {
System.out.println("请求结束后运行: 移除用户");
UserHolder.removeUser();
}
}其他controller
1
2
3
4
5
6
7
8
9
10
11
12
13
14
15
16
17
18
19
20
21
22
23
24
25
26
27
28
29
30
31
32
33
34
35
36
37
38
39
40
41
42
43
44
45
46
47
48
49
50
51
52
53
54
55
56
57
58
59
60
61
62
63
64
65
66
67
68
69
70
71
72
73
74
75
76
77
78
79
80
81
82
83
public class ManagerController {
private ManagerService managerService;
public Result getAll() {
List<User> list = managerService.getAll();
return Result.ok(list);
}
// 查询单个用户
public Result getOne( String account) {
System.out.println("\n获取单个用户信息: 账号名 = " + account);
User user = managerService.getOneByAccount(account);
System.out.println("获取单个用户信息: " + user);
if (user != null) {
return Result.ok(user);
} else {
return Result.fail("获取用户失败");
}
}
// 修改用户信息
public Result updateUser( User user) {
Integer userId = managerService.getOneByAccount(user.getAccount()).getUserId();
System.out.println("改写用户信息功能: id = " + userId);
if (userId == null) {
return Result.fail("账户信息错误,可能为空");
}
user.setUserId(userId);
Integer flag = managerService.updateUser(user);
if (flag > 0) {
return Result.ok();
} else {
return Result.fail("账号信息改写出错!");
}
}
// 查询用户列表, 分页
public Result getUserList( Integer per_page, Integer current_page) {
PageHelper.startPage(current_page, per_page);
List<User> list = managerService.getAll();
PageInfo<User> pageInfo = new PageInfo<>(list);
System.out.print("分页获取用户列表——————当前页:" + pageInfo.getPageNum());
System.out.print(" 总页数:" + pageInfo.getPages());
System.out.print(" 总条数:" + pageInfo.getTotal());
List<UserDto> datalist = new ArrayList<>();
for (User user : list) {
datalist.add(new UserDto(user));
}
UserListDTO data = new UserListDTO(pageInfo.getPageNum(), pageInfo.getPages(), (int) pageInfo.getTotal(), datalist);
return Result.ok(data, "获取用户列表成功");
}
// 删除单个用户
public Result deleteUser( List<String> accounts){
for (String account : accounts) {
if (managerService.deleteUser(account) <= 0) {
return Result.fail("部分删除失败");
}
}
return Result.ok();
}
// 新增用户
public Result insertUser( User user){
String nowTime = new SimpleDateFormat("yyyy-MM-dd HH:mm:ss").format(new java.util.Date());
Timestamp timestamp = Timestamp.valueOf(nowTime);
user.setCreateTime(timestamp);
user.setUpdateTime(timestamp);
managerService.insertUser(user);
return null;
}
}